LV05-01-uboot-04-uboot启动流程

本文主要是uboot启动流程的相关笔记。若笔记中有错误或者不合适的地方,欢迎批评指正😃。

点击查看使用工具及版本
Windows版本 windows11
Ubuntu版本 Ubuntu16.04的64位版本
VMware® Workstation 16 Pro 16.2.3 build-19376536
终端软件 MobaXterm(Professional Edition v23.0 Build 5042 (license))
Linux开发板 正点原子 i.MX6ULL Linux 阿尔法开发板
uboot NXP官方提供的uboot,NXP提供的版本为uboot-imx-rel_imx_4.1.15_2.1.0_ga(使用的uboot版本为U-Boot 2016.03)
linux内核 linux-4.15(NXP官方提供)
Win32DiskImager Win32DiskImager v1.0
点击查看本文参考资料
分类 网址 说明
官方网站 https://www.arm.com/ ARM官方网站,在这里我们可以找到Cotex-Mx以及ARMVx的一些文档
https://www.nxp.com.cn/ NXP官方网站
https://www.nxpic.org.cn/NXP 官方社区
https://u-boot.readthedocs.io/en/latest/u-boot官网
https://www.kernel.org/linux内核官网
点击查看相关文件下载
分类 网址 说明
NXP https://github.com/nxp-imx NXP imx开发资源GitHub组织,里边会有u-boot和linux内核的仓库
https://elixir.bootlin.com/linux/latest/source 在线阅读linux kernel源码
nxp-imx/linux-imx/releases/tag/rel_imx_4.1.15_2.1.0_ga NXP linux内核仓库tags中的rel_imx_4.1.15_2.1.0_ga
nxp-imx/uboot-imx/releases/tag/rel_imx_4.1.15_2.1.0_ga NXP u-boot仓库tags中的rel_imx_4.1.15_2.1.0_ga
I.MX6ULL i.MX 6ULL Applications Processors for Industrial Products I.MX6ULL 芯片手册(datasheet,可以在线查看)
i.MX 6ULL Applications ProcessorReference Manual I.MX6ULL 参考手册(下载后才能查看,需要登录NXP官网)

一、链接脚本u-boot.lds

1. 程序入口

我们要分析uboot的启动流程,就要找到整个程序的“入口”,找到第一行程序在哪里。程序的链接是由链接脚本来决定的,所以通过链接脚本可以找到程序的入口。如果没有编译过 uboot 的话,链接脚本为uboot源码目录中的这个文件:

1
arch/arm/cpu/u-boot.lds

但是这个不是最终使用的链接脚本,最终的链接脚本是在这个链接脚本的基础上生成的。编译一下 uboot,编译完成以后就会在 uboot 根目录下生成 u-boot.lds文件:

image-20221015091825040

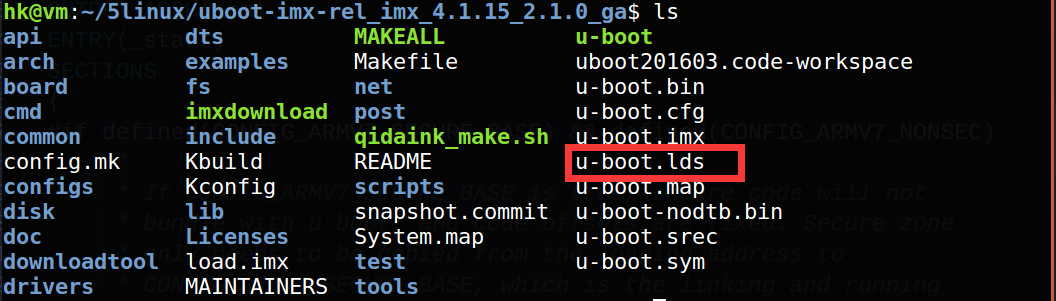
【注意】只有编译 u-boot 以后才会在根目录下出现 u-boot.lds 文件 。

我们打开这个文件,会看到如下内容:

1
2
3
4
5
6
7
8
9
10
11
12
13
14
15
16
OUTPUT_FORMAT("elf32-littlearm", "elf32-littlearm", "elf32-littlearm")
OUTPUT_ARCH(arm)
ENTRY(_start)
SECTIONS
{
. = 0x00000000;
. = ALIGN(4);
.text :
{
*(.__image_copy_start)
*(.vectors)
arch/arm/cpu/armv7/start.o (.text*)
*(.text*)
}
// 后边的省略 ... ...
}

其中第 3 行为代码当前入口点: _start,关于 _start 在uboot源码中的这个文件中有定义:

1
arch/arm/lib/vectors.S

我们打开着这个文件,有如下内容:

1
2
3
4
5
6
7
8
9
10
11
12
13
14
15
16
17
18
19
20
21
22
23
.globl _start

/* 中间注释省略 ... ... */

.section ".vectors", "ax"

/* 中间注释省略 ... ... */

_start:

#ifdef CONFIG_SYS_DV_NOR_BOOT_CFG
.word CONFIG_SYS_DV_NOR_BOOT_CFG
#endif

b reset
ldr pc, _undefined_instruction
ldr pc, _software_interrupt
ldr pc, _prefetch_abort
ldr pc, _data_abort
ldr pc, _not_used
ldr pc, _irq
ldr pc, _fiq

可以看出, _start 后面就是中断向量表,从图中的“ .section “ .vectors “,” ax ” 可以得到,此代码存放在 .vectors 段里面

2. uboot起始地址

我们使用以下命令在 uboot 源码中查找 __image_copy_start :

1
grep -nR "__image_copy_start"
image-20221015092906081

我们打开 u-boot.map 文件,搜索 __image_copy_start 可以找到如下内容:

1
2
3
4
5
6
7
8
9
10
11
12
13
14
15
16
17
18
19
20
21
22
23
24
// 上边部分省略 ... ...
链结器命令稿和内存映射

段 .text 的地址设置为 0x87800000
0x0000000000000000 . = 0x0
0x0000000000000000 . = ALIGN (0x4)

.text 0x0000000087800000 0x3e734
*(.__image_copy_start)
.__image_copy_start
0x0000000087800000 0x0 arch/arm/lib/built-in.o
0x0000000087800000 __image_copy_start
*(.vectors)
.vectors 0x0000000087800000 0x300 arch/arm/lib/built-in.o
0x0000000087800000 _start
0x0000000087800020 _undefined_instruction
0x0000000087800024 _software_interrupt
0x0000000087800028 _prefetch_abort
0x000000008780002c _data_abort
0x0000000087800030 _not_used
0x0000000087800034 _irq
0x0000000087800038 _fiq
0x0000000087800040 IRQ_STACK_START_IN
// 下边部分省略 ... ...

u-boot.map 是 uboot 的映射文件,编译 uboot 后存在于源码顶层目录中,可以从此文件看到某个文件或者函数链接到了哪个地址。可以看到 __image_copy_start 为 0X87800000,而 .text 的起始地址也是 0X87800000 。

我们再打开uboot源码目录中的链接文件 u-boot.lds ,可以看到有如下语句:

1
2
3
4
5
6
7
8
9
10
11
12
13
14
15
16
OUTPUT_FORMAT("elf32-littlearm", "elf32-littlearm", "elf32-littlearm")
OUTPUT_ARCH(arm)
ENTRY(_start)
SECTIONS
{
. = 0x00000000;
. = ALIGN(4);
.text :
{
*(.__image_copy_start)
*(.vectors)
arch/arm/cpu/armv7/start.o (.text*)
*(.text*)
}
// 后边的省略 ... ...
}

可以看到第 11 行是 vectors 段, vectors 段保存中断向量表 ,我们从 arch/arm/lib/vectors.S 文件中知道 vectors.S 的代码是存在 vectors 段中的。 vectors 段的起始地址也是 0X87800000,说明整个 uboot 的起始地址就是 0X87800000,这也是为什么我们裸机可执行程序的链接起始地址选择 0X87800000 了,目的就是为了和 uboot 一致。

u-boot.lds 的第12行是将 arch/arm/cpu/armv7/start.s 编译出来的代码放到中断向量表后面。

u-boot.lds 的第13行是 text 段,其他的代码段就放到这里 。

3. 与地址相关的变量

在 u-boot.lds 中有一些跟地址有关的“变量”需要我们注意一下,这些变量要最终编译完成才能确定的:

变量 数值 描述
__image_copy_start 0x87800000 uboot 拷贝的首地址
__image_copy_end 0x8785dd54 uboot 拷贝的结束地址
__rel_dyn_start 0x8785dd54 .rel.dyn 段起始地址
__rel_dyn_end 0x878668f4 .rel.dyn 段结束地址
_image_binary_end 0x878668f4 镜像结束地址
__bss_start 0x8785dd54 .bss 段起始地址
__bss_end 0x878a8e74 .bss 段结束地址

表一-3-1

这些“变量”值可以在 u-boot.map 文件中查找,上表中除了__image_copy_start以外,其他的变量值每次编译的时候可能会变化,如果修改了 uboot 代码、修改了 uboot 配置、选用不同的优化等级等等都会影响到这些值。所以,一切以实际值为准。
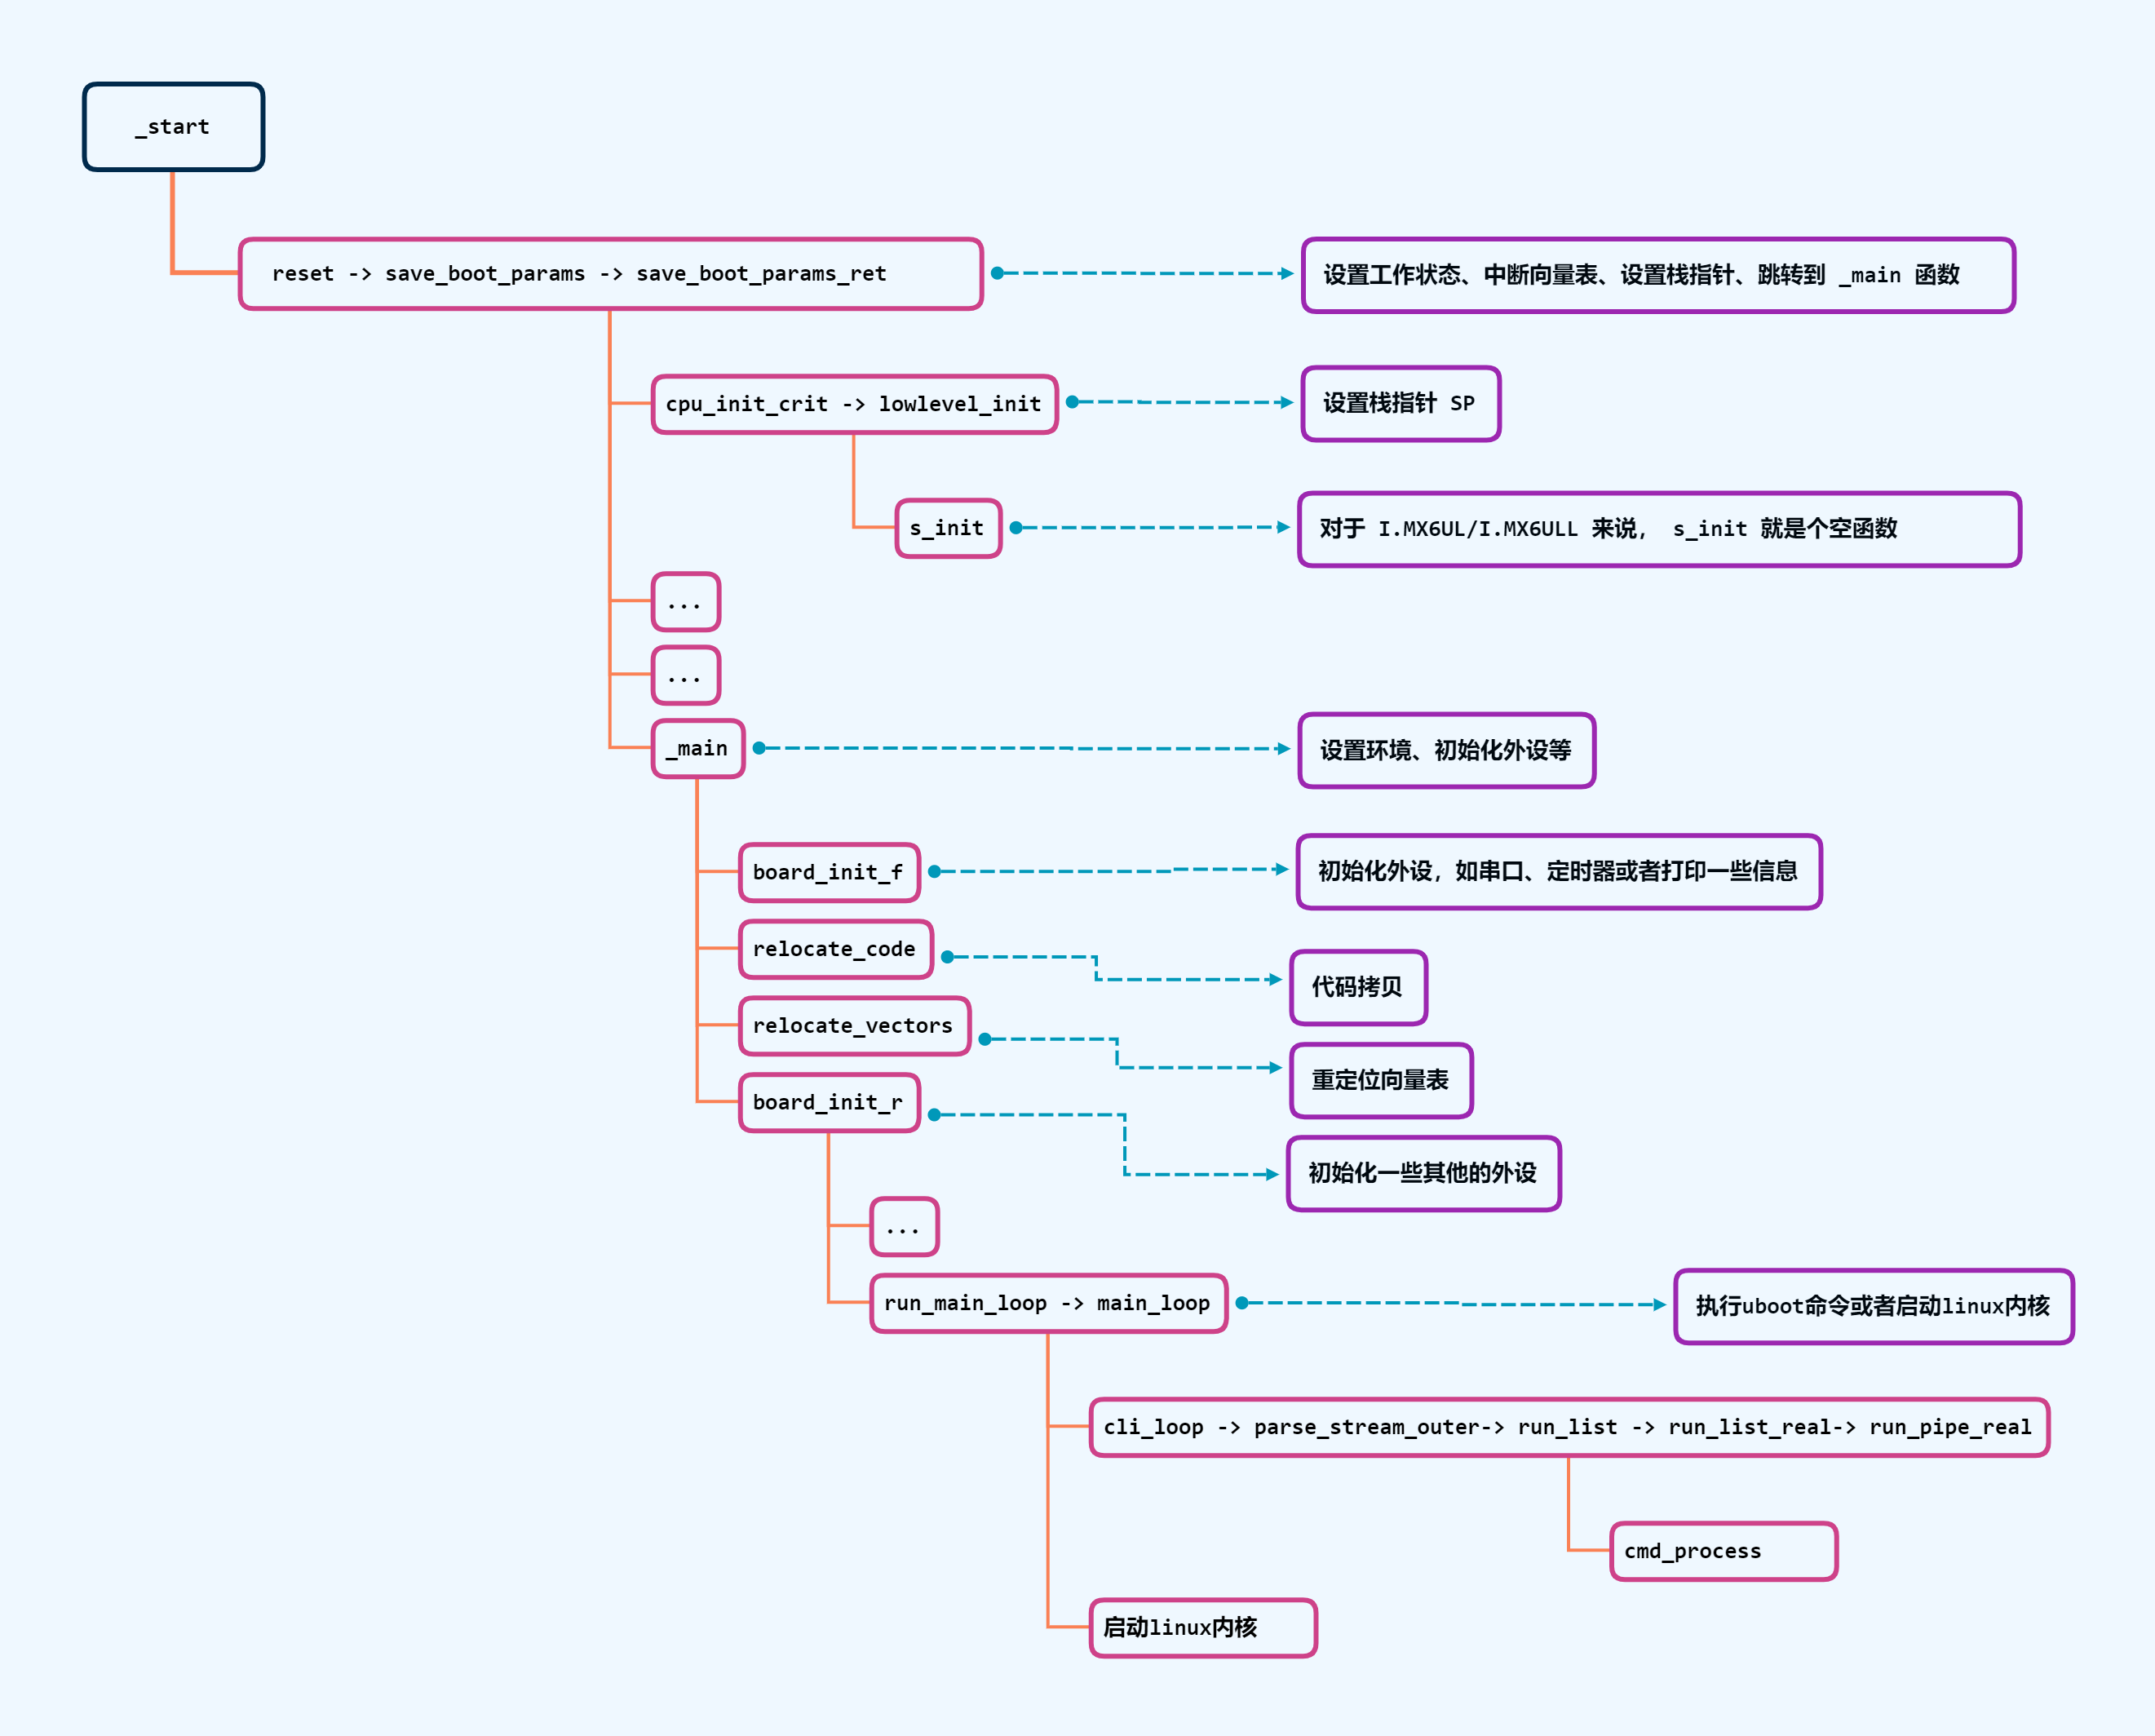
二、uboot启动流程

1. reset 函数

1.1 reset 函数在哪?

从 u-boot.lds 中我们已经知道了入口点是 arch/arm/lib/vectors.S 文件中的_start,相关代码如下:

1
2
3
4
5
6
7
8
9
10
11
12
13
14
15
16
17
18
19
20
21
22
.globl _start

/* 中间注释省略 ... ... */

.section ".vectors", "ax"

/* 中间注释省略 ... ... */

_start:

#ifdef CONFIG_SYS_DV_NOR_BOOT_CFG
.word CONFIG_SYS_DV_NOR_BOOT_CFG
#endif

b reset
ldr pc, _undefined_instruction
ldr pc, _software_interrupt
ldr pc, _prefetch_abort
ldr pc, _data_abort
ldr pc, _not_used
ldr pc, _irq
ldr pc, _fiq

_start后边为中断向量表,程序启动后,会首先跳转到 reset 函数里边,而 reset 函数则是定义在uboot源码的这个文件中:

1
arch/arm/cpu/armv7/start.S

我们打开这个文件,找到reset,会有如下内容:

1
2
3
reset:
/* Allow the board to save important registers */
b save_boot_params

可以看到 reset 中又从 reset 函数跳转到了 save_boot_params 函数,而 save_boot_params 函数同样定义在 start.S 里面 :

1
2
3
4
5
6
7
8
9
10
11
12
13
/*************************************************************************
*
* void save_boot_params(u32 r0, u32 r1, u32 r2, u32 r3)
* __attribute__((weak));
*
* Stack pointer is not yet initialized at this moment
* Don't save anything to stack even if compiled with -O0
*
*************************************************************************/
ENTRY(save_boot_params)
b save_boot_params_ret @ back to my caller
ENDPROC(save_boot_params)
.weak save_boot_params

发现 save_boot_params 函数也是只有一句跳转语句,跳转到 save_boot_params_ret 函数,save_boot_params_ret 也是定义在 start.S 文件中:

1
2
3
4
5
6
7
8
9
10
11
12
13
save_boot_params_ret:
/*
* disable interrupts (FIQ and IRQ), also set the cpu to SVC32 mode,
* except if in HYP mode already
*/
mrs r0, cpsr
and r1, r0, #0x1f @ mask mode bits
teq r1, #0x1a @ test for HYP mode
bicne r0, r0, #0x1f @ clear all mode bits
orrne r0, r0, #0x13 @ set SVC mode
orr r0, r0, #0xc0 @ disable FIQ and IRQ
msr cpsr,r0
/* 后边的省略 ... ... */

1.2 最终做了什么?

1.2.1 设置工作状态

上边我们通过reset找到了 save_boot_params_ret 函数,reset函数经过多次跳转,最终执行的是 save_boot_params_ret 函数中的内容,如下所示:

1
2
3
4
5
6
7
8
9
10
11
12
13
save_boot_params_ret:
/*
* disable interrupts (FIQ and IRQ), also set the cpu to SVC32 mode,
* except if in HYP mode already
*/
mrs r0, cpsr
and r1, r0, #0x1f @ mask mode bits
teq r1, #0x1a @ test for HYP mode
bicne r0, r0, #0x1f @ clear all mode bits
orrne r0, r0, #0x13 @ set SVC mode
orr r0, r0, #0xc0 @ disable FIQ and IRQ
msr cpsr,r0
/* 后边的省略 ... ... */

第 6 行:读取寄存器 cpsr 中的值,并保存到 r0 寄存器中。

第 7 行:将寄存器 r0 中的值与 0X1F 进行与运算,结果保存到 r1 寄存器中,目的就是提取 cpsr 寄存器的 bit[4:0] 这 5 位,这 5 位表示M4 M3 M2 M1 M0,而 M[4:0] 这五位用来设置处理器的工作模式。

点击查看 Cotex-A7 工作模式
M[4:0]模式
10000User(usr)
10001FIQ(fiq)
10010IRQ(irq)
10011Supervisor(svc)
10110Monitor(mon)
10111Abort(abt)
11010Hyp(hyp)
11011Undefined(und)
11111System(sys)

第 8 行:判断 r1 寄存器的值是否等于 0X1A(0b11010),也就是判断当前处理器模式是否处于 Hyp 模式。
第 9 行:如果 r1 和 0X1A 不相等,也就是 CPU 不处于 Hyp 模式的话就将 r0 寄存器的 bit[4:0] 进行清零,其实就是清除模式位
第 10 行:如果处理器不处于 Hyp 模式的话就将 r0 的寄存器的值与 0x13 进行或运算,0x13=0b10011,也就是设置处理器进入 SVC 模式。
第 11 行, r0 寄存器的值再与 0xC0 进行或运算,那么 r0 寄存器此时的值就是 0xD3, cpsr 寄存器的 I 位和 F 位分别控制 IRQ 和 FIQ 两个中断的开关,设置为 1 就关闭了 FIQ 和 IRQ。
第 12 行,将 r0 寄存器写回到 cpsr 寄存器中。完成设置 CPU 处于 SVC32 模式,并且关闭 FIQ 和 IRQ 这两个中断。

1.2.2 设置向量表

接下来,还是 save_boot_params_ret 函数,会继续执行以下代码:

1
2
3
4
5
6
7
8
9
10
11
12
13
14
15
/*
* Setup vector:
* (OMAP4 spl TEXT_BASE is not 32 byte aligned.
* Continue to use ROM code vector only in OMAP4 spl)
*/
#if !(defined(CONFIG_OMAP44XX) && defined(CONFIG_SPL_BUILD))
/* Set V=0 in CP15 SCTLR register - for VBAR to point to vector */
mrc p15, 0, r0, c1, c0, 0 @ Read CP15 SCTLR Register
bic r0, #CR_V @ V = 0
mcr p15, 0, r0, c1, c0, 0 @ Write CP15 SCTLR Register

/* Set vector address in CP15 VBAR register */
ldr r0, =_start
mcr p15, 0, r0, c12, c0, 0 @Set VBAR
#endif

第 6 行:如果没有定义 CONFIG_OMAP44XX 和 CONFIG_SPL_BUILD 的话条件成立,此处条件成立。

第 8 行:读取 CP15 中 c1 寄存器的值到 r0 寄存器中,根据协处理器相关知识,这里是读取 SCTLR 寄存器的值。

第 9 行:CR_V 在 arch/arm/include/asm/system.h 中有如下所示定义:

1
#define CR_V	(1 << 13)	/* Vectors relocated to 0xffff0000	*/

因此这一行的目的就是清除 SCTLR 寄存器中的 bit[13]。bit[13] 为 V 位,此位是向量表控制位,当为 0 的时候向量表基地址为 0X00000000 ,软件可以重定位向量表。为 1 的时候向量表基地址为 0XFFFF0000,软件不能重定位向量表。这里将 V 清零,目的就是为了接下来的向量表重定位。

第 10 行:将 r0 寄存器的值重新写入到寄存器 SCTLR 中。

第 13 行:设置 r0 寄存器的值为 _start, _start就是整个 uboot 的入口地址,其值为0X87800000,相当于 uboot 的起始地址,因此 0x87800000 也是向量表的起始地址。

第 14 行:将 r0 寄存器的值(向量表值)写入到 CP15 的 c12 寄存器中,也就是 VBAR 寄存器。因此第 8~14 行就是设置向量表重定位的。

1.2.3 最终跳转到 main

接下来就是:

1
2
3
4
5
6
7
	/* the mask ROM code should have PLL and others stable */
#ifndef CONFIG_SKIP_LOWLEVEL_INIT
bl cpu_init_cp15
bl cpu_init_crit
#endif

bl _main

第 2 行:如果没有定义 CONFIG_SKIP_LOWLEVEL_INIT 的话条件成立。我们没有定义: CONFIG_SKIP_LOWLEVEL_INIT,因此条件成立,执行下面的语句。

第 3 行:调用 cpu_init_cp15 函数,用来设置 CP15 相关的内容,比如关闭 MMU 等,此函数同样在 start.S文件中定义的,这里就暂时不关心这个函数了。

第 4 行:调用 cpu_init_crit函数,而该函数内部仅仅是调用了函数 lowlevel_init (这个函数后边会再分析)。

第 7 行:跳转到 main 函数。

2. lowlevel_init 函数

上边我们分析过,到执行 main 函数之前,还会调用lowlevel_init 函数,接下来我们看一下这个函数是干嘛的。

2.1 lowlevel_init 函数在哪?

lowlevel_init 这个函数在uboot源码的这个文件中定义 :

1
arch/arm/cpu/armv7/lowlevel_init.S

我们打开这个文件会看到有如下内容:

1
2
3
4
5
6
7
8
9
10
11
12
13
14
15
16
17
18
19
20
21
22
23
24
25
26
27
28
29
30
31
32
33
34
35
36
37
38
39
40
41
42
43
44
45
46
47
48
49
50
51
52
53
54
55
56
57
58
59
/*
* A lowlevel_init function that sets up the stack to call a C function to
* perform further init.
*
* (C) Copyright 2010
* Texas Instruments, <www.ti.com>
*
* Author :
* Aneesh V <aneesh@ti.com>
*
* SPDX-License-Identifier: GPL-2.0+
*/

#include <asm-offsets.h>
#include <config.h>
#include <linux/linkage.h>

ENTRY(lowlevel_init)
/*
* Setup a temporary stack. Global data is not available yet.
*/
ldr sp, =CONFIG_SYS_INIT_SP_ADDR
bic sp, sp, #7 /* 8-byte alignment for ABI compliance */
#ifdef CONFIG_SPL_DM
mov r9, #0
#else
/*
* Set up global data for boards that still need it. This will be
* removed soon.
*/
#ifdef CONFIG_SPL_BUILD
ldr r9, =gdata
#else
sub sp, sp, #GD_SIZE
bic sp, sp, #7
mov r9, sp
#endif
#endif
/*
* Save the old lr(passed in ip) and the current lr to stack
*/
push {ip, lr}

/*
* Call the very early init function. This should do only the
* absolute bare minimum to get started. It should not:
*
* - set up DRAM
* - use global_data
* - clear BSS
* - try to start a console
*
* For boards with SPL this should be empty since SPL can do all of
* this init in the SPL board_init_f() function which is called
* immediately after this.
*/
bl s_init
pop {ip, pc}
ENDPROC(lowlevel_init)

2.2 最终做了什么?

2.1 设置堆栈指针 sp

第 22 行代码内容如下:

1
ldr	sp, =CONFIG_SYS_INIT_SP_ADDR

该语句设置 sp 指向 CONFIG_SYS_INIT_SP_ADDR, CONFIG_SYS_INIT_SP_ADDR 在 include/configs/mx6ullevk.h 文件中有如下所示定义:

1
2
3
4
5
6
7
#define CONFIG_SYS_INIT_RAM_ADDR	IRAM_BASE_ADDR
#define CONFIG_SYS_INIT_RAM_SIZE IRAM_SIZE

#define CONFIG_SYS_INIT_SP_OFFSET \
(CONFIG_SYS_INIT_RAM_SIZE - GENERATED_GBL_DATA_SIZE)
#define CONFIG_SYS_INIT_SP_ADDR \
(CONFIG_SYS_INIT_RAM_ADDR + CONFIG_SYS_INIT_SP_OFFSET)
点击查看 IRAM_BASE_ADDR 和 IRAM_SIZE 的值

IRAM_BASE_ADDR 和 IRAM_SIZE 在 文 件 arch/arm/include/asm/arch-mx6/imx-regs.h 中有定义,如下所示,其实就是IMX6UL/IM6ULL 内部 ocram 的首地址和大小。

1
2
3
4
5
6
7
8
#define IRAM_BASE_ADDR			0x00900000
// 它俩并不挨着,中间的省略 ... ...
#if !(defined(CONFIG_MX6SX) || defined(CONFIG_MX6UL) || \
defined(CONFIG_MX6SLL) || defined(CONFIG_MX6SL))
#define IRAM_SIZE 0x00040000
#else
#define IRAM_SIZE 0x00020000
#endif

如果第 3 行的条件成立的话 IRAM_SIZE=0X40000,当定义了 CONFIG_MX6SX、CONFIG_MX6U、 CONFIG_MX6SLL 和CONFIG_MX6SL 中的任意一个的话,条件就不成立,在 .config 中定义了 CONFIG_MX6UL,所以条件不成立,所以最终IRAM_SIZE = 0X20000 = 128KB。所以我们可以得到如下值:

1
2
CONFIG_SYS_INIT_RAM_ADDR = IRAM_BASE_ADDR = 0x00900000
CONFIG_SYS_INIT_RAM_SIZE = 0x00020000 = 128KB
点击查看 GENERATED_GBL_DATA_SIZE 的值

GENERATED_GBL_DATA_SIZE 在文件 include/generated/generic-asm-offsets.h 中有定义:

1
2
3
4
5
6
7
8
9
10
11
12
13
14
15
16
17
18
#ifndef __GENERIC_ASM_OFFSETS_H__
#define __GENERIC_ASM_OFFSETS_H__
/*
* DO NOT MODIFY.
*
* This file was generated by Kbuild
*/

#define GENERATED_GBL_DATA_SIZE 256 /* (sizeof(struct global_data) + 15) & ~15 @ */
#define GENERATED_BD_INFO_SIZE 80 /* (sizeof(struct bd_info) + 15) & ~15 @ */
#define GD_SIZE 248 /* sizeof(struct global_data) @ */
#define GD_BD 0 /* offsetof(struct global_data, bd) @ */
#define GD_MALLOC_BASE 192 /* offsetof(struct global_data, malloc_base) @ */
#define GD_RELOCADDR 48 /* offsetof(struct global_data, relocaddr) @ */
#define GD_RELOC_OFF 68 /* offsetof(struct global_data, reloc_off) @ */
#define GD_START_ADDR_SP 64 /* offsetof(struct global_data, start_addr_sp) @ */

#endif

第 9 行:GENERATED_GBL_DATA_SIZE=256, GENERATED_GBL_DATA_SIZE 的含义为 (sizeof(struct global_data) + 15) & ~15 。所以我们可以得到如下值:

1
GENERATED_GBL_DATA_SIZE = 256

所以,所需要的变量有如下三个:

1
2
3
CONFIG_SYS_INIT_RAM_ADDR = IRAM_BASE_ADDR = 0x00900000
CONFIG_SYS_INIT_RAM_SIZE = 0x00020000 = 128KB
GENERATED_GBL_DATA_SIZE = 256

故,CONFIG_SYS_INIT_SP_ADDR 的值如下:

1
2
CONFIG_SYS_INIT_SP_OFFSET = CONFIG_SYS_INIT_RAM_SIZE - GENERATED_GBL_DATA_SIZE = 0x00020000 - 256 = 0x1FF00
CONFIG_SYS_INIT_SP_ADDR = CONFIG_SYS_INIT_RAM_ADDR + CONFIG_SYS_INIT_SP_OFFSET = 0x00900000 + 0x1FF00 = 0X0091FF00

此时的 sp 指向 0X91FF00,这属于 IMX6UL/IMX6ULL 的内部 ram。

image-20221015130030906

2.2 sp指针8字节对齐

第 23 行代码:

1
bic	sp, sp, #7 /* 8-byte alignment for ABI compliance */

2.3 sp指针其他操作

第 34 行:sp 指针减去 GD_SIZE, GD_SIZE 同样在 include/generated/generic-asm-offsets.h 中定了,大小为 248。

第 35 行:对 sp 做 8 字节对齐,此时 sp 的地址为 0X0091FF00 - 248 = 0X0091FE08。此时的 sp 指针如下图所示:

image-20221015130125594

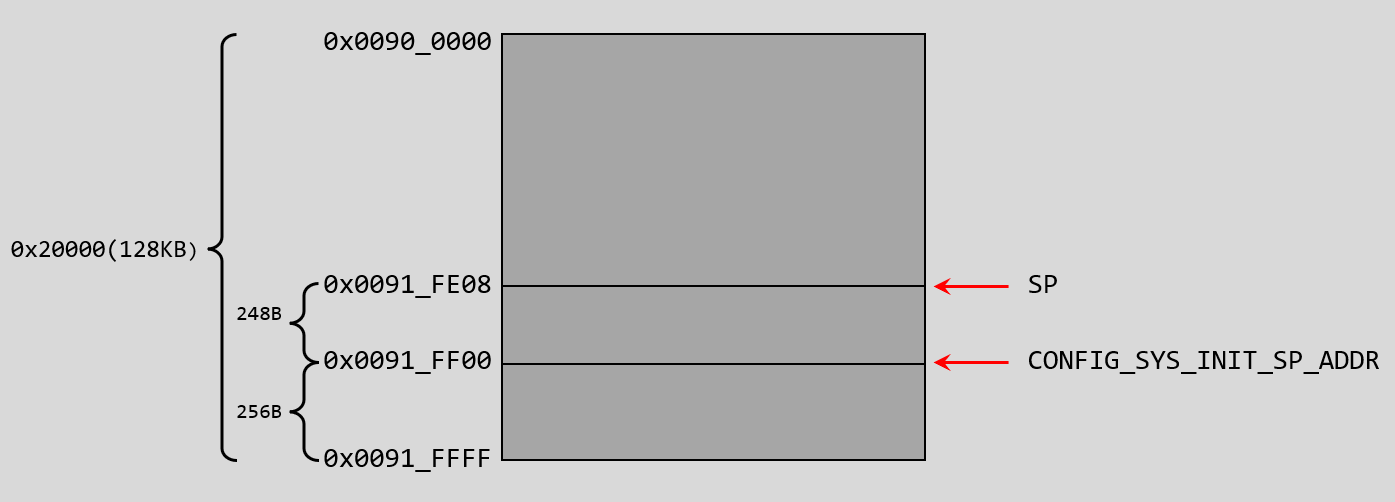
第 36 行:将 sp 地址保存在 r9 寄存器中。

第 42 行:将 ip 和 lr 压栈

第 57 行:调用函数 s_init,这个函数我们后边再说。

第 58 行:将第 36 行入栈的 ip 和 lr 进行出栈,并将 lr 赋给 pc。

3. s_init 函数

3.1 s_init 函数在哪?

前边我们分析 lowlevel_init 函数的时候,发现这个函数在最后调用了 s_init 函数,s_init 函数定义在uboot源码的这个文件中:

1
arch/arm/cpu/armv7/mx6/soc.c

我们打开这个文件,会看到此函数定义如下:

1
2
3
4
5
6
7
8
9
10
11
12
13
14
15
16
17
18
19
20
21
22
23
24
25
26
27
28
29
30
31
32
33
34
35
36
37
38
39
40
41
42
43
44
void s_init(void)
{
struct anatop_regs *anatop = (struct anatop_regs *)ANATOP_BASE_ADDR;
struct mxc_ccm_reg *ccm = (struct mxc_ccm_reg *)CCM_BASE_ADDR;
u32 mask480;
u32 mask528;
u32 reg, periph1, periph2;

if (is_cpu_type(MXC_CPU_MX6SX) || is_cpu_type(MXC_CPU_MX6UL) ||
is_cpu_type(MXC_CPU_MX6ULL) || is_cpu_type(MXC_CPU_MX6SLL))
return;

/* Due to hardware limitation, on MX6Q we need to gate/ungate all PFDs
* to make sure PFD is working right, otherwise, PFDs may
* not output clock after reset, MX6DL and MX6SL have added 396M pfd
* workaround in ROM code, as bus clock need it
*/

mask480 = ANATOP_PFD_CLKGATE_MASK(0) |
ANATOP_PFD_CLKGATE_MASK(1) |
ANATOP_PFD_CLKGATE_MASK(2) |
ANATOP_PFD_CLKGATE_MASK(3);
mask528 = ANATOP_PFD_CLKGATE_MASK(1) |
ANATOP_PFD_CLKGATE_MASK(3);

reg = readl(&ccm->cbcmr);
periph2 = ((reg & MXC_CCM_CBCMR_PRE_PERIPH2_CLK_SEL_MASK)
>> MXC_CCM_CBCMR_PRE_PERIPH2_CLK_SEL_OFFSET);
periph1 = ((reg & MXC_CCM_CBCMR_PRE_PERIPH_CLK_SEL_MASK)
>> MXC_CCM_CBCMR_PRE_PERIPH_CLK_SEL_OFFSET);

/* Checking if PLL2 PFD0 or PLL2 PFD2 is using for periph clock */
if ((periph2 != 0x2) && (periph1 != 0x2))
mask528 |= ANATOP_PFD_CLKGATE_MASK(0);

if ((periph2 != 0x1) && (periph1 != 0x1) &&
(periph2 != 0x3) && (periph1 != 0x3))
mask528 |= ANATOP_PFD_CLKGATE_MASK(2);

writel(mask480, &anatop->pfd_480_set);
writel(mask528, &anatop->pfd_528_set);
writel(mask480, &anatop->pfd_480_clr);
writel(mask528, &anatop->pfd_528_clr);
}

3.2 最终做了什么?

在此函数中会判断CPU的类型,如果 CPU 为 MX6SX、 MX6UL、 MX6ULL 或 MX6SLL中的任意一种,那么就会直接返回,相当于s_init 函数什么都没做。所以对于 I.MX6UL/I.MX6ULL 来说, s_init 就是个空函数。从 s_init 函数退出以后进入函数 lowlevel_init,但是 lowlevel_init 函数也执行完成了,返回到了函数 cpu_init_crit,函数 cpu_init_crit 也执行完成了,最终返回到 save_boot_params_ret。

4. _main 函数

4.1 _main 函数在哪里?

经过前边的分析,save_boot_params_ret 函数最后会跳转到 _main 函数,这个函数定义在 uboot 源码的这个文件中:

1
arch/arm/lib/crt0.S

我们打开这个文件,会看到如下内容:

1
2
3
4
5
6
7
8
9
10
11
12
13
14
15
16
17
18
19
20
21
22
23
24
25
26
27
28
ENTRY(_main)

/*
* Set up initial C runtime environment and call board_init_f(0).
*/

#if defined(CONFIG_SPL_BUILD) && defined(CONFIG_SPL_STACK)
ldr sp, =(CONFIG_SPL_STACK)
#else
ldr sp, =(CONFIG_SYS_INIT_SP_ADDR)
#endif
#if defined(CONFIG_CPU_V7M) /* v7M forbids using SP as BIC destination */
mov r3, sp
bic r3, r3, #7
mov sp, r3
#else
bic sp, sp, #7 /* 8-byte alignment for ABI compliance */
#endif
mov r0, sp
bl board_init_f_alloc_reserve
mov sp, r0
/* set up gd here, outside any C code */
mov r9, r0
bl board_init_f_init_reserve

mov r0, #0
bl board_init_f
/* 后边的省略 ... ... */

4.2 做了什么?

在 arch/arm/lib/crt0.S 文件开头,其实已经说明了 _main 函数主要做了那些事情。

  • (1)设置调用 board_init_f() 的初始环境。
  • (2)调用board_init_f()。
  • (3)设置中间环境,其中堆栈和GD是由系统RAM中的board_init_f()分配的,但BSS和初始化的非const数据仍然不可用。
  • (4)对于U-Boot(不是SPL),调用relocate_code()。对于SPL, board_init_f()只返回(到crt0)。
  • (5)设置调用board_init_r()的最终环境。
  • (6)对于U-Boot本身(不是SPL),一些cpu在内存方面还有一些工作要做,因此调用 c_runtime_cpu_setup 。
  • (7)调用board_init_r()。

4.2.1 设置初始C运行时环境

以下部分为 arch/arm/lib/crt0.S 文件的 69 - 93 行代码

1
2
3
4
5
6
7
8
9
10
11
12
13
14
15
16
17
18
19
20
21
22
23
24
25
/*
* Set up initial C runtime environment and call board_init_f(0).
*/

#if defined(CONFIG_SPL_BUILD) && defined(CONFIG_SPL_STACK)
ldr sp, =(CONFIG_SPL_STACK)
#else
ldr sp, =(CONFIG_SYS_INIT_SP_ADDR)
#endif
#if defined(CONFIG_CPU_V7M) /* v7M forbids using SP as BIC destination */
mov r3, sp
bic r3, r3, #7
mov sp, r3
#else
bic sp, sp, #7 /* 8-byte alignment for ABI compliance */
#endif
mov r0, sp
bl board_init_f_alloc_reserve
mov sp, r0
/* set up gd here, outside any C code */
mov r9, r0
bl board_init_f_init_reserve

mov r0, #0
bl board_init_f

第 8 行(第 76 行):设置 sp 指针为 CONFIG_SYS_INIT_SP_ADDR,也就是 sp 指向 0X0091FF00。

第 15 行(第 83 行):sp 做 8 字节对齐。

第 17 行(第 85 行):读取 sp 到寄存器 r0 里面,此时 r0=0X0091FF00。

第 18 行(第 86 行):调用函数 board_init_f_alloc_reserve,此函数有一个参数,参数为 r0 中的值,也就是 0X0091FF00 ,该函数主要是留出早期的 malloc 内存区域和 gd 内存区域。

点击查看 board_init_f_alloc_reserve 函数

此函数定义在 common/init/board_init.c 文件中:

1
2
3
4
5
6
7
8
9
10
11
ulong board_init_f_alloc_reserve(ulong top)
{
/* Reserve early malloc arena */
#if defined(CONFIG_SYS_MALLOC_F)
top -= CONFIG_SYS_MALLOC_F_LEN;
#endif
/* LAST : reserve GD (rounded up to a multiple of 16 bytes) */
top = rounddown(top-sizeof(struct global_data), 16);

return top;
}

函数 board_init_f_alloc_reserve 主要是留出早期的 malloc 内存区域和 gd 内存区域,其中 CONFIG_SYS_MALLOC_F_LEN=0X400( 在文件 include/generated/autoconf.h 中定义 ) ,sizeof(struct global_data)=248(GD_SIZE 值),完成以后的内存分布如下图:

image-20221015143824906

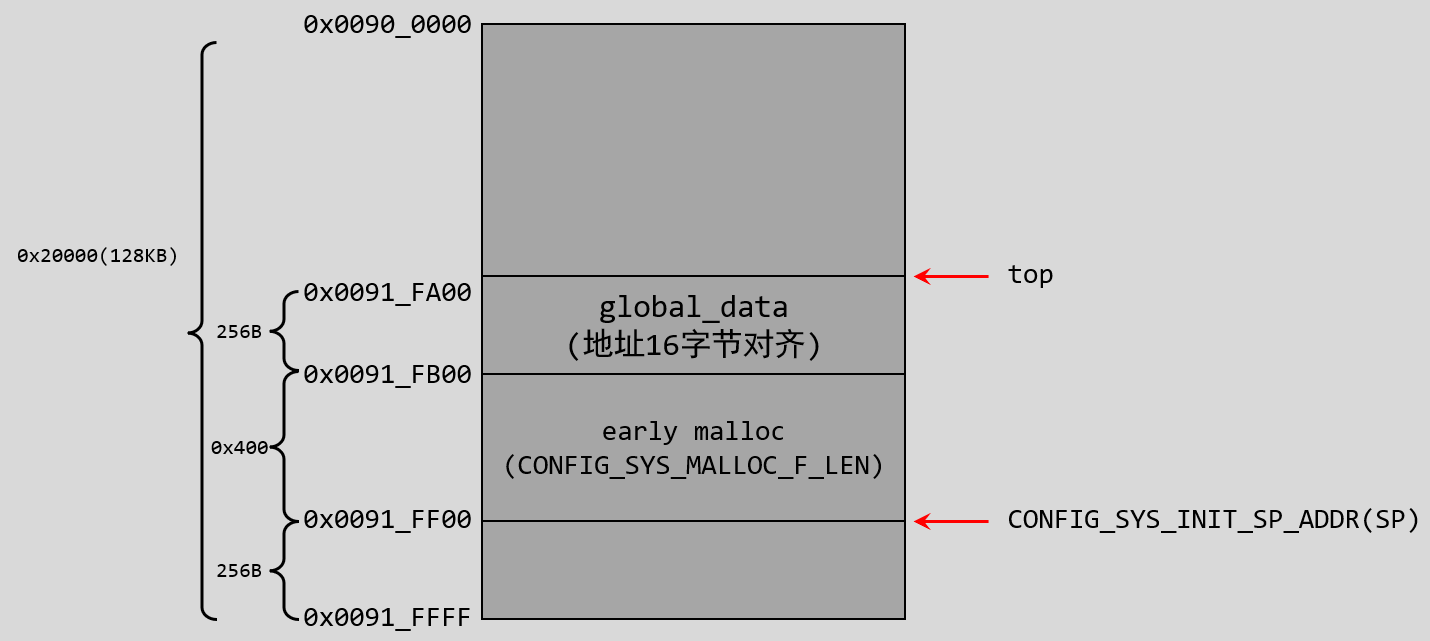
函数 board_init_f_alloc_reserve 是有返回值的,返回值为新的 top 值,此时 top=0X0091FA00。

第 19 行(第 87 行):将 r0 写入到 sp 里面,r0 保存着函数 board_init_f_alloc_reserve 的返回值,所以这一句也就是设置 sp = 0X0091FA00。

第 21 行(第 89 行):将 r0 寄存器的值写到寄存器 r9 里面,因为 r9 寄存器存放着全局变量 gd 的地址。所以这一句其实就是让 gd 指向 0X0091FA00 。

点击查看 gd 地址

在文件 arch/arm/include/asm/global_data.h 中有如下宏定义:

1
2
3
4
5
#ifdef CONFIG_ARM64
#define DECLARE_GLOBAL_DATA_PTR register volatile gd_t *gd asm ("x18")
#else
#define DECLARE_GLOBAL_DATA_PTR register volatile gd_t *gd asm ("r9")
#endif

可以看出, uboot 中定义了一个指向 gd_t 的指针 gd, gd 是存放在寄存器 r9 里面的,因此 gd 是个全局变量。 另外 gd_t 是个结构体, 这个结构体定义在 uboot 源码的这个文件中:

1
include/asm-generic/global_data.h

我们打开这个文件,可以看到这个结构体定义如下:

1
2
3
4
5
6
7
8
9
10
11
typedef struct global_data {
bd_t *bd;
unsigned long flags;
unsigned int baudrate;
unsigned long cpu_clk; /* CPU clock in Hz! */
unsigned long bus_clk;
/* We cannot bracket this with CONFIG_PCI due to mpc5xxx */
unsigned long pci_clk;
unsigned long mem_clk;
// 中间部分省略 ... ...
} gd_t;

由此可知,这一行代码就是设置 gd 所指向的位置,也就是 gd 指向 0X0091FA00。

第 22 行(第 90 行):调用函数 board_init_f_init_reserve ,该函数主要是用于初始化 gd,其实就是清 0 处理。

点击查看 board_init_f_init_reserve

此函数在文件 common/init/board_init.c 中有定义 :

1
2
3
4
5
6
7
8
9
10
11
12
13
14
15
16
17
18
19
20
21
22
23
24
25
26
27
28
29
30
31
32
33
34
35
36
37
38
39
void board_init_f_init_reserve(ulong base)
{
struct global_data *gd_ptr;
#ifndef _USE_MEMCPY
int *ptr;
#endif

/*
* clear GD entirely and set it up.
* Use gd_ptr, as gd may not be properly set yet.
*/

gd_ptr = (struct global_data *)base;
/* zero the area */
#ifdef _USE_MEMCPY
memset(gd_ptr, '\0', sizeof(*gd));
#else
for (ptr = (int *)gd_ptr; ptr < (int *)(gd_ptr + 1); )
*ptr++ = 0;
#endif
/* set GD unless architecture did it already */
#if !defined(CONFIG_ARM)
arch_setup_gd(gd_ptr);
#endif
/* next alloc will be higher by one GD plus 16-byte alignment */
base += roundup(sizeof(struct global_data), 16);

/*
* record early malloc arena start.
* Use gd as it is now properly set for all architectures.
*/

#if defined(CONFIG_SYS_MALLOC_F)
/* go down one 'early malloc arena' */
gd->malloc_base = base;
/* next alloc will be higher by one 'early malloc arena' size */
base += CONFIG_SYS_MALLOC_F_LEN;
#endif
}

可以看出,此函数用于初始化 gd,其实就是清零处理。另外,此函数还设置了 gd->malloc_base 为 gd 基地址+gd 大小 = 0X0091FA00 + 248 = 0X0091FAF8,再做 16 字节对齐,最终 gd->malloc_base = 0X0091FB00,这个也就是 early malloc 的起始地址。

第 25 行(第 93 行):调用 board_init_f 函数,这个函数定义在文件 common/board_f.c 中,主要用来初始化 DDR,定时器,完成代码拷贝等,后边我们会再详细分析这个函数。

4.2.2 设置中间环境

以下部分为 arch/arm/lib/crt0.S 文件的 97 - 127 行代码

1
2
3
4
5
6
7
8
9
10
11
12
13
14
15
16
17
18
19
20
21
22
23
24
25
26
27
28
29
30
31
/*
* Set up intermediate environment (new sp and gd) and call
* relocate_code(addr_moni). Trick here is that we'll return
* 'here' but relocated.
*/

ldr sp, [r9, #GD_START_ADDR_SP] /* sp = gd->start_addr_sp */
#if defined(CONFIG_CPU_V7M) /* v7M forbids using SP as BIC destination */
mov r3, sp
bic r3, r3, #7
mov sp, r3
#else
bic sp, sp, #7 /* 8-byte alignment for ABI compliance */
#endif
ldr r9, [r9, #GD_BD] /* r9 = gd->bd */
sub r9, r9, #GD_SIZE /* new GD is below bd */

adr lr, here
ldr r0, [r9, #GD_RELOC_OFF] /* r0 = gd->reloc_off */
add lr, lr, r0
#if defined(CONFIG_CPU_V7M)
orr lr, #1 /* As required by Thumb-only */
#endif
ldr r0, [r9, #GD_RELOCADDR] /* r0 = gd->relocaddr */
b relocate_code
here:
/*
* now relocate vectors
*/

bl relocate_vectors

第 13 行(第 109 行):sp 做 8 字节对齐。

第 15 行(第 111 行):获取 gd->bd 的地址赋给 r9,此时 r9 存放的是之前的 gd,这里通过获取 gd->bd 的地址来计算出新的 gd 的位置。

点击查看 GD_BD 的值

GD_BD 定义在文件 include/generated/generic-asm-offsets.h 中:

1
2
3
4
5
6
7
8
9
10
11
12
13
14
15
16
17
18
#ifndef __GENERIC_ASM_OFFSETS_H__
#define __GENERIC_ASM_OFFSETS_H__
/*
* DO NOT MODIFY.
*
* This file was generated by Kbuild
*/

#define GENERATED_GBL_DATA_SIZE 256 /* (sizeof(struct global_data) + 15) & ~15 @ */
#define GENERATED_BD_INFO_SIZE 80 /* (sizeof(struct bd_info) + 15) & ~15 @ */
#define GD_SIZE 248 /* sizeof(struct global_data) @ */
#define GD_BD 0 /* offsetof(struct global_data, bd) @ */
#define GD_MALLOC_BASE 192 /* offsetof(struct global_data, malloc_base) @ */
#define GD_RELOCADDR 48 /* offsetof(struct global_data, relocaddr) @ */
#define GD_RELOC_OFF 68 /* offsetof(struct global_data, reloc_off) @ */
#define GD_START_ADDR_SP 64 /* offsetof(struct global_data, start_addr_sp) @ */

#endif

所以 ,其实 GD_BD = 0。

第 16 行(第 112 行):新的 gd 在 bd 下面,所以 r9 减去 gd 的大小就是新的 gd 的位置,获取到新的 gd的位置以后赋值给 r9。

第 18 行(第 114 行):设置 lr 寄存器为 here,这样后面执行其他函数返回的时候就返回到了第 26 行(第 122 行)的 here 位置处。

第 19 行(第 115 行):读取 gd->reloc_off 的值复制给 r0 寄存器, GD_RELOC_OFF=68。

点击查看 GD_RELOC_OFF 的值

GD_RELOC_OFF 定义在文件 include/generated/generic-asm-offsets.h 中:

1
2
3
4
5
6
7
8
9
10
11
12
13
14
15
16
17
18
#ifndef __GENERIC_ASM_OFFSETS_H__
#define __GENERIC_ASM_OFFSETS_H__
/*
* DO NOT MODIFY.
*
* This file was generated by Kbuild
*/

#define GENERATED_GBL_DATA_SIZE 256 /* (sizeof(struct global_data) + 15) & ~15 @ */
#define GENERATED_BD_INFO_SIZE 80 /* (sizeof(struct bd_info) + 15) & ~15 @ */
#define GD_SIZE 248 /* sizeof(struct global_data) @ */
#define GD_BD 0 /* offsetof(struct global_data, bd) @ */
#define GD_MALLOC_BASE 192 /* offsetof(struct global_data, malloc_base) @ */
#define GD_RELOCADDR 48 /* offsetof(struct global_data, relocaddr) @ */
#define GD_RELOC_OFF 68 /* offsetof(struct global_data, reloc_off) @ */
#define GD_START_ADDR_SP 64 /* offsetof(struct global_data, start_addr_sp) @ */

#endif

所以 ,其实 GD_RELOC_OFF = 68。

第 20 行(第 116 行): lr 寄存器的值加上 r0 寄存器的值,重新赋值给 lr 寄存器。因为接下来要重定位代码,也就是把代码拷贝到新的地方去(现在的 uboot 存放的起始地址为 0X87800000,下面要将 uboot 拷贝到 DDR 最后面的地址空间出,将 0X87800000 开始的内存空出来),其中就包括here,因此 lr 中的 here 要使用重定位后的位置。、

第 24 行(第 120 行):读取 gd->relocaddr 的值赋给 r0 寄存器,此时 r0 寄存器就保存着 uboot 要拷贝的目的地址,为 0X9FF47000。 GD_RELOCADDR=48。

点击查看 GD_RELOCADDR 的值

GD_RELOCADDR 定义在文件 include/generated/generic-asm-offsets.h 中:

1
2
3
4
5
6
7
8
9
10
11
12
13
14
15
16
17
18
#ifndef __GENERIC_ASM_OFFSETS_H__
#define __GENERIC_ASM_OFFSETS_H__
/*
* DO NOT MODIFY.
*
* This file was generated by Kbuild
*/

#define GENERATED_GBL_DATA_SIZE 256 /* (sizeof(struct global_data) + 15) & ~15 @ */
#define GENERATED_BD_INFO_SIZE 80 /* (sizeof(struct bd_info) + 15) & ~15 @ */
#define GD_SIZE 248 /* sizeof(struct global_data) @ */
#define GD_BD 0 /* offsetof(struct global_data, bd) @ */
#define GD_MALLOC_BASE 192 /* offsetof(struct global_data, malloc_base) @ */
#define GD_RELOCADDR 48 /* offsetof(struct global_data, relocaddr) @ */
#define GD_RELOC_OFF 68 /* offsetof(struct global_data, reloc_off) @ */
#define GD_START_ADDR_SP 64 /* offsetof(struct global_data, start_addr_sp) @ */

#endif

所以 ,其实 GD_RELOCADDR = 48。

第 25 行(第 121 行):调用函数 relocate_code,也就是代码重定位函数,此函数负责将 uboot 拷贝到新的地方去,此函数定义在 arch/arm/lib/relocate.S 中,后边会再详细分析这个函数。

第 31 行(第 127 行):调用函数 relocate_vectors,对中断向量表做重定位,此函数定义在文件 arch/arm/lib/relocate.S 中,后边我们会再分析这个函数。

4.2.3 设置最终环境

以下部分为 arch/arm/lib/crt0.S 文件的 129 - 177 行代码,这部分其实是跟上边的 here 是一起的,只是这部分设置的是最终环境,就拆分开来分析了:

1
2
3
4
5
6
7
8
9
10
11
12
13
14
15
16
17
18
19
20
21
22
23
24
25
26
27
28
29
30
31
32
33
34
35
36
37
38
39
40
41
42
43
44
45
46
47
48
49
/* Set up final (full) environment */

bl c_runtime_cpu_setup /* we still call old routine here */
#endif
#if !defined(CONFIG_SPL_BUILD) || defined(CONFIG_SPL_FRAMEWORK)
# ifdef CONFIG_SPL_BUILD
/* Use a DRAM stack for the rest of SPL, if requested */
bl spl_relocate_stack_gd
cmp r0, #0
movne sp, r0
movne r9, r0
# endif
ldr r0, =__bss_start /* this is auto-relocated! */

#ifdef CONFIG_USE_ARCH_MEMSET
ldr r3, =__bss_end /* this is auto-relocated! */
mov r1, #0x00000000 /* prepare zero to clear BSS */

subs r2, r3, r0 /* r2 = memset len */
bl memset
#else
ldr r1, =__bss_end /* this is auto-relocated! */
mov r2, #0x00000000 /* prepare zero to clear BSS */

clbss_l:cmp r0, r1 /* while not at end of BSS */
#if defined(CONFIG_CPU_V7M)
itt lo
#endif
strlo r2, [r0] /* clear 32-bit BSS word */
addlo r0, r0, #4 /* move to next */
blo clbss_l
#endif

#if ! defined(CONFIG_SPL_BUILD)
bl coloured_LED_init
bl red_led_on
#endif
/* call board_init_r(gd_t *id, ulong dest_addr) */
mov r0, r9 /* gd_t */
ldr r1, [r9, #GD_RELOCADDR] /* dest_addr */
/* call board_init_r */
#if defined(CONFIG_SYS_THUMB_BUILD)
ldr lr, =board_init_r /* this is auto-relocated! */
bx lr
#else
ldr pc, =board_init_r /* this is auto-relocated! */
#endif
/* we should not return here. */
#endif

第 3 行(第 131 行):调用函数 c_runtime_cpu_setup。

点击查看 c_runtime_cpu_setup 函数

此函数定义在文件arch/arm/cpu/armv7/start.S 中 :

1
2
3
4
5
6
7
8
9
10
11
12
13
ENTRY(c_runtime_cpu_setup)
/*
* If I-cache is enabled invalidate it
*/
#ifndef CONFIG_SYS_ICACHE_OFF
mcr p15, 0, r0, c7, c5, 0 @ invalidate icache
mcr p15, 0, r0, c7, c10, 4 @ DSB
mcr p15, 0, r0, c7, c5, 4 @ ISB
#endif

bx lr

ENDPROC(c_runtime_cpu_setup)

第 13 ~ 31 行(第 141~159 行):清除 BSS 段。

第 39 行(第 167 行):设置函数 board_init_r 的两个参数,board_init_r 函数第一个参数是 gd,因此读取 r9 保存到 r0 里面。

点击查看 board_init_r 函数

函数 board_init_r 声明如下 :

1
board_init_r(gd_t *id, ulong dest_addr)

第一个参数是 gd,因此读取 r9 保存到 r0 里面。

第 40 行(第 168 行):函数 board_init_r 的第二个参数是目的地址,因此 r1= gd->relocaddr。

第 46 行(第 174 行):调用函数 board_init_r,此函数定义在文件 common/board_r.c 中,后边会再详细分析这个函数。

这个就是_main 函数的运行流程,在_main 函数里面调用了 board_init_f、 relocate_code、relocate_vectors 和 board_init_r 这 4 个函数,

5. board_init_f 函数

5.1 board_init_f 函数在哪里?

上边我们分析 _main 函数的时候,它调用这个函数,board_init_f 函数主要有两个工作 :

(1)初始化一系列外设,比如串口、定时器,或者打印一些消息等。

(2)初始化 gd 的各个成员变量, uboot 会将自己重定位到 DRAM 最后面的地址区域,也就是将自己拷贝到 DRAM 最后面的内存区域中。这么做的目的是给 Linux 腾出空间,防止 Linux kernel 覆盖掉 uboot,将 DRAM 前面的区域完整的空出来。在拷贝之前肯定要给 uboot 各部分分配好内存位置和大小,比如 gd 应该存放到哪个位置, malloc 内存池应该存放到哪个位置等等。这些信息都保存在 gd 的成员变量中,因此要对 gd 的这些成员变量做初始化。最终形成一个完整的内存“分配图”,在后面重定位 uboot 的时候就会用到这个内存“分配图”。

这个函数定义在 uboot 源码中的这个文件中:

1
common/board_f.c

我们打开这个文件,可以看到函数如下:

1
2
3
4
5
6
7
8
9
10
11
12
13
14
15
16
17
18
19
20
21
22
23
24
25
26
27
28
29
30
31
32
33
void board_init_f(ulong boot_flags)
{
#ifdef CONFIG_SYS_GENERIC_GLOBAL_DATA
/*
* For some archtectures, global data is initialized and used before
* calling this function. The data should be preserved. For others,
* CONFIG_SYS_GENERIC_GLOBAL_DATA should be defined and use the stack
* here to host global data until relocation.
*/
gd_t data;

gd = &data;

/*
* Clear global data before it is accessed at debug print
* in initcall_run_list. Otherwise the debug print probably
* get the wrong vaule of gd->have_console.
*/
zero_global_data();
#endif

gd->flags = boot_flags;
gd->have_console = 0;

if (initcall_run_list(init_sequence_f))
hang();

#if !defined(CONFIG_ARM) && !defined(CONFIG_SANDBOX) && \
!defined(CONFIG_EFI_APP)
/* NOTREACHED - jump_to_copy() does not return */
hang();
#endif
}

5.2 做了什么?

函数实现如下:

1
2
3
4
5
6
7
8
9
10
11
12
13
14
15
16
17
18
19
20
21
22
23
24
25
26
27
28
29
30
31
32
33
void board_init_f(ulong boot_flags)
{
#ifdef CONFIG_SYS_GENERIC_GLOBAL_DATA
/*
* For some archtectures, global data is initialized and used before
* calling this function. The data should be preserved. For others,
* CONFIG_SYS_GENERIC_GLOBAL_DATA should be defined and use the stack
* here to host global data until relocation.
*/
gd_t data;

gd = &data;

/*
* Clear global data before it is accessed at debug print
* in initcall_run_list. Otherwise the debug print probably
* get the wrong vaule of gd->have_console.
*/
zero_global_data();
#endif

gd->flags = boot_flags;
gd->have_console = 0;

if (initcall_run_list(init_sequence_f))
hang();

#if !defined(CONFIG_ARM) && !defined(CONFIG_SANDBOX) && \
!defined(CONFIG_EFI_APP)
/* NOTREACHED - jump_to_copy() does not return */
hang();
#endif
}

因为没有定义 CONFIG_SYS_GENERIC_GLOBAL_DATA,所以第 3 ~ 20 行(第 1037 ~ 1054 行)代码无效。

第 22 行(第 1056 行):初始化 gd->flags = boot_flags = 0。

第 23 行(第 1057 行):设置 gd->have_console=0。

第 25 行(第 1059 行):通过函数 initcall_run_list 来运行初始化序列 init_sequence_f 里面的一些列函数, init_sequence_f 里面包含了一系列的初始化函数。这才是最重要的一个函数,由它完成的功能我们在 5.3 进行详细分析。

5.3 init_sequence_f

5.3.1 数组成员

点击查看 init_sequence_f

init_sequence_f 也是定义在文件 common/board_f.c 中,由于 init_sequence_f 的内容比较长,里面有大量的条件编译代码,将条件编译部分删除掉了,去掉条件编译以后的 init_sequence_f 定义如下:

1
2
3
4
5
6
7
8
9
10
11
12
13
14
15
16
17
18
19
20
21
22
23
24
25
26
27
28
29
30
31
32
33
34
35
36
37
38
39
40
41
42
43
44
45
46
47
48
49
50
51
52
53
54
55
56
57
58
59
60
61
62
63
static init_fnc_t init_sequence_f[] = {
setup_mon_len,
initf_malloc,
initf_console_record,
arch_cpu_init, /* basic arch cpu dependent setup */
initf_dm,
arch_cpu_init_dm,
mark_bootstage, /* need timer, go after init dm */
board_early_init_f,
timer_init, /* initialize timer */
board_postclk_init,
get_clocks,
env_init, /* initialize environment */
init_baud_rate, /* initialze baudrate settings */
serial_init, /* serial communications setup */
console_init_f, /* stage 1 init of console */
display_options, /* say that we are here */
display_text_info, /* show debugging info if required */
print_cpuinfo, /* display cpu info (and speed) */
show_board_info,
INIT_FUNC_WATCHDOG_INIT
INIT_FUNC_WATCHDOG_RESET
init_func_i2c,
announce_dram_init,
/* TODO: unify all these dram functions? */
dram_init, /* configure available RAM banks */
post_init_f,
INIT_FUNC_WATCHDOG_RESET
testdram,
INIT_FUNC_WATCHDOG_RESET
/*
* Now that we have DRAM mapped and working, we can
* relocate the code and continue running from DRAM.
*
* Reserve memory at end of RAM for (top down in that order):
* - area that won't get touched by U-Boot and Linux (optional)
* - kernel log buffer
* - protected RAM
* - LCD framebuffer
* - monitor code
* - board info struct
*/
setup_dest_addr,
reserve_round_4k,
reserve_mmu,
reserve_trace,
reserve_uboot,
reserve_malloc,
reserve_board,
setup_machine,
reserve_global_data,
reserve_fdt,
reserve_arch,
reserve_stacks,
setup_dram_config,
show_dram_config,
display_new_sp,
INIT_FUNC_WATCHDOG_RESET
reloc_fdt,
setup_reloc,
NULL,
};

5.3.2 重要函数说明

点击查看重要函数功能分析

接下来分析以上函数执行完以后的结果:

第 2 行:setup_mon_len 函数设置 gd 的 mon_len 成员变量,此处为__bss_end -_start,也就是整个代码的长度。 0X878A8E74 - 0x87800000 = 0XA8E74,这个就是代码长度。

第 3 行: initf_malloc 函数初始化 gd 中跟 malloc 有关的成员变量,比如 malloc_limit,此函数会设置 gd->malloc_limit = CONFIG_SYS_MALLOC_F_LEN=0X400。 malloc_limit 表示 malloc 内存池大小。

第 4 行: initf_console_record , 如 果 定 义 了 宏 CONFIG_CONSOLE_RECORD 和 宏 CONFIG_SYS_MALLOC_F_LEN 的话此函数就会调用函数 console_record_init,但是 IMX6ULL 的 uboot 没有定义宏 CONFIG_CONSOLE_RECORD,所以此函数直接返回 0。

第 5 行:arch_cpu_init 函数。

第 6 行:initf_dm 函数,驱动模型的一些初始化。

第 7 行:arch_cpu_init_dm 函数未实现。

第 8 行:mark_bootstage 函数应该是和什么标记有关的,具体没有深究过。

第 9 行: board_early_init_f 函数,板子相关的早期的一些初始化设置, I.MX6ULL 用来初始化串口的 IO 配置。

第 10 行: timer_init,初始化定时器, Cortex-A7 内核有一个定时器,这里初始化的就是 CortexA 内核的那个定时器。通过这个定时器来为 uboot 提供时间。就跟 Cortex-M 内核 Systick 定时器一样。关于 Cortex-A 内部定时器的详细内容,请参考文档《ARM ArchitectureReference Manual ARMv7-A and ARMv7-R edition》 的 Chapter B8 The Generic Timer 章节。

第 11 行: board_postclk_init,对于 I.MX6ULL 来说是设置 VDDSOC 电压。

第 12 行:get_clocks 函数用于获取一些时钟值, I.MX6ULL 获取的是 sdhc_clk 时钟,也就是 SD 卡外设的时钟。

第 13 行:env_init 函数是和环境变量有关的,设置 gd 的成员变量 env_addr,也就是环境变量的保存地址。

第 14 行:init_baud_rate 函数用于初始化波特率,根据环境变量 baudrate 来初始化 gd->baudrate。

第 15 行:serial_init,初始化串口。

第 16 行:console_init_f,设置 gd->have_console 为 1,表示有个控制台,此函数也将前面暂存在缓冲区中的数据通过控制台打印出来。

第 17 行: display_options,通过串口输出一些信息 ,如:

image-20221015165952642

第 18 行: display_text_info,打印一些文本信息,如果开启 UBOOT 的 DEBUG 功能的话就会输出 text_base、 bss_start、 bss_end,形式如下:

1
debug("U-Boot code: %08lX -> %08lX BSS: -> %08lX\n",text_base, bss_start, bss_end);

第 19 行: print_cpuinfo 函数用于打印 CPU 信息,如:

image-20221015170028569

第 20 行: show_board_info 函数用于打印板子信息,会调用 checkboard 函数,如:

image-20221015170057791

第 21 行:INIT_FUNC_WATCHDOG_INIT,初始化看门狗,对于 I.MX6ULL 来说是空函数。

第 22 行:INIT_FUNC_WATCHDOG_RESET,复位看门狗,对于 I.MX6ULL 来说是空函数。

第 23 行:init_func_i2c 函数用于初始化 I2C,初始化完成以后会输出如下信息:

image-20221015170124394

第 24 行:announce_dram_init,这个函数很简单,就是输出字符串“DRAM:”

第 26 行:dram_init,并非真正的初始化 DDR,只是设置 gd->ram_size 的值,对于正点原子 I.MX6ULL 开发板 EMMC 版本核心板来说就是 512MB。

第 27 行: post_init_f,此函数用来完成一些测试,初始化 gd->post_init_f_time。

第 29 行:testdram,测试 DRAM,空函数。

第 44 行:setup_dest_addr 函数,设置目的地址,设置 gd->ram_size, gd->ram_top, gd->relocaddr 这三个的值。

点击查看 这三个值的打印方法

接下来我们会遇到很多跟数值有关的设置,如果直接看代码分析的话就太费时间了,我们可以修改 uboot 代码,直接将这些值通过串口打印出来,比如这里我们修改文件 common/board_f.c,因为 setup_dest_addr 函数定义在文件 common/board_f.c 中,在setup_dest_addr函数输入如下图内容:

image-20221015170554062

设置好以后重新编译 uboot,然后烧写到 SD 卡中,选择 SD 卡启动,重启开发板,我们就会得到以下输出信息:
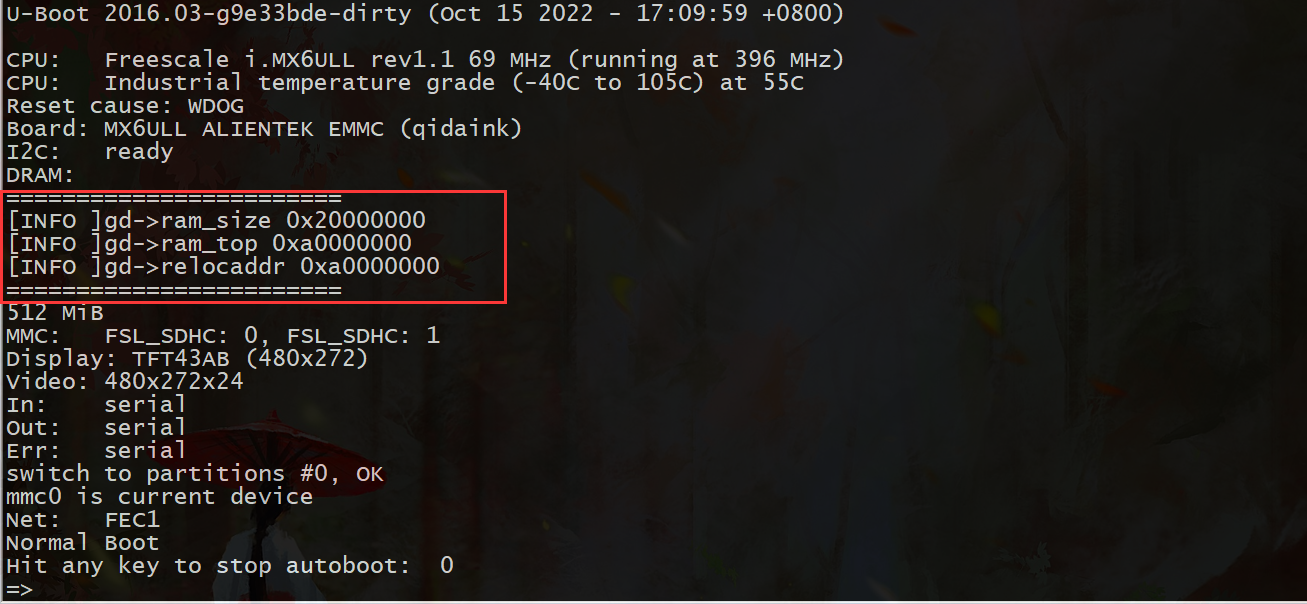
image-20221015171129255

从图中可以看出:

1
2
3
gd->ram_size = 0X20000000  //ram 大小为 0X20000000=512MB
gd->ram_top = 0XA0000000 //ram 最高地址为 0X80000000+0X20000000=0XA0000000
gd->relocaddr = 0XA0000000 //重定位后最高地址为 0XA0000000

第 45 行 :reserve_round_4k 函 数 用 于 对 gd->relocaddr 做 4KB 对 齐 , 因 为 gd->relocaddr=0XA0000000,已经是 4K 对齐了,所以调整后不变。

第 46 行:reserve_mmu,留出 MMU 的 TLB 表的位置,分配 MMU 的 TLB 表内存以后会对 gd->relocaddr 做 64K 字节对齐。对齐之后有:

1
2
3
gd->arch.tlb_size= 0X4000    //MMU 的 TLB 表大小
gd->arch.tlb_addr=0X9FFF0000 //MMU 的 TLB 表起始地址, 64KB 对齐以后
gd->relocaddr=0X9FFF0000 //relocaddr 地址

第 47 行:reserve_trace 函数,留出跟踪调试的内存, I.MX6ULL 没有用到。

第 48 行: reserve_uboot, 留出重定位后的 uboot 所占用的内存区域, uboot 所占用大小由 gd->mon_len 所指定,留出 uboot 的空间以后还要对 gd->relocaddr 做 4K 字节对齐,并且重新设置 gd->start_addr_sp 。完成之后吗,相关的变量值为:

1
2
3
gd->mon_len = 0XA8EF4
gd->start_addr_sp = 0X9FF47000
gd->relocaddr = 0X9FF47000

第 49 行:reserve_malloc,留出 malloc 区域,调整 gd->start_addr_sp 位置, malloc 区域由宏TOTAL_MALLOC_LEN 定义。调整之后,相关变量的值如下:

1
2
TOTAL_MALLOC_LEN=0X1002000
gd->start_addr_sp=0X9EF45000 //0X9FF47000-16MB-8KB=0X9EF45000
点击查看 TOTAL_MALLOC_LEN

这个宏,定义在 include/common.h 中:

1
#define	TOTAL_MALLOC_LEN	(CONFIG_SYS_MALLOC_LEN + CONFIG_ENV_SIZE)

在 include/configs/mx6ull_alientek_emmc.h 文件中定义宏 CONFIG_SYS_MALLOC_LEN 和 CONFIG_ENV_SIZE:

1
2
3
4
#define CONFIG_ENV_SIZE			SZ_8K

/* Size of malloc() pool */
#define CONFIG_SYS_MALLOC_LEN (16 * SZ_1M) /* malloc 内存池大小,这里设置为 16MB */

所以宏 CONFIG_SYS_MALLOC_LEN 为 16MB = 0X1000000,宏 CONFIG_ENV_SIZE = 8KB = 0X2000,因此TOTAL_MALLOC_LEN = 0X1002000。

第 50 行:reserve_board 函数,留出板子 bd 所占的内存区, bd 是结构体 bd_t, bd_t 大小为 80 字节 。此时相关变量的值如下:

1
2
gd->start_addr_sp=0X9EF44FB0
gd->bd=0X9EF44FB0

第 51 行: setup_machine,设置机器 ID, linux 启动的时候会和这个机器 ID 匹配,如果匹配的话 linux 就会启动正常。但是 I.MX6ULL 不用这种方式了,这是以前老版本的 uboot 和 linux 使用的,新版本使用设备树了,因此此函数无效。

第 52 行:reserve_global_data 函数,保留出 gd_t 的内存区域, gd_t 结构体大小为 248B。相关变量的值如下:

1
2
gd->start_addr_sp=0X9EF44EB8 //0X9EF44FB0-248=0X9EF44EB8
gd->new_gd=0X9EF44EB8

第 53 行:reserve_fdt,留出设备树相关的内存区域, I.MX6ULL 的 uboot 没有用到,因此此函数无效。

第 54 行:reserve_arch 是个空函数。

第 55 行: reserve_stacks,留出栈空间,先对 gd->start_addr_sp 减去 16,然后做 16 字节对齐。如果使能 IRQ 的话还要留出 IRQ 相应的内存,具体工作是由 arch/arm/lib/stack.c 文件中的函数 arch_reserve_stacks 完成。在我们使用的这个 uboot 中并没有使用到 IRQ,所以不会留出 IRQ 相应的内存区域,此时gd->start_addr_sp 的值如下:

1
gd->start_addr_sp=0X9EF44E90

第 56 行: setup_dram_config 函数设置 dram 信息,就是设置 gd->bd->bi_dram[0].start 和 gd->bd->bi_dram[0].size,后面会传递给 linux 内核,告诉 linux DRAM 的起始地址和大小。我们可以在该函数中打印一下这几个变量,结果应该是下边这样:

1
2
gd->bd->bi_dram[0].start = 0x80000000
gd->bd->bi_dram[0].size = 0x20000000

第 57 行, show_dram_config 函数,用于显示 DRAM 的配置 ,如:

image-20221015203536954

第 58 行:display_new_sp 函数,显示新的 sp 位置,也就是 gd->start_addr_sp,不过要定义宏 DEBUG 。

第 60 行:reloc_fdt 函数用于重定位 fdt,没有用到。

第 61 行: setup_reloc,设置 gd 的其他一些成员变量,供后面重定位的时候使用,并且将以前的 gd 拷贝到 gd->new_gd 处。需要使能 DEBUG 才能看到相应的信息输出 。这里我们要是打印这些信息的话,会发现uboot 重定位后的偏移为 0X18747000,重定位后的新地址为0X9FF4700,新的 gd 首地址为 0X9EF44EB8,最终的 sp 为 0X9EF44E90。
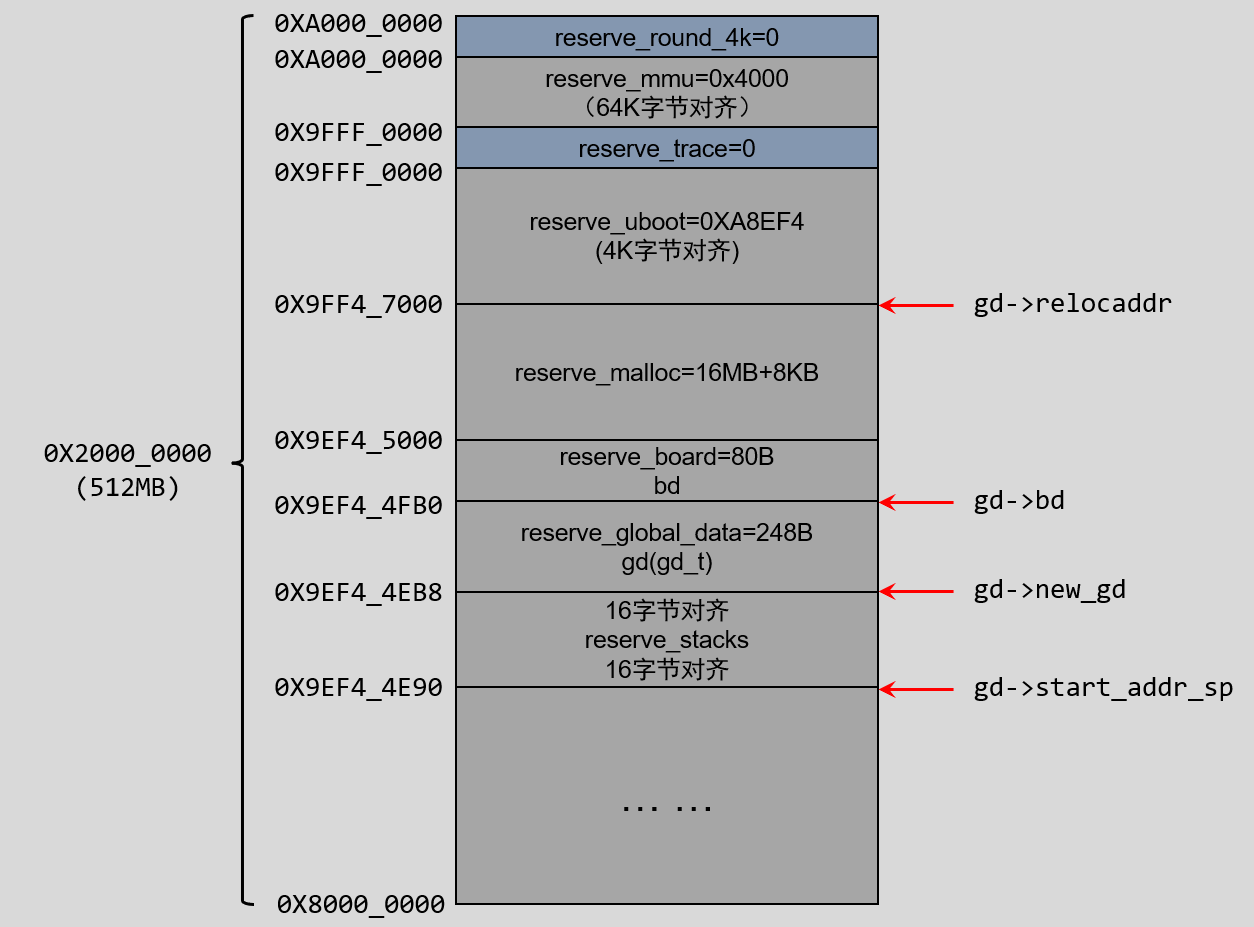
5.3.3 最终内存分配

经过上边的一系列函数的执行,最终的内存分配如下图所示:

image-20221015210430581

6. relocate_code 函数

6.1 relocate_code 函数在哪里?

上边我们分析 _main 函数的时候,它调用这个函数,relocate_code 函数是用于代码拷贝的,它定义在 uboot 源码中的这个文件中:

1
arch/arm/lib/relocate.S

我们打开这个文件,可以看到如下代码:

1
2
3
4
5
6
7
8
9
10
11
12
13
14
15
16
17
18
19
20
21
22
23
24
25
26
27
28
29
30
31
32
33
34
35
36
37
38
39
40
41
42
43
44
45
46
47
48
49
50
51
52
53
54
55
56
57
58
59
60
61
62
63
64
/*
* void relocate_code(addr_moni)
*
* This function relocates the monitor code.
*
* NOTE:
* To prevent the code below from containing references with an R_ARM_ABS32
* relocation record type, we never refer to linker-defined symbols directly.
* Instead, we declare literals which contain their relative location with
* respect to relocate_code, and at run time, add relocate_code back to them.
*/

ENTRY(relocate_code)
ldr r1, =__image_copy_start /* r1 <- SRC &__image_copy_start */
subs r4, r0, r1 /* r4 <- relocation offset */
beq relocate_done /* skip relocation */
ldr r2, =__image_copy_end /* r2 <- SRC &__image_copy_end */

copy_loop:
ldmia r1!, {r10-r11} /* copy from source address [r1] */
stmia r0!, {r10-r11} /* copy to target address [r0] */
cmp r1, r2 /* until source end address [r2] */
blo copy_loop

/*
* fix .rel.dyn relocations
*/
ldr r2, =__rel_dyn_start /* r2 <- SRC &__rel_dyn_start */
ldr r3, =__rel_dyn_end /* r3 <- SRC &__rel_dyn_end */
fixloop:
ldmia r2!, {r0-r1} /* (r0,r1) <- (SRC location,fixup) */
and r1, r1, #0xff
cmp r1, #23 /* relative fixup? */
bne fixnext

/* relative fix: increase location by offset */
add r0, r0, r4
ldr r1, [r0]
add r1, r1, r4
str r1, [r0]
fixnext:
cmp r2, r3
blo fixloop

relocate_done:

#ifdef __XSCALE__
/*
* On xscale, icache must be invalidated and write buffers drained,
* even with cache disabled - 4.2.7 of xscale core developer's manual
*/
mcr p15, 0, r0, c7, c7, 0 /* invalidate icache */
mcr p15, 0, r0, c7, c10, 4 /* drain write buffer */
#endif

/* ARMv4- don't know bx lr but the assembler fails to see that */

#ifdef __ARM_ARCH_4__
mov pc, lr
#else
bx lr
#endif

ENDPROC(relocate_code)

6.2 做了什么?

我们的分析按下边的行号进行:

1
2
3
4
5
6
7
8
9
10
11
12
13
14
15
16
17
18
19
20
21
22
23
24
25
26
27
28
29
30
31
32
33
34
35
36
37
38
39
40
41
42
43
44
45
46
47
48
49
50
51
52
ENTRY(relocate_code)
ldr r1, =__image_copy_start /* r1 <- SRC &__image_copy_start */
subs r4, r0, r1 /* r4 <- relocation offset */
beq relocate_done /* skip relocation */
ldr r2, =__image_copy_end /* r2 <- SRC &__image_copy_end */

copy_loop:
ldmia r1!, {r10-r11} /* copy from source address [r1] */
stmia r0!, {r10-r11} /* copy to target address [r0] */
cmp r1, r2 /* until source end address [r2] */
blo copy_loop

/*
* fix .rel.dyn relocations
*/
ldr r2, =__rel_dyn_start /* r2 <- SRC &__rel_dyn_start */
ldr r3, =__rel_dyn_end /* r3 <- SRC &__rel_dyn_end */
fixloop:
ldmia r2!, {r0-r1} /* (r0,r1) <- (SRC location,fixup) */
and r1, r1, #0xff
cmp r1, #23 /* relative fixup? */
bne fixnext

/* relative fix: increase location by offset */
add r0, r0, r4
ldr r1, [r0]
add r1, r1, r4
str r1, [r0]
fixnext:
cmp r2, r3
blo fixloop

relocate_done:

#ifdef __XSCALE__
/*
* On xscale, icache must be invalidated and write buffers drained,
* even with cache disabled - 4.2.7 of xscale core developer's manual
*/
mcr p15, 0, r0, c7, c7, 0 /* invalidate icache */
mcr p15, 0, r0, c7, c10, 4 /* drain write buffer */
#endif

/* ARMv4- don't know bx lr but the assembler fails to see that */

#ifdef __ARM_ARCH_4__
mov pc, lr
#else
bx lr
#endif

ENDPROC(relocate_code)

第 2 行(第 80 行):r1=__image_copy_start,也就是 r1 寄存器保存源地址,从第一节中的表一-3-1可知 __image_copy_start = 0X87800000。

第 3 行(第 81 行):r0=0X9FF47000,这个地址就是 uboot 拷贝的目标首地址。 r4 = r0-r1 = 0X9FF47000 - 0X87800000 = 0X18747000,因此 r4 保存偏移量。

第 4 行(第 82 行):如果在第 3 行(第 81 行)中, r0-r1 等于 0,说明 r0 和 r1 相等,也就是源地址和目的地址是一样的,那肯定就不需要拷贝了,直接执行 relocate_done 函数。

第 5 行(第 83 行):r2=__image_copy_end, r2 中保存拷贝之前的代码结束地址,由表一-3-1可知,__image_copy_end = 0x8785dd54。

第 6 行(第 84 行):函数 copy_loop 完成代码拷贝工作!从 r1,也就是__image_copy_start 开始,读取 uboot 代码保存到 r10 和 r11 中,一次就只拷贝这 2 个 32 位的数据。拷贝完成以后 r1 的值会更新,保存下一个要拷贝的数据地址。

第 9 行(第 87 行):将 r10 和 r11 的数据写到 r0 开始的地方,也就是目的地址。写完以后 r0 的值会更新,更新为下一个要写入的数据地址。

第 10 行(第 88 行):比较 r1 是否和 r2 相等,也就是检查是否拷贝完成,如果不相等的话说明没有拷贝完成, 没有拷贝完成的话就跳转到 copy_loop 接着拷贝,直至拷贝完成。

第 16 ~ 31 行(第 94 ~ 109 行):是重定位 .rel.dyn 段, .rel.dyn 段是存放 .text 段中需要重定位地址的集合。重定位就是 uboot 将自身拷贝到 DRAM 的另一个地方去继续运行(DRAM 的高地址处)。 我们知道,一个可执行的 bin 文件,其链接地址和运行地址要相等,也就是链接到哪个地址,在运行之前就要拷贝到哪个地址去。现在我们重定位以后,运行地址就和链接地址不同了,这样寻址的时候不会出问题吗?这个问题这里我就没有继续深入追究了,有兴趣的话可以看正点原子的驱动开发手册,里边有很详细的说明。

7. relocate_vectors函数

7.1 relocate_vectors 函数在哪里?

上边我们分析 _main 函数的时候,它调用这个函数,relocate_vectors 函数用于重定位向量表,它定义在 uboot 源码中的这个文件中:

1
arch/arm/lib/relocate.S

我们打开这个文件,可以看到如下代码:

1
2
3
4
5
6
7
8
9
10
11
12
13
14
15
16
17
18
19
20
21
22
23
24
25
26
27
28
29
30
31
32
33
34
35
36
37
38
39
ENTRY(relocate_vectors)

#ifdef CONFIG_CPU_V7M
/*
* On ARMv7-M we only have to write the new vector address
* to VTOR register.
*/
ldr r0, [r9, #GD_RELOCADDR] /* r0 = gd->relocaddr */
ldr r1, =V7M_SCB_BASE
str r0, [r1, V7M_SCB_VTOR]
#else
#ifdef CONFIG_HAS_VBAR
/*
* If the ARM processor has the security extensions,
* use VBAR to relocate the exception vectors.
*/
ldr r0, [r9, #GD_RELOCADDR] /* r0 = gd->relocaddr */
mcr p15, 0, r0, c12, c0, 0 /* Set VBAR */
#else
/*
* Copy the relocated exception vectors to the
* correct address
* CP15 c1 V bit gives us the location of the vectors:
* 0x00000000 or 0xFFFF0000.
*/
ldr r0, [r9, #GD_RELOCADDR] /* r0 = gd->relocaddr */
mrc p15, 0, r2, c1, c0, 0 /* V bit (bit[13]) in CP15 c1 */
ands r2, r2, #(1 << 13)
ldreq r1, =0x00000000 /* If V=0 */
ldrne r1, =0xFFFF0000 /* If V=1 */
ldmia r0!, {r2-r8,r10}
stmia r1!, {r2-r8,r10}
ldmia r0!, {r2-r8,r10}
stmia r1!, {r2-r8,r10}
#endif
#endif
bx lr

ENDPROC(relocate_vectors)

7.2 做了什么?

我们的分析按下边的行号进行:

1
2
3
4
5
6
7
8
9
10
11
12
13
14
15
16
17
18
19
20
21
22
23
24
25
26
27
28
29
30
31
32
33
34
35
36
37
38
39
ENTRY(relocate_vectors)

#ifdef CONFIG_CPU_V7M
/*
* On ARMv7-M we only have to write the new vector address
* to VTOR register.
*/
ldr r0, [r9, #GD_RELOCADDR] /* r0 = gd->relocaddr */
ldr r1, =V7M_SCB_BASE
str r0, [r1, V7M_SCB_VTOR]
#else
#ifdef CONFIG_HAS_VBAR
/*
* If the ARM processor has the security extensions,
* use VBAR to relocate the exception vectors.
*/
ldr r0, [r9, #GD_RELOCADDR] /* r0 = gd->relocaddr */
mcr p15, 0, r0, c12, c0, 0 /* Set VBAR */
#else
/*
* Copy the relocated exception vectors to the
* correct address
* CP15 c1 V bit gives us the location of the vectors:
* 0x00000000 or 0xFFFF0000.
*/
ldr r0, [r9, #GD_RELOCADDR] /* r0 = gd->relocaddr */
mrc p15, 0, r2, c1, c0, 0 /* V bit (bit[13]) in CP15 c1 */
ands r2, r2, #(1 << 13)
ldreq r1, =0x00000000 /* If V=0 */
ldrne r1, =0xFFFF0000 /* If V=1 */
ldmia r0!, {r2-r8,r10}
stmia r1!, {r2-r8,r10}
ldmia r0!, {r2-r8,r10}
stmia r1!, {r2-r8,r10}
#endif
#endif
bx lr

ENDPROC(relocate_vectors)

第 3 行(第 29 行):如果定义了 CONFIG_CPU_V7M 的话就执行第 4 ~ 10 行(第 30 ~ 36 行)的代码,这是 Cortex-M 内核单片机执行的语句,因此对于 I.MX6ULL 来说是无效的。

第 12 行(第 38 行):如果定义了 CONFIG_HAS_VBAR 的话就执行此语句,这个是向量表偏移, CortexA7 是支持向量表偏移的。而且,在.config 里面定义了 CONFIG_HAS_VBAR,因此会执行这个分支。

第 17 行(第 43 行):r0=gd->relocaddr,也就是重定位后 uboot 的首地址,向量表肯定是从这个地址开始存放的。

第 18 行(第 44 行):将 r0 的值写入到 CP15 的 VBAR 寄存器中,也就是将新的向量表首地址写入到寄存器 VBAR 中,设置向量表偏移。

8. board_init_r 函数

8.1 board_init_r 函数在哪里?

上边我们分析 _main 函数的时候,它调用这个函数,前边我们了解了 board_init_f 函数,在此函数里面会调用一系列的函数来初始化一些外设和 gd 的成员变量。但是 board_init_f 并没有初始化所有的外设,还需要做一些后续工作,这些后续工作就是由函数 board_init_r 来完成的 它定义在 uboot 源码中的这个文件中:

1
common/board_r.c

我们打开这个文件,可以看到如下代码:

1
2
3
4
5
6
7
8
9
10
11
12
13
14
15
16
17
18
19
20
21
22
23
24
25
void board_init_r(gd_t *new_gd, ulong dest_addr)
{
#ifdef CONFIG_NEEDS_MANUAL_RELOC
int i;
#endif

#ifdef CONFIG_AVR32
mmu_init_r(dest_addr);
#endif

#if !defined(CONFIG_X86) && !defined(CONFIG_ARM) && !defined(CONFIG_ARM64)
gd = new_gd;
#endif

#ifdef CONFIG_NEEDS_MANUAL_RELOC
for (i = 0; i < ARRAY_SIZE(init_sequence_r); i++)
init_sequence_r[i] += gd->reloc_off;
#endif

if (initcall_run_list(init_sequence_r))
hang();

/* NOTREACHED - run_main_loop() does not return */
hang();
}

8.2 做了什么?

我们的分析按下边的行号进行:

1
2
3
4
5
6
7
8
9
10
11
12
13
14
15
16
17
18
19
20
21
22
23
24
25
void board_init_r(gd_t *new_gd, ulong dest_addr)
{
#ifdef CONFIG_NEEDS_MANUAL_RELOC
int i;
#endif

#ifdef CONFIG_AVR32
mmu_init_r(dest_addr);
#endif

#if !defined(CONFIG_X86) && !defined(CONFIG_ARM) && !defined(CONFIG_ARM64)
gd = new_gd;
#endif

#ifdef CONFIG_NEEDS_MANUAL_RELOC
for (i = 0; i < ARRAY_SIZE(init_sequence_r); i++)
init_sequence_r[i] += gd->reloc_off;
#endif

if (initcall_run_list(init_sequence_r))
hang();

/* NOTREACHED - run_main_loop() does not return */
hang();
}

第 20 行(第 1010 行):调用 initcall_run_list 函数来执行初始化序列 init_sequence_r, init_sequence_r 是一个函数集合,init_sequence_r 也定义在文件 common/board_r.c 中,我们下一小节详细学习。

8.3 init_sequence_r 

8.3.1 数组成员

点击查看 init_sequence_r

init_sequence_r 也定义在文件 common/board_r.c 中,由于 init_sequence_f 的内容比较长,里面有大量的条件编译代码,这里将条件编译部分删除掉了,去掉条件编译以后的 init_sequence_r 定义如下:

1
2
3
4
5
6
7
8
9
10
11
12
13
14
15
16
17
18
19
20
21
22
23
24
25
26
27
28
29
30
31
32
33
34
35
36
37
38
39
40
41
init_fnc_t init_sequence_r[] = {
initr_trace,
initr_reloc,
initr_caches,
initr_reloc_global_data,
initr_barrier,
initr_malloc,
initr_console_record,
bootstage_relocate,
initr_bootstage,
board_init, /* Setup chipselects */
stdio_init_tables,
initr_serial,
initr_announce,
INIT_FUNC_WATCHDOG_RESET
power_init_board,
initr_flash,
INIT_FUNC_WATCHDOG_RESET
initr_nand,
initr_mmc,
initr_env,
INIT_FUNC_WATCHDOG_RESET
initr_secondary_cpu,
INIT_FUNC_WATCHDOG_RESET
stdio_add_devices,
initr_jumptable,
console_init_r, /* fully init console as a device */
INIT_FUNC_WATCHDOG_RESET
interrupt_init,
initr_enable_interrupts,
initr_ethaddr,
board_late_init,
INIT_FUNC_WATCHDOG_RESET
initr_net,
INIT_FUNC_WATCHDOG_RESET
run_main_loop,
};

8.3.2 重要函数说明

点击查看重要函数功能分析

第 2 行:initr_trace 函数,如果定义了宏 CONFIG_TRACE 的话就会调用函数 trace_init,初始化和调试跟踪有关的内容。

第 3 行:initr_reloc 函数用于设置 gd->flags,标记重定位完成。

第 4 行:initr_caches 函数用于初始化 cache,使能 cache。

第 5 行:initr_reloc_global_data 函数,初始化重定位后 gd 的一些成员变量。

第 6 行:initr_barrier 函数, I.MX6ULL 未用到。

第 7 行:initr_malloc 函数,初始化 malloc。

第 8 行:initr_console_record 函数,初始化控制台相关的内容, I.MX6ULL 未用到,空函数。

第 9 行: bootstage_relocate 函数,启动状态重定位。

第 10 行:initr_bootstage 函数,初始化 bootstage 什么的。

第 11 行:board_init 函数,板级初始化,包括 74XX 芯片, I2C、 FEC、 USB 和 QSPI 等。这里执行的是 mx6ull_alientek_emmc.c 文件中的 board_init 函数。

第 12 行:stdio_init_tables 函数, stdio 相关初始化。

第 13 行:initr_serial 函数,初始化串口。

第 14 行:initr_announce 函数,与调试有关,通知已经在 RAM 中运行。

第 18 行:power_init_board 函数,初始化电源芯片,正点原子的 I.MX6ULL 开发板没有用到。

第 19 行:initr_flash 函数,对于 I.MX6ULL 而言,没有定义宏 CONFIG_SYS_NO_FLASH的话函数 initr_flash 才有效。但是 mx6_common.h 中定义了宏 CONFIG_SYS_NO_FLASH,所以此函数无效。

第 21 行:initr_nand 函数,初始化 NAND,如果使用 NAND 版本核心板的话就会初始化NAND。

第 22 行:initr_mmc 函数,初始化 EMMC,如果使用 EMMC 版本核心板的话就会初始化EMMC,串口输出如下图所示信息:

image-20221016083509867

第 23 行:initr_env 函数,初始化环境变量。

第 25 行:initr_secondary_cpu 函数,初始化其他 CPU 核, I.MX6ULL 只有一个核,所以此函数没用。

第 27 行:stdio_add_devices 函数,各种输入输出设备的初始化,如 LCD driver, I.MX6ULL 使用 drv_video_init 函数初始化 LCD。会输出如图所示信息:

image-20221016083629656

第 28 行:initr_jumptable 函数,初始化跳转表。

第 29 行:console_init_r 函数,控制台初始化,初始化完成以后此函数会调用 stdio_print_current_devices 函数来打印出当前的控制台设备,如图所示:

image-20221016083741446

第 31 行:interrupt_init 函数,初始化中断。

第 32 行:initr_enable_interrupts 函数,使能中断。

第 33 行:initr_ethaddr 函数,初始化网络地址,也就是获取 MAC 地址。读取环境变量“ethaddr”的值。

第 34 行, board_late_init 函数,板子后续初始化,此函数定义在文件 mx6ull_alientek_emmc.c 中,如果环境变量存储在 EMMC 或者 SD 卡中的话,此函数会调用 board_late_mmc_env_init 函数初始化 EMMC/SD。会切换到正在时候用的 emmc 设备。

点击查看 board_late_mmc_env_init

这个函数出现在uboot源码的这个文件中:

1
2
board/freescale/mx6ull_alientek_emmc/mx6ull_alientek_emmc.c # 在该文件被调用
board/freescale/common/mmc.c # 在该文件中定义

函数定义如下:

1
2
3
4
5
6
7
8
9
10
11
12
13
14
15
16
17
18
19
void board_late_mmc_env_init(void)
{
char cmd[32];
char mmcblk[32];
u32 dev_no = mmc_get_env_dev();

if (!check_mmc_autodetect())
return;

setenv_ulong("mmcdev", dev_no);

/* Set mmcblk env */
sprintf(mmcblk, "/dev/mmcblk%dp2 rootwait rw",
mmc_map_to_kernel_blk(dev_no));
setenv("mmcroot", mmcblk);

sprintf(cmd, "mmc dev %d", dev_no);
run_command(cmd, 0);
}

第 17 ~ 18 行(第 46 ~ 47 行)就是运行“mmc dev xx”命令,用于切换到正在使用的EMMC 设备,串口输出信息如图所示:

image-20221016084737899

第 38 行:initr_net 函数,用于初始化网络设备,函数的调用顺序为:initr_net→eth_initialize→board_eth_init() ,最终在串口上会输出如下信息:

image-20221016084922548

第 40 行, run_main_loop 函数(后边再详细说明),主循环,处理命令。

9. run_main_loop 函数

前边我们分析到了 board_init_r 函数,在此函数中又会调用到 run_main_loop 函数,接下来我们来了解一下这个函数的功能。

uboot 启动以后会进入 bootdelay 秒倒计时,如果在 bootdelay 秒倒计时结束之前按下按下回车键,那么就会进入 uboot 的命令模式,如果倒计时结束以后都没有按下回车键,那么就会自动启动 Linux 内核,这个功能就是由 run_main_loop 函数来完成的。

9.1 run_main_loop 函数在哪?

run_main_loop 函数定义在uboot 源码的这个文件中:

1
common/board_r.c

函数内容如下:

1
2
3
4
5
6
7
8
9
10
static int run_main_loop(void)
{
#ifdef CONFIG_SANDBOX
sandbox_main_loop_init();
#endif
/* main_loop() can return to retry autoboot, if so just run it again */
for (;;)
main_loop();
return 0;
}

9.2 做了什么?

9.2.1 run_main_loop函数定义

我们按照下边的行号分析:

1
2
3
4
5
6
7
8
9
10
static int run_main_loop(void)
{
#ifdef CONFIG_SANDBOX
sandbox_main_loop_init();
#endif
/* main_loop() can return to retry autoboot, if so just run it again */
for (;;)
main_loop();
return 0;
}

第 7 行 和第 8 行(第 759 行和第 760 行)是个死循环,“for(;;)”和“while(1)”功能一样,死循环里面就一个 main_loop 函数 。

9.2.2 main_loop 函数

这个函数定义在 common/main.c 中,函数内容如下:

1
2
3
4
5
6
7
8
9
10
11
12
13
14
15
16
17
18
19
20
21
22
23
24
25
26
27
28
29
30
31
32
33
/* We come here after U-Boot is initialised and ready to process commands */
void main_loop(void)
{
const char *s;

bootstage_mark_name(BOOTSTAGE_ID_MAIN_LOOP, "main_loop");

#ifndef CONFIG_SYS_GENERIC_BOARD
puts("Warning: Your board does not use generic board. Please read\n");
puts("doc/README.generic-board and take action. Boards not\n");
puts("upgraded by the late 2014 may break or be removed.\n");
#endif

#ifdef CONFIG_VERSION_VARIABLE
setenv("ver", version_string); /* set version variable */
#endif /* CONFIG_VERSION_VARIABLE */

cli_init();

run_preboot_environment_command();

#if defined(CONFIG_UPDATE_TFTP)
update_tftp(0UL, NULL, NULL);
#endif /* CONFIG_UPDATE_TFTP */

s = bootdelay_process();
if (cli_process_fdt(&s))
cli_secure_boot_cmd(s);

autoboot_command(s);

cli_loop();
}

第 6 行(第 48 行):调用 bootstage_mark_name 函数,打印出启动进度。

第 15 行(第 57 行):如果定义了宏 CONFIG_VERSION_VARIABLE 的话就会执行函数 setenv,将变量 ver 的值设置为 version_string,也就是设置版本号环境变量。

点击查看 version_string

version_string 定义在文件 cmd/version.c 中,定义如下:

1
const char __weak version_string[] = U_BOOT_VERSION_STRING;

其中U_BOOT_VERSION_STRING 是个宏, 定义在文件 include/version.h:

1
2
#define U_BOOT_VERSION_STRING U_BOOT_VERSION " (" U_BOOT_DATE " - " \
U_BOOT_TIME " " U_BOOT_TZ ")" CONFIG_IDENT_STRING

U_BOOT_VERSION 定义在文件 include/generated/version_autogenerated.h 中:

1
2
3
4
#define PLAIN_VERSION "2016.03-g9e33bde-dirty"
#define U_BOOT_VERSION "U-Boot " PLAIN_VERSION
#define CC_VERSION_STRING "arm-linux-gnueabihf-gcc (Linaro GCC 4.9-2017.01) 4.9.4"
#define LD_VERSION_STRING "GNU ld (Linaro_Binutils-2017.01) 2.24.0.20141017 Linaro 2014_11-3-git"

可以看出, U_BOOT_VERSION 为“U-boot 2016.03”,U_BOOT_DATE 、 U_BOOT_TIME 和 U_BOOT_TZ 定义在 include/generated/timestamp_autogenerated.h 文件中,内容如下:

1
2
3
4
#define U_BOOT_DATE "Oct 15 2022"
#define U_BOOT_TIME "17:13:29"
#define U_BOOT_TZ "+0800"
#define U_BOOT_DMI_DATE "10/15/2022"

宏 CONFIG_IDENT_STRING 为空,所以 U_BOOT_VERSION_STRING 为“U-Boot 2016.03(Oct 15 2022 - 17:13:29 +0800)”,进入 uboot 命令模式,输入命令“version”查看版本号,如图:

image-20221016100037636

第 18 行(第 60 行):cli_init 函数,跟命令初始化有关,初始化 hush shell 相关的变量。

第 20 行(第 62 行):run_preboot_environment_command 函数,获取环境变量 perboot 的内容, perboot 是一些预启动命令,一般不使用这个环境变量。

第 26 行(第 68 行):bootdelay_process 函数,此函数会读取环境变量 bootdelay 和 bootcmd 的内容,然后将 bootdelay 的值赋值给全局变量 stored_bootdelay,返回值为环境变量 bootcmd 的值。

第 27 行(第 69 行):如果定义了 CONFIG_OF_CONTROL 的话函数 cli_process_fdt 就会实现,如果没有定义 CONFIG_OF_CONTROL 的话函数 cli_process_fdt 直接返回一个 false。在我们使用的 uboot 中没有定义 CONFIG_OF_CONTROL,因此 cli_process_fdt 函数返回值为 false。

第 30 行(第 72 行):autoboot_command 函数,此函数就是检查倒计时是否结束,倒计时结束之前有没有被打断。

点击查看 autoboot_command

此函数定义在文件 common/autoboot.c 中,内容如下:

1
2
3
4
5
6
7
8
9
10
11
12
13
14
15
16
17
18
19
20
21
22
23
24
void autoboot_command(const char *s)
{
debug("### main_loop: bootcmd=\"%s\"\n", s ? s : "<UNDEFINED>");

if (stored_bootdelay != -1 && s && !abortboot(stored_bootdelay)) {
#if defined(CONFIG_AUTOBOOT_KEYED) && !defined(CONFIG_AUTOBOOT_KEYED_CTRLC)
int prev = disable_ctrlc(1); /* disable Control C checking */
#endif

run_command_list(s, -1, 0);

#if defined(CONFIG_AUTOBOOT_KEYED) && !defined(CONFIG_AUTOBOOT_KEYED_CTRLC)
disable_ctrlc(prev); /* restore Control C checking */
#endif
}

#ifdef CONFIG_MENUKEY
if (menukey == CONFIG_MENUKEY) {
s = getenv("menucmd");
if (s)
run_command_list(s, -1, 0);
}
#endif /* CONFIG_MENUKEY */
}

autoboot_command 函数里面有很多条件编译,宏CONFIG_AUTOBOOT_KEYED 、 CONFIG_AUTOBOOT_KEYED_CTRLC 和
CONFIG_MENUKEY 这三个宏在 I.MX6ULL 里面没有定义,去掉条件编译得到如下代码:

1
2
3
4
5
6
7
void autoboot_command(const char *s)
{
if (stored_bootdelay != -1 && s && !abortboot(stored_bootdelay))
{
run_command_list(s, -1, 0);
}
}

可以看到,当以下三条全部成立的话,就会执行函数 run_command_list :

(1)stored_bootdelay 不等于 -1 。

(2)s 不为空。

(3)函数 abortboot 返回值为 0。

stored_bootdelay 等于环境变量 bootdelay 的值; s 是环境变量 bootcmd 的值,一般不为空,因此前两个成立,就剩下了函数 abortboot 的返回值 ,如果倒计时自然结束那么就执行函数 run_command_list,此函数会执行参数 s 指定的一系列命令,也就是环境变量 bootcmd 的命令,bootcmd 里面保存着默认的启动命令,因此 linux 内核启动!这个就是 uboot 中倒计时结束以后自动启动 linux 内核的原理。如果倒计时结束之前按下了键盘上的按键,那么 run_command_list 函数就不会执行,相当于 autoboot_command 是个空函数。

点击查看 abortboot 函数

abortboot 函数 也 定 义 在 文 件 common/autoboot.c 中:

1
2
3
4
5
6
7
8
static int abortboot(int bootdelay)
{
#ifdef CONFIG_AUTOBOOT_KEYED
return abortboot_keyed(bootdelay);
#else
return abortboot_normal(bootdelay);
#endif
}

因为宏 CONFIG_AUTOBOOT_KEYE 未定义,因此执行函数 abortboot_normal ,此函数也定义在文件 common/autoboot.c 中,内容
如下:

1
2
3
4
5
6
7
8
9
10
11
12
13
14
15
16
17
18
19
20
21
22
23
24
25
26
27
28
29
30
31
32
33
34
35
36
37
38
39
40
41
42
43
44
45
46
47
48
49
50
51
52
53
54
55
56
static int abortboot_normal(int bootdelay)
{
int abort = 0;
unsigned long ts;

#ifdef CONFIG_MENUPROMPT
printf(CONFIG_MENUPROMPT);
#else
if (bootdelay >= 0)
printf("Hit any key to stop autoboot: %2d ", bootdelay);
#endif

#if defined CONFIG_ZERO_BOOTDELAY_CHECK
/*
* Check if key already pressed
* Don't check if bootdelay < 0
*/
if (bootdelay >= 0) {
if (tstc()) { /* we got a key press */
(void) getc(); /* consume input */
puts("\b\b\b 0");
abort = 1; /* don't auto boot */
}
}
#endif

while ((bootdelay > 0) && (!abort)) {
--bootdelay;
/* delay 1000 ms */
ts = get_timer(0);
do {
if (tstc()) { /* we got a key press */
abort = 1; /* don't auto boot */
bootdelay = 0; /* no more delay */
# ifdef CONFIG_MENUKEY
menukey = getc();
# else
(void) getc(); /* consume input */
# endif
break;
}
udelay(10000);
} while (!abort && get_timer(ts) < 1000);

printf("\b\b\b%2d ", bootdelay);
}

putc('\n');

#ifdef CONFIG_SILENT_CONSOLE
if (abort)
gd->flags &= ~GD_FLG_SILENT;
#endif

return abort;
}

函数 abortboot_normal 同样很多条件编译,删除掉条件编译相关代码后 abortboot_normal 函数内容如下:

1
2
3
4
5
6
7
8
9
10
11
12
13
14
15
16
17
18
19
20
21
22
23
24
25
26
27
28
29
30
31
static int abortboot_normal(int bootdelay)
{
int abort = 0;
unsigned long ts;

if (bootdelay >= 0)
printf("Hit any key to stop autoboot: %2d ", bootdelay);

while ((bootdelay > 0) && (!abort))
{
--bootdelay;
/* delay 1000 ms */
ts = get_timer(0);
do
{
if (tstc()) /* we got a key press */
{
abort = 1; /* don't auto boot */
bootdelay = 0; /* no more delay */
(void) getc(); /* consume input */
break;
}
udelay(10000);
}
while (!abort && get_timer(ts) < 1000);

printf("\b\b\b%2d ", bootdelay);
}
putc('\n');
return abort;
}

第 3 行:变量 abort 是函数 abortboot_normal 的返回值,默认值为 0。

第 7 行:通过串口输出“Hit any key to stop autoboot”字样,如图:

image-20221016101203235

第 9 ~ 25 行:是倒计时的具体实现。其中的第 16 行判断键盘是否有按下,也就是是否打断了倒计时,如果键盘按下的话就执行相应的
分支。比如设置 abort 为 1,设置 bootdelay 为 0 等,最后跳出倒计时循环。

第 30 行,返回 abort 的值,如果倒计时自然结束,没有被打断 abort 就为 0,否则的话 abort的值就为 1。

第 32 行(第 74 行):如果倒计时结束之前按下按键,那么就会执行cli_loop 函数,这个就是命令处理函数,负责接收好处理输入的命令。

10. cli_loop 函数

前边我们分析到,当执行run_main_loop 函数,倒计时结束前按下按键,会执行 cli_loop,接下来就来了解一下这个函数。

10.1 cli_loop 函数在哪?

cli_loop 函数是 uboot 的命令行处理函数,最终是调用到 cmd_process 函数来处理命令。我们在 uboot 中输入各种命令,进行各种操作就是 cli_loop 来处理的,此函数定义在uboot源码这个文件中 :

1
common/cli.c

我们打开这个文件,可以看到函数内容如下:

1
2
3
4
5
6
7
8
9
10
void cli_loop(void)
{
#ifdef CONFIG_SYS_HUSH_PARSER
parse_file_outer();
/* This point is never reached */
for (;;);
#else
cli_simple_loop();
#endif /*CONFIG_SYS_HUSH_PARSER*/
}

10.2 做了什么?

10.2.1 cli_loop

我们按照下边的行号分析:

1
2
3
4
5
6
7
8
9
10
void cli_loop(void)
{
#ifdef CONFIG_SYS_HUSH_PARSER
parse_file_outer();
/* This point is never reached */
for (;;);
#else
cli_simple_loop();
#endif /*CONFIG_SYS_HUSH_PARSER*/
}

在文件 include/configs/mx6_common.h 中有定义宏 CONFIG_SYS_HUSH_PARSER,而正点原子的 I.MX6ULL 开发板配置头文件 mx6ullevk.h 里面会引用 mx_common.h 这个头文件,因此宏 CONFIG_SYS_HUSH_PARSER 有定义。

第 4 行(第 205 行):调用函数 parse_file_outer(10.2.2中分析)。

第 6 行(第 207 行)是个死循环,永远不会执行到这里。

10.2.2 parse_file_outer 函数

函数 parse_file_outer 定义在文件 common/cli_hush.c 中,去掉条件编译内容以后的函数内容如下:

1
2
3
4
5
6
7
8
int parse_file_outer(void)
{
int rcode;
struct in_str input;
setup_file_in_str(&input);
rcode = parse_stream_outer(&input, FLAG_PARSE_SEMICOLON);
return rcode;
}

第 5 行:调用函数 setup_file_in_str 初始化变量 input 的成员变量。

第 6 行:调用函数 parse_stream_outer(10.2.3中分析),这个函数就是 hush shell 的命令解释器,负责接收命令行输入,然后解析并执行相应的命令。

10.2.3 parse_stream_outer函数

函数 parse_stream_outer 定义在文件 common/cli_hush.c中,精简版的函数内容如下:

1
2
3
4
5
6
7
8
9
10
11
12
13
14
15
16
17
18
19
20
21
22
23
24
25
26
27
28
29
static int parse_stream_outer(struct in_str *inp, int flag)
{
struct p_context ctx;
o_string temp=NULL_O_STRING;
int rcode;
int code = 1;
do
{
// 中间的省略 ... ...
rcode = parse_stream(&temp, &ctx, inp,
flag & FLAG_CONT_ON_NEWLINE ? -1 : '\n');
// 中间的省略 ......
if (rcode != 1 && ctx.old_flag == 0)
{
// 中间的省略 ......
run_list(ctx.list_head);
// 中间的省略 ......
}
else
{
// 中间的省略 ......
}
b_free(&temp);
/* loop on syntax errors, return on EOF */
}
while (rcode != -1 && !(flag & FLAG_EXIT_FROM_LOOP) &&
(inp->peek != static_peek || b_peek(inp)));
return 0;
}

第 7 ~ 21 行:这几行中的do-while 循环就是处理输入命令的。

第 10 行:调用函数 parse_stream 进行命令解析。

第 16 行:调用 run_list 函数来执行解析出来的命令 。

10.2.4 run_list 函数

该函数定义在 common/cli_hush.c 文件中,函数会经过一系列的函数调用,最终通过调用 cmd_process 函数来处理命令 :

1
2
3
4
5
6
7
8
9
10
11
12
13
14
15
16
17
/* Select which version we will use */
static int run_list(struct pipe *pi)
{
int rcode=0;
#ifndef __U_BOOT__
if (fake_mode==0) {
#endif
rcode = run_list_real(pi);
#ifndef __U_BOOT__
}
#endif
/* free_pipe_list has the side effect of clearing memory
* In the long run that function can be merged with run_list_real,
* but doing that now would hobble the debugging effort. */
free_pipe_list(pi,0);
return rcode;
}

第 8 行:run_list 调用 run_list_real 函数。

  • run_list_real 函数
1
2
3
4
5
6
7
8
9
10
11
// common/cli_hush.c
static int run_list_real(struct pipe *pi)
{
char *save_name = NULL;
// 中间的省略 ... ...
int if_code=0, next_if_code=0; /* need double-buffer to handle elif */
// 中间的省略 ... ...
rcode = run_pipe_real(pi);
// 中间的省略 ... ...
return rcode;
}

第 8 行:run_list_real 函数调用 run_pipe_real 函数。

  • run_pipe_real 函数
1
2
3
4
5
6
7
8
9
10
11
12
13
14
15
16
17
18
19
20
21
22
23
24
// common/cli_hush.c
static int run_pipe_real(struct pipe *pi)
{
int i;

int nextin;
int flag = do_repeat ? CMD_FLAG_REPEAT : 0;
struct child_prog *child;
char *p;
// 中间的省略 ... ...
if (pi->num_progs == 1) child = & (pi->progs[0]);
// 中间的省略 ... ...
return rcode;
}
else if (pi->num_progs == 1 && pi->progs[0].argv != NULL)
{
// 中间的省略 ... ...
/* Process the command */
return cmd_process(flag, child->argc, child->argv,
&flag_repeat, NULL);
}

return -1;
}

第 19 行:run_pipe_real 函数调用 cmd_process 函数。

11. cmd_process 函数

我们在uboot中使用的命令,是通过该函数进行解析和执行的。

11.1 命令的定义与执行

11.1.1 相关宏定义

uboot使用宏U_BOOT_CMD来定义命令,宏 U_BOOT_CMD 定义在文件 include/command.h 中,定义如下:

1
2
#define U_BOOT_CMD(_name, _maxargs, _rep, _cmd, _usage, _help)		\
U_BOOT_CMD_COMPLETE(_name, _maxargs, _rep, _cmd, _usage, _help, NULL)

可以看出 U_BOOT_CMD 是 U_BOOT_CMD_COMPLETE 的 特 例 , 我们将U_BOOT_CMD_COMPLETE 的最后一个参数设置成NULL 就是 U_BOOT_CMD。U_BOOT_CMD_COMPLETE 定义在文件 include/command.h 中,定义如下:

1
2
3
4
#define U_BOOT_CMD_COMPLETE(_name, _maxargs, _rep, _cmd, _usage, _help, _comp) \
ll_entry_declare(cmd_tbl_t, _name, cmd) = \
U_BOOT_CMD_MKENT_COMPLETE(_name, _maxargs, _rep, _cmd, \
_usage, _help, _comp);

宏 U_BOOT_CMD_COMPLETE 又 用 到 了 ll_entry_declare 和 U_BOOT_CMD_MKENT_COMPLETE。 ll_entry_declar 定义在文件include/linker_lists.h 中,定义如下:

1
2
3
4
#define ll_entry_declare(_type, _name, _list)				\
_type _u_boot_list_2_##_list##_2_##_name __aligned(4) \
__attribute__((unused, \
section(".u_boot_list_2_"#_list"_2_"#_name)))

其中_type 为 cmd_tbl_t,因此 ll_entry_declare 就是定义了一个 cmd_tbl_t 变量,这里用到了 C 语言中的“##”连接符。其中的“##_list”表示用_list 的值来替换,“##_name”就是用_name 的值来替换。

宏 U_BOOT_CMD_MKENT_COMPLETE 定义在文件 include/command.h 中,内容如下:

1
2
3
4
#define U_BOOT_CMD_MKENT_COMPLETE(_name, _maxargs, _rep, _cmd,		\
_usage, _help, _comp) \
{ #_name, _maxargs, _rep, _cmd, _usage, \
_CMD_HELP(_help) _CMD_COMPLETE(_comp) }

“ # ” 表 示 将 _name 传递过来的值字符串化 ,U_BOOT_CMD_MKENT_COMPLETE 又用到了宏_CMD_HELP 和_CMD_COMPLETE,这两个宏的定义(include/command.h)如下:

1
2
3
4
5
6
7
8
9
10
#ifdef CONFIG_AUTO_COMPLETE
# define _CMD_COMPLETE(x) x,
#else
# define _CMD_COMPLETE(x)
#endif
#ifdef CONFIG_SYS_LONGHELP
# define _CMD_HELP(x) x,
#else
# define _CMD_HELP(x)
#endif

可以看出,如果定义了宏 CONFIG_AUTO_COMPLETE 和 CONFIG_SYS_LONGHELP 的话 , _CMD_COMPLETE 和 _CMD_HELP 就是取自身的值,然后在加上一个 ‘ , ’。 CONFIG_AUTO_COMPLETE 和 CONFIG_SYS_LONGHELP 这两个宏有定义在文件 mx6_common.h 中。

11.1.2 命令实例

U_BOOT_CMD宏的流程大概我们已经清楚了,我们就以一个具体的命令为例,来看一下 U_BOOT_CMD 经过展开以后究竟是个什么模样的。以命令 dhcp 为例, dhcp 命令定义在 cmd/net.c 文件中:

1
2
3
4
5
U_BOOT_CMD(
dhcp, 3, 1, do_dhcp,
"boot image via network using DHCP/TFTP protocol",
"[loadAddress] [[hostIPaddr:]bootfilename]"
);

我们将这个命令进行一个展开:

  • 将 U_BOOT_CMD 展开
1
2
3
4
U_BOOT_CMD_COMPLETE(dhcp, 3, 1, do_dhcp,
"boot image via network using DHCP/TFTP protocol",
"[loadAddress] [[hostIPaddr:]bootfilename]",
NULL);
  • 将 U_BOOT_CMD_COMPLETE 展开
1
2
3
4
5
ll_entry_declare(cmd_tbl_t, dhcp, cmd) = \
U_BOOT_CMD_MKENT_COMPLETE(dhcp, 3, 1, do_dhcp, \
"boot image via network using DHCP/TFTP protocol", \
"[loadAddress] [[hostIPaddr:]bootfilename]", \
NULL);
  • 将 ll_entry_declare 和 U_BOOT_CMD_MKENT_COMPLETE 展开
1
2
3
4
5
6
7
8
cmd_tbl_t _u_boot_list_2_cmd_2_dhcp __aligned(4) \
__attribute__((unused,section(.u_boot_list_2_cmd_2_dhcp))) \
{
"dhcp", 3, 1, do_dhcp, \
"boot image via network using DHCP/TFTP protocol", \
"[loadAddress] [[hostIPaddr:]bootfilename]",\
NULL
}

所以,dhcp 命令展开后,最终形式为:

1
2
3
4
5
6
7
8
cmd_tbl_t _u_boot_list_2_cmd_2_dhcp __aligned(4) \
__attribute__((unused,section(.u_boot_list_2_cmd_2_dhcp))) \
{
"dhcp", 3, 1, do_dhcp, \
"boot image via network using DHCP/TFTP protocol", \
"[loadAddress] [[hostIPaddr:]bootfilename]",\
NULL
}

第 1 行:定义了一个 cmd_tbl_t 类型的变量,变量名为_u_boot_list_2_cmd_2_dhcp,此变量 4 字节对齐。

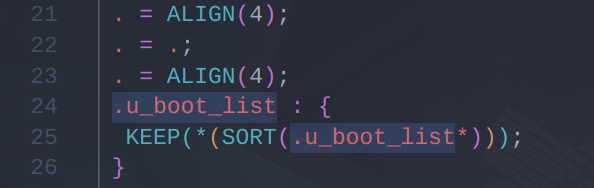
第 2 行 :使 用 __attribute__ 关键字设置变量 _u_boot_list_2_cmd_2_dhcp 存储在 .u_boot_list_2_cmd_2_dhcp 段中。u-boot.lds 链接脚本中有一个名为“.u_boot_list”的段,所有.u_boot_list 开头的段都存放到.u_boot.list 中,所以第 2 行 就是设置变量_u_boot_list_2_cmd_2_dhcp 的存储位置。

image-20221016113057647

第 3~6 行: cmd_tbl_t 是个结构体,因此第 3 ~ 6 行是初始化 cmd_tbl_t 这个结构体的各个成员变量。

点击查看 cmd_tbl_t 结构体成员

cmd_tbl_t 结构体定义在文件 include/command.h 中 :

1
2
3
4
5
6
7
8
9
10
11
12
13
14
15
16
17
18
struct cmd_tbl_s
{
char *name; /* Command Name */
int maxargs; /* maximum number of arguments */
int repeatable; /* autorepeat allowed? */
/* Implementation function */
int (*cmd)(struct cmd_tbl_s *, int, int, char * const []);
char *usage; /* Usage message (short) */
#ifdef CONFIG_SYS_LONGHELP
char *help; /* Help message (long) */
#endif
#ifdef CONFIG_AUTO_COMPLETE
/* do auto completion on the arguments */
int (*complete)(int argc, char * const argv[], char last_char, int maxv, char *cmdv[]);
#endif
};

typedef struct cmd_tbl_s cmd_tbl_t;

结合 dhcp 命令展开后的最终形式,可以得出变量_u_boot_list_2_cmd_2_dhcp 的各个成员的值如下所示:

1
2
3
4
5
6
7
_u_boot_list_2_cmd_2_dhcp.name = "dhcp"
_u_boot_list_2_cmd_2_dhcp.maxargs = 3
_u_boot_list_2_cmd_2_dhcp.repeatable = 1
_u_boot_list_2_cmd_2_dhcp.cmd = do_dhcp
_u_boot_list_2_cmd_2_dhcp.usage = "boot image via network using DHCP/TFTP protocol"
_u_boot_list_2_cmd_2_dhcp.help = "[loadAddress] [[hostIPaddr:]bootfilename]"
_u_boot_list_2_cmd_2_dhcp.complete = NULL

11.2.3 命令执行

前边我们已经分析了在uboot中是如何定义一个命令的,那当我们在 uboot 的命令行中输入“dhcp”这个命令的时候,是怎么执行的呢?其实最终执行的是 do_dhcp 这个函数。

1
2
3
4
static int do_dhcp(cmd_tbl_t *cmdtp, int flag, int argc, char * const argv[])
{
return netboot_common(DHCP, cmdtp, argc, argv);
}

在这个函数中实际上是调用了 netboot_common 函数,这个函数定义在 cmd/net.c 中,具体怎么执行的,这里我就没有去了解了。

总的来说,uboot 中使用 U_BOOT_CMD 来定义一个命令,最终的目的就是为了定义一个 cmd_tbl_t 类型的变量,并初始化这个变量的各个成员。 uboot 中的每个命令都存储在.u_boot_list 段中,每个命令都有一个名为 do_xxx(xxx 为具体的命令名)的函数,这个 do_xxx 函数就是具体的命令处理函数。

11.2 cmd_process 函数在哪?

cmd_process 函数定义在文件 common/command.c 中,函数内容如下:

1
2
3
4
5
6
7
8
9
10
11
12
13
14
15
16
17
18
19
20
21
22
23
24
25
26
27
28
29
30
31
32
33
34
35
36
37
38
39
40
41
42
enum command_ret_t cmd_process(int flag, int argc, char * const argv[],
int *repeatable, ulong *ticks)
{
enum command_ret_t rc = CMD_RET_SUCCESS;
cmd_tbl_t *cmdtp;

/* Look up command in command table */
cmdtp = find_cmd(argv[0]);
if (cmdtp == NULL) {
printf("Unknown command '%s' - try 'help'\n", argv[0]);
return 1;
}

/* found - check max args */
if (argc > cmdtp->maxargs)
rc = CMD_RET_USAGE;

#if defined(CONFIG_CMD_BOOTD)
/* avoid "bootd" recursion */
else if (cmdtp->cmd == do_bootd) {
if (flag & CMD_FLAG_BOOTD) {
puts("'bootd' recursion detected\n");
rc = CMD_RET_FAILURE;
} else {
flag |= CMD_FLAG_BOOTD;
}
}
#endif

/* If OK so far, then do the command */
if (!rc) {
if (ticks)
*ticks = get_timer(0);
rc = cmd_call(cmdtp, flag, argc, argv);
if (ticks)
*ticks = get_timer(*ticks);
*repeatable &= cmdtp->repeatable;
}
if (rc == CMD_RET_USAGE)
rc = cmd_usage(cmdtp);
return rc;
}

11.3 做了什么?

我们按照下边的行号分析:

1
2
3
4
5
6
7
8
9
10
11
12
13
14
15
16
17
18
19
20
21
22
23
24
25
26
27
28
29
30
31
32
33
34
35
36
37
38
39
40
41
42
enum command_ret_t cmd_process(int flag, int argc, char * const argv[],
int *repeatable, ulong *ticks)
{
enum command_ret_t rc = CMD_RET_SUCCESS;
cmd_tbl_t *cmdtp;

/* Look up command in command table */
cmdtp = find_cmd(argv[0]);
if (cmdtp == NULL) {
printf("Unknown command '%s' - try 'help'\n", argv[0]);
return 1;
}

/* found - check max args */
if (argc > cmdtp->maxargs)
rc = CMD_RET_USAGE;

#if defined(CONFIG_CMD_BOOTD)
/* avoid "bootd" recursion */
else if (cmdtp->cmd == do_bootd) {
if (flag & CMD_FLAG_BOOTD) {
puts("'bootd' recursion detected\n");
rc = CMD_RET_FAILURE;
} else {
flag |= CMD_FLAG_BOOTD;
}
}
#endif

/* If OK so far, then do the command */
if (!rc) {
if (ticks)
*ticks = get_timer(0);
rc = cmd_call(cmdtp, flag, argc, argv);
if (ticks)
*ticks = get_timer(*ticks);
*repeatable &= cmdtp->repeatable;
}
if (rc == CMD_RET_USAGE)
rc = cmd_usage(cmdtp);
return rc;
}

第 8 行(第 507 行):调用函数 find_cmd 在命令表中找到指定的命令。

点击查看 find_cmd 函数

函数定义在 common/command.c 文件中:

1
2
3
4
5
6
cmd_tbl_t *find_cmd(const char *cmd)
{
cmd_tbl_t *start = ll_entry_start(cmd_tbl_t, cmd);
const int len = ll_entry_count(cmd_tbl_t, cmd);
return find_cmd_tbl(cmd, start, len);
}

参数 cmd 就是所查找的命令名字, uboot 中的命令表其实就是 cmd_tbl_t 结构体数组,通过函数 ll_entry_start 得到数组的第一个元素,也就是命令表起始地址。通过函数 ll_entry_count 得到数组长度,也就是命令表的长度。最终通过函数 find_cmd_tbl 在命令表中找到所需的命令,每个命令都有一个 name 成员,所以将参数 cmd 与命令表中每个成员的 name 字段都对比一下,如果相等的话就说明找到了这个命令,找到以后就返回这个命令。

第 34 行(第 533 行):当 find_cmd 找到相应命令后,就会调用函数 cmd_call 来执行具体的命令 。

点击查看 cmd_call 函数

这个函数定义在 common/command.c 中:

1
2
3
4
5
6
7
8
9
10
11
12
13
14
15
16
17
18
19
20
/**
* Call a command function. This should be the only route in U-Boot to call
* a command, so that we can track whether we are waiting for input or
* executing a command.
*
* @param cmdtp Pointer to the command to execute
* @param flag Some flags normally 0 (see CMD_FLAG_.. above)
* @param argc Number of arguments (arg 0 must be the command text)
* @param argv Arguments
* @return 0 if command succeeded, else non-zero (CMD_RET_...)
*/
static int cmd_call(cmd_tbl_t *cmdtp, int flag, int argc, char * const argv[])
{
int result;

result = (cmdtp->cmd)(cmdtp, flag, argc, argv);
if (result)
debug("Command failed, result=%d\n", result);
return result;
}

在前面的分析中我们知道, cmd_tbl_t 的 cmd 成员就是具体的命令处理函数,所以第 16 行(第 494 行)调用 cmdtp 的 cmd 成员来处理具体的命令,返回值为命令的执行结果。

第 39 行(第 538 行):cmd_process 中会检测 cmd_tbl 的返回值,如果返回值为 CMD_RET_USAGE 的话就会调用 cmd_usage 函数输出命令的用法,其实就是输出 cmd_tbl_t 的 usage 成员变量。

三、uboot启动总结

uboot_start