LV05-03-线程同步-02-互斥锁
本文主要是线程同步——互斥锁的相关笔记,若笔记中有错误或者不合适的地方,欢迎批评指正😃。
点击查看使用工具及版本
| Windows | windows11 |
| Ubuntu | Ubuntu16.04的64位版本 |
| VMware® Workstation 16 Pro | 16.2.3 build-19376536 |
| SecureCRT | Version 8.7.2 (x64 build 2214) - 正式版-2020年5月14日 |
| 开发板 | 正点原子 i.MX6ULL Linux阿尔法开发板 |
| uboot | NXP官方提供的uboot,NXP提供的版本为uboot-imx-rel_imx_4.1.15_2.1.0_ga(使用的uboot版本为U-Boot 2016.03) |
| linux内核 | linux-4.15(NXP官方提供) |
| STM32开发板 | 正点原子战舰V3(STM32F103ZET6) |
点击查看本文参考资料
| 参考方向 | 参考原文 |
| --- | --- |
点击查看相关文件下载
| --- | --- |
一、互斥锁的概念
1. 基本概念与特性
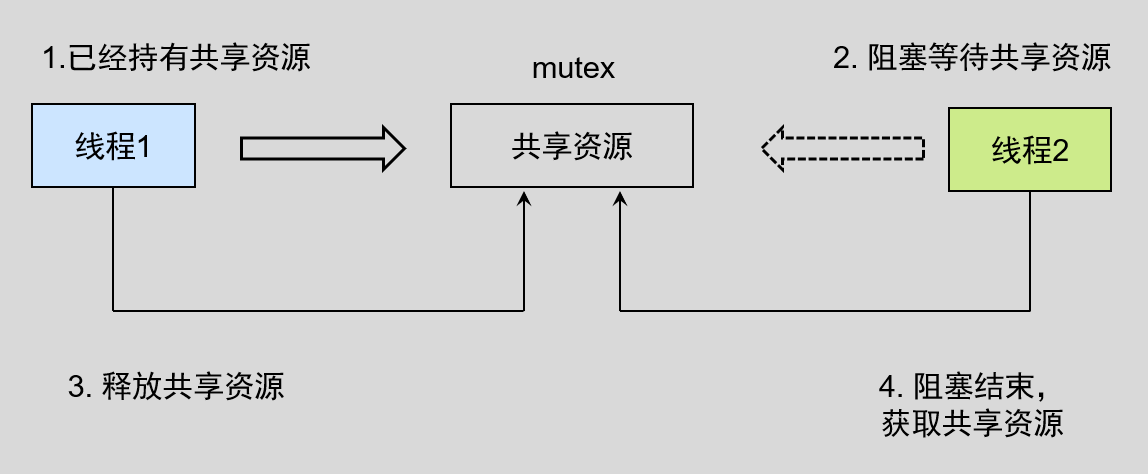
互斥锁(mutex)又叫互斥量,从本质上说是一把锁,在访问共享资源之前对互斥锁进行上锁,在访问完成后释放互斥锁(解锁);对互斥锁进行上锁之后,任何其它试图再次对互斥锁进行加锁的线程都会被阻塞,直到当前线程释放互斥锁。如果释放互斥锁时有一个以上的线程阻塞,那么这些阻塞的线程会被唤醒,它们都会尝试对互斥锁进行加锁,当有一个线程成功对互斥锁上锁之后,其它线程就不能再次上锁了,只能再次陷入阻塞,等待下一次解锁。
在我们的程序设计当中,只有将所有线程访问共享资源都设计成相同的数据访问规则,互斥锁才能正常工作。如果允许其中的某个线程在没有得到锁的情况下也可以访问共享资源,那么即使其它的线程在使用共享资源前都申请锁,也还是会出现数据不一致的问题。
2. 应用场景
当线程 1加锁成功后,此时互斥锁已经被线程 1 独占了,只要线程 1没有释放手中的锁,线程 2 加锁就会失败,于是线程2就会释放 CPU 让给其他线程,既然线程 2 释放掉了 CPU,自然线程 2 加锁的代码就会被阻塞。
对于互斥锁加锁失败而阻塞的现象,是由操作系统内核实现的。当加锁失败时,内核会将线程置为睡眠状态,等到锁被释放后,内核会在合适的时机唤醒线程,当这个线程成功获取到锁后,于是就可以继续执行。
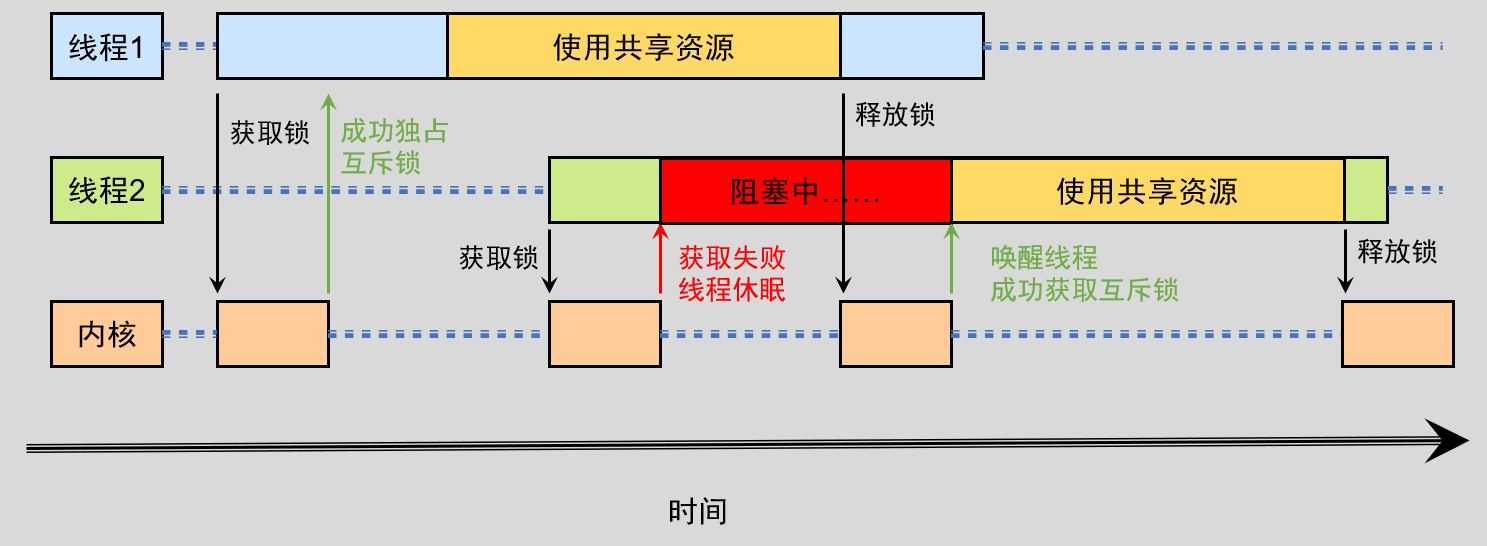
互斥锁加锁失败时,会从用户态陷入到内核态,让内核帮我们切换线程,虽然简化了使用锁的难度,但是存在一定的性能开销成本。这个成本来自于两次线程上下文切换。
- 当线程加锁失败时,内核会把线程的状态从运行状态设置为睡眠状态,然后把
CPU切换给其他线程运行; - 当锁被释放时,之前睡眠状态的线程会变为就绪状态,然后内核会在合适的时间,把
CPU切换给该线程运行。
前边我们知道当两个线程是属于同一个进程,因为虚拟内存是共享的,所以在线程上下文切换时,虚拟内存这些资源就保持不动,只需要切换线程的私有数据、寄存器等不共享的数据。上下切换的耗时有大佬统计过,大概在几十纳秒到几微秒之间,如果我们锁住的代码执行时间比较短,那可能上下文切换的时间都比锁住的代码执行时间还要长。所以,如果我们能确定被锁住的代码执行时间很短,就不应该用互斥锁,而应该选用自旋锁(后边介绍),否则使用互斥锁。
二、基本操作
1. 互斥锁初始化
互斥锁的初始化有两种方式,一种是动态方式,即通过pthread_mutex_init()函数完成初始化;另一种是静态方式,通过宏进行初始化。
1.1 pthread_mutex_init()
1.1.1 函数说明
在linux下可以使用man pthread_mutex_init命令查看该函数的帮助手册。
1 | /* Compile and link with -pthread. */ |
额……,😥属实没看懂man手册里边的哪个声明,不过网上以及一些教材似乎更多的是下边的声明形式,虽然没看懂,但是把,他们的变量类型时一样的,就按第二种声明的形式来理解可能更好些。
【函数说明】该函数是以动态方式初始化一个互斥锁。
【函数参数】
mutex:pthread_mutex_t *类型,指向需要进行初始化操作的互斥锁对象。attr:pthread_mutexattr_t *类型,指向一个pthread_mutexattr_t类型对象,该对象用于定义互斥锁的属性,若将参数attr设置为NULL,则表示将互斥锁的属性设置为默认值,在这种情况下其实就等价于PTHREAD_MUTEX_INITIALIZER这种方式初始化,而不同之处在于,使用宏不进行错误检查。
【返回值】int类型,成功返回0;失败将返回一个非0的错误码。
【使用格式】一般情况下基本使用格式如下:
1 | /* 需要包含的头文件 */ |
【注意事项】当在Ubuntu系统下执行man 3 pthread_mutex_init命令时提示找不到该函数,并不是Linux下没有这个函数,而是该函数相关的man手册帮助信息没有被安装,这时我们只需执行以下命令安装即可:
1 | sudo apt-get install manpages-posix-dev |
1.1.2 使用实例
暂无。
1.2 PTHREAD_MUTEX_INITIALIZER
1.2.1 函数说明
在linux下可以使用man 3 pthread_mutex_init命令查看该宏的定义格式。
1 | /* Compile and link with -pthread. */ |
【函数说明】该宏用于使用默认属性初始化一个互斥锁。
【定义原型】该宏定义在pthread.h文件中,可以在终端中使用以下命令查看pthread.h文件位置:
1 | locate pthread.h # 若出现locate 命令未安装之类的,按照提示安装即可 |
定义形式如下:
1 |
【返回值】none
【使用格式】一般情况下基本使用格式如下:
1 | /* 需要包含的头文件 */ |
【注意事项】
(1)PTHREAD_MUTEX_INITIALIZER宏已经携带了互斥锁的默认属性。
(2)只适用于在定义的时候就直接进行初始化,对于其它情况则不能使用这种方式,例如先定义互斥锁,后再进行初始化,或者在堆中动态分配的互斥锁,使用malloc()函数申请分配的互斥锁对象等情况还是要使用pthread_mutex_init()函数完成。
1.2.2 使用实例
暂无。
2. 加锁和解锁
定义了互斥锁之后,后边肯定就是使用互斥锁啦。使用的时候有加锁和解锁两个过程,或者说是获取锁和释放锁两个过程。
2.1 pthread_mutex_lock()
2.1.1 函数说明
在linux下可以使用man pthread_mutex_lock命令查看该函数的帮助手册。
1 | /* Compile and link with -pthread. */ |
【函数说明】该函数用于以阻塞方式对互斥锁加锁、获取互斥锁。
【函数参数】
mutex:pthread_mutex_t *类型,指向已经初始化过的互斥锁对象。
【返回值】int类型,用成功时返回0;失败将返回一个非0值的错误码。
【使用格式】一般情况下基本使用格式如下:
1 | /* 需要包含的头文件 */ |
【注意事项】调用pthread_mutex_lock()函数对互斥锁进行上锁,如果互斥锁处于未锁定状态,则此次调用会上锁成功,函数调用将立马返回;如果互斥锁此时已经被其它线程锁定了,那么调用pthread_mutex_lock()会一直阻塞,直到该互斥锁被解锁,到那时,调用将锁定互斥锁并返回。
2.1.2 使用实例
暂无。
2.2 pthread_mutex_trylock()
2.2.1 函数说明
在linux下可以使用man pthread_mutex_trylock命令查看该函数的帮助手册。
1 | /* Compile and link with -pthread. */ |
【函数说明】该函数用于以非阻塞的方式对互斥锁加锁、申请互斥锁。
【函数参数】
mutex:pthread_mutex_t *类型,指向已经初始化过的互斥锁对象。
【返回值】int类型,用成功时返回0;失败将返回一个非0值的错误码;如果目标互斥锁已经被其它线程锁住,则调用失败返回错误码EBUSY。
【使用格式】一般情况下基本使用格式如下:
1 | /* 需要包含的头文件 */ |
【注意事项】调用pthread_mutex_trylock()函数尝试对互斥锁进行加锁,如果互斥锁处于未锁住状态,那么调用pthread_mutex_trylock()将会锁住互斥锁并立马返回,如果互斥锁已经被其它线程锁住,调用pthread_mutex_trylock()加锁失败,但不会阻塞,而是返回错误码EBUSY。
2.2.2 使用实例
暂无。
2.3 pthread_mutex_unlock()
2.3.1 函数说明
在linux下可以使用man pthread_mutex_lock命令查看该函数的帮助手册。
1 | /* Compile and link with -pthread. */ |
【函数说明】该函数用于对互斥锁解锁、释放互斥锁。
【函数参数】
mutex:pthread_mutex_t *类型,指向已经初始化过的互斥锁对象。
【返回值】int类型,用成功时返回0;失败将返回一个非0值的错误码。
【使用格式】一般情况下基本使用格式如下:
1 | /* 需要包含的头文件 */ |
【注意事项】
(1)调用pthread_mutex_unlock()函数将已经处于锁定状态的互斥锁进行解锁。以下行为均属错误:
- 对处于未锁定状态的互斥锁进行解锁操作。
- 解锁由其它线程锁定的互斥锁。
(2)如果有多个线程处于阻塞状态等待互斥锁被解锁,当互斥锁被当前锁定它的线程调用pthread_mutex_unlock()函数解锁后,这些等待着的线程都会有机会对互斥锁上锁,但无法判断究竟哪个线程会获取互斥锁。
(3)若有多把锁,解锁时与上锁时顺序相反,就是最后上的锁要先解开,这样可以减少一些其他线程申请共享资源而等待的时间。
1 | pthread_mutex_lock(&mutex1); |
2.3.2 使用实例
暂无。
3. 销毁互斥锁
定义了互斥锁之后,当不再需要互斥锁时,应该将其销毁。
3.1 pthread_mutex_destroy()
3.1.1 函数说明
在linux下可以使用man pthread_mutex_destroy命令查看该函数的帮助手册。
1 | /* Compile and link with -pthread. */ |
【函数说明】该函数用于销毁一个不再使用的互斥锁。
【函数参数】
mutex:pthread_mutex_t *类型,指向已经初始化过的互斥锁对象。
【返回值】int类型,用成功时返回0;失败将返回一个非0值的错误码。
【使用格式】一般情况下基本使用格式如下:
1 | /* 需要包含的头文件 */ |
【注意事项】
(1)不能销毁还没有解锁的互斥锁,否则将会出现错误。
(2) 没有初始化的互斥锁也不能销毁。
3.1.2 使用实例
暂无。
4. 互斥锁使用实例
前边终于把需要使用的函数学习完了,接下来就是一个实例啦。
点击查看实例
1 |
|
程序中的宏macro_mutex用于决定是否初始化互斥锁,若初始化的话,用什么方式初始化。
- 若
macro_mutex为0,则不使用互斥锁。 - 若
macro_mutex为1,则使用函数pthread_mutex_init()初始化互斥锁。 - 若
macro_mutex为2,则使用宏PTHREAD_MUTEX_INITIALIZER初始化互斥锁。
在终端执行以下命令编译程序:
1 | gcc test.c -Wall -l pthread # 生成可执行文件 a.out |
然后,终端会有以下信息显示:
1 | This is threadMutex1 thread create,ret=0,tid1=139994152797760 |
然后我们打开test.txt文件,查看文件内容如下:
1 | II wwrriittee tthhrreeaaddMMuutteexx21 lliinnee |
该文件被两个线程共享,两个线程都是写入,未保护共享文件,导致文件写入出错。
在终端执行以下命令编译程序:
1 | gcc test.c -Wall -l pthread # 生成可执行文件 a.out |
然后,终端会有以下信息显示:
1 | This is threadMutex1 thread create,ret=0,tid1=140036714059328 |
然后我们打开test.txt文件,查看文件内容如下:
1 | I write threadMutex2 line |
该文件被两个线程共享,两个线程都是写入,使用互斥锁保护共享文件,文件写入正常。
在终端执行以下命令编译程序:
1 | gcc test.c -Wall -l pthread # 生成可执行文件 a.out |
然后,终端会有以下信息显示:
1 | This is threadMutex1 thread create,ret=0,tid1=140367502612032 |
然后我们打开test.txt文件,查看文件内容如下:
1 | I write threadMutex1 line |
该文件被两个线程共享,两个线程都是写入,使用互斥锁保护共享文件,文件写入正常。
三、互斥锁属性
使用pthread_mutex_init()函数初始化互斥锁时可以设置互斥锁的属性,通过参数attr指定。如果将参数attr设置为NULL,则表示将互斥锁属性设置为默认值。如果不使用默认属性,在调用pthread_mutex_init()函数时,参数attr必须要指向一个pthread_mutexattr_t对象,而不能使用NULL。关于互斥锁的属性比较多,例如进程共享属性、健壮属性、类型属性等等,后边用到的会再补充在这篇笔记中。
1. 属性对象初始化
1.1 pthread_mutexattr_init()
1.1.1 函数说明
在linux下可以使用man pthread_mutexattr_init命令查看该函数的帮助手册。
1 | /* Compile and link with -pthread. */ |
【函数说明】该函数初始化一个互斥锁的属性对象(就是自定义创建的互斥锁的各个默认属性)。
【函数参数】
attr:pthread_mutexattr_t *类型,指向需要初始化的互斥锁属性对象。
【返回值】int类型,用成功时返回0;失败将返回一个非0值的错误码。
【使用格式】一般情况下基本使用格式如下:
1 | /* 需要包含的头文件 */ |
【注意事项】none
1.1.2 使用实例
暂无。
2. 属性对象销毁
2.1 pthread_mutexattr_destroy()
2.1.1 函数说明
在linux下可以使用man pthread_mutexattr_destroy命令查看该函数的帮助手册。
1 | /* Compile and link with -pthread. */ |
【函数说明】该函数用于销毁一个不再使用的互斥锁属性对象。
【函数参数】
attr:pthread_mutexattr_t *类型,指向已经初始化过且不需要再使用的互斥锁属性对象。
【返回值】int类型,用成功时返回0;失败将返回一个非0值的错误码。
【使用格式】一般情况下基本使用格式如下:
1 | /* 需要包含的头文件 */ |
【注意事项】none
2.1.2 使用实例
暂无。
3. 类型属性
3.1 pthread_mutexattr_gettype()
3.1.1 函数说明
在linux下可以使用man pthread_mutexattr_destroy命令查看该函数的帮助手册。
1 | /* Compile and link with -pthread. */ |
额……,😥又遇到这样声明的一个函数,给我的感觉就像是restrict attr应该有一个下划线一样,类似这样restrict_attr,一些资料中使用的另一种声明,就还是使用自己容易理解的吧,反正传入的参数以及格式都是一样的。
【函数说明】该函数获取一个互斥锁的类型属性。
【函数参数】
attr:const pthread_mutexattr_t *类型,指向已经初始化过的互斥锁属性对象。type:int *类型,将互斥锁类型属性保存在参数type所指向的内存中。
【返回值】int类型,用成功时返回0;失败将返回一个非0值的错误码。
【使用格式】一般情况下基本使用格式如下:
1 | /* 需要包含的头文件 */ |
【注意事项】none
3.1.2 使用实例
暂无。
3.2 pthread_mutexattr_settype()
3.2.1 函数说明
在linux下可以使用man pthread_mutexattr_settype命令查看该函数的帮助手册。
1 | /* Compile and link with -pthread. */ |
【函数说明】该函数设置一个互斥锁的类型属性。
【函数参数】
attr:const pthread_mutexattr_t *类型,指向已经初始化过的互斥锁属性对象。type:int类型,将互斥锁类型属性设置为参数type所指向的内存中的值。
点击查看 type 可取的值
| PTHREAD_MUTEX_NORMAL | 一种标准的互斥锁类型,不做任何的错误检查或死锁检测。如果线程试图对已经由自己锁定的互斥锁再次进行加锁,则发生死锁;互斥锁处于未锁定状态,或者已由其它线程锁定,对其解锁会导致不确定结果。 |
| PTHREAD_MUTEX_ERRORCHECK | 此类互斥锁会提供错误检查。例如这三种情况都会导致返回错误:线程试图对已经由自己锁定的互斥锁再次进行加锁(同一线程对同一互斥锁加锁两次),返回错误;线程对由其它线程锁定的互斥锁进行解锁,返回错误;线程对处于未锁定状态的互斥锁进行解锁,返回错误。这类互斥锁运行起来比较慢,因为它需要做错误检查,不过可将其作为调试工具,以发现程序哪里违反了互斥锁使用的基本原则。 |
| PTHREAD_MUTEX_RECURSIVE | 此类互斥锁允许同一线程在互斥锁解锁之前对该互斥锁进行多次加锁,然后维护互斥锁加锁的次数,把这种互斥锁称为递归互斥锁,但是如果解锁次数不等于加速次数,则是不会释放锁的;所以,如果对一个递归互斥锁加锁两次,然后解锁一次,那么这个互斥锁依然处于锁定状态,对它再次进行解锁之前不会释放该锁。 |
| PTHREAD_MUTEX_DEFAULT | 此类互斥锁提供默认的行为和特性。使用宏PTHREAD_MUTEX_INITIALIZER初始化的互斥锁,或者调用参数arg为NULL的pthread_mutexattr_init()函数所创建的互斥锁,都属于此类型。此类锁意在为互斥锁的实现保留最大灵活性,Linux上,PTHREAD_MUTEX_DEFAULT类型互斥锁的行为与PTHREAD_MUTEX_NORMAL类型相仿。 |
【返回值】int类型,用成功时返回0;失败将返回一个非0值的错误码。
【使用格式】一般情况下基本使用格式如下:
1 | /* 需要包含的头文件 */ |
【注意事项】none
3.2.2 使用实例
暂无。
3.3 类型设置实例
点击查看实例
1 |
|
在终端执行以下命令编译程序:
1 | gcc test.c -Wall -lpthread # 生成可执行文件 a.out |
然后,终端会有以下信息显示:
1 | mutex type:0 |
四、互斥锁死锁
1. 死锁的概念
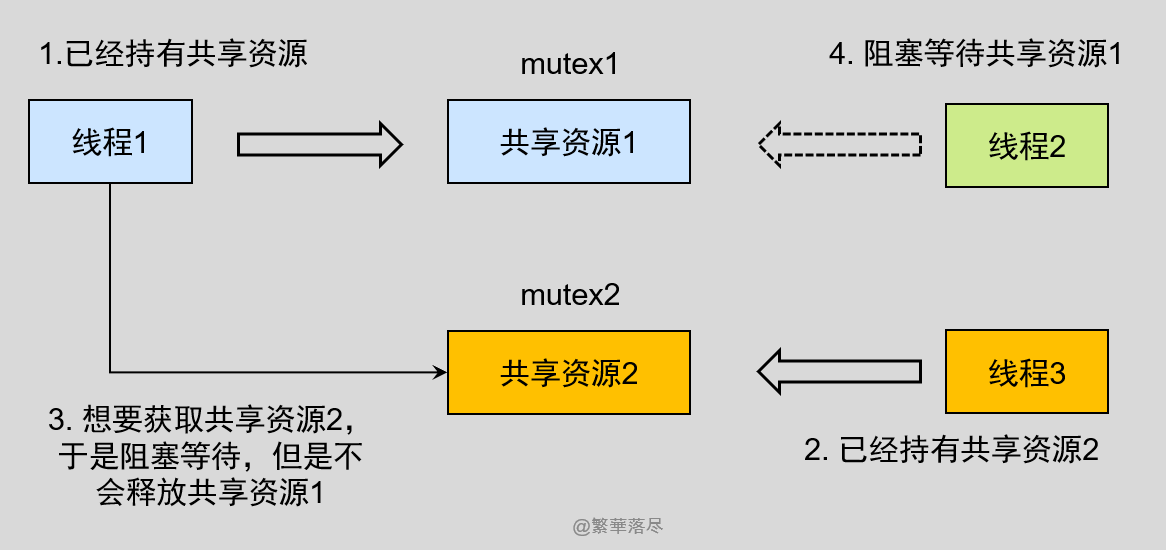
有的时候,一个线程需要同时访问两个或更多不同的共享资源,而每个资源又由不同的互斥锁管理。当超过一个线程对同一组互斥锁(两个或两个以上的互斥锁)进行加锁时,就有可能发生死锁。例如,程序中使用一个以上的互斥锁,如果允许一个线程一直占有第一个互斥锁,并且在试图锁住第二个互斥锁时处于阻塞状态,但是拥有第二个互斥锁的线程也在试图锁住第一个互斥锁。因为两个线程都在相互请求另一个线程拥有的资源,所以这两个线程都无法向前运行,会被一直阻塞,于是就产生了死锁。
看到过一个比较容易懂的例子,就是这样:小林拿了小美房间的钥匙,而小林在自己的房间里,小美拿了小林房间的钥匙,而小美也在自己的房间里。如果小林要从自己的房间里出去,必须拿到小美手中的钥匙,但是小美要出去,又必须拿到小林手中的钥匙,这就形成了死锁。
再来看一个代码的实例:
1 | /* 线程1 */ |
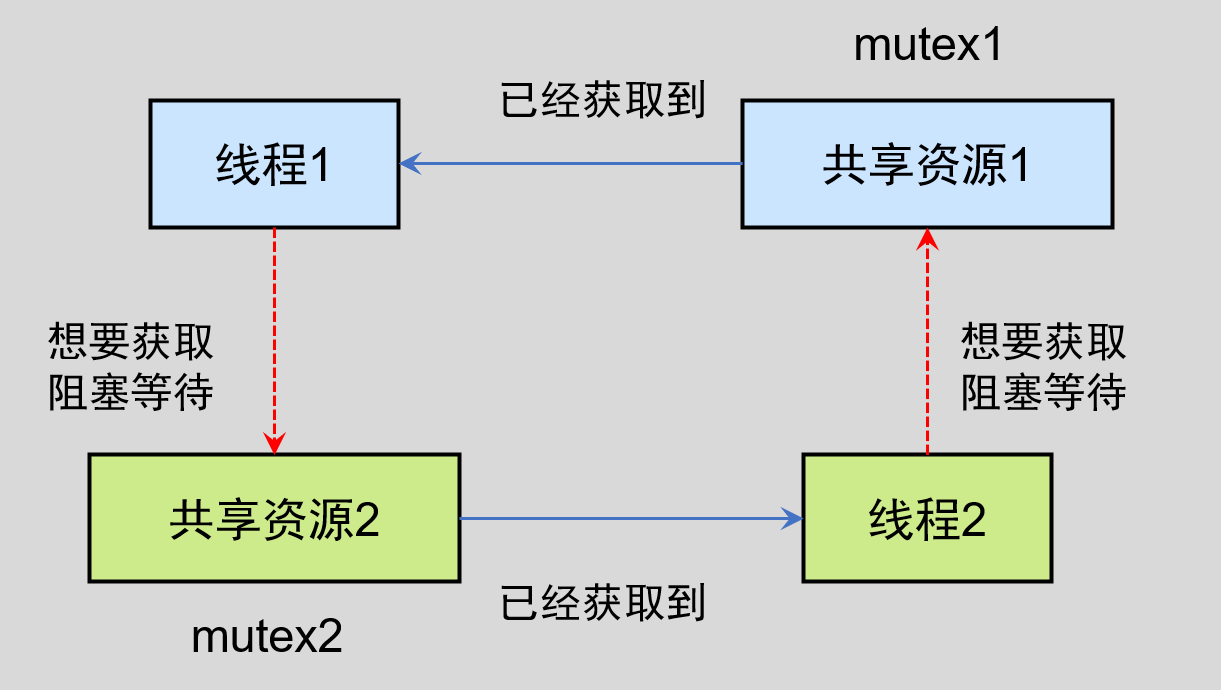
对于线程1,它目前持有mutex1互斥锁,所以其他线程想要使用互斥锁mutex1加锁的共享资源1时,就必须等待线程1释放mutex1互斥锁。
对于线程2,它目前持有mutex2互斥锁,所以其他线程想要使用互斥锁mutex2加锁的共享资源2时,就必须等待线程2释放mutex1互斥锁。
现在线程1持有互斥锁mutex1加锁的共享资源1时,又想要获取被线程2加锁的共享资源2,于是,它只能阻塞等待,这就导致了互斥锁1无法释放,共享资源1无法被线程2访问。
但是呢,线程2持有互斥锁mutex2加锁的共享资源2时,又想要获取被线程1加锁的共享资源1,于是,它也只能阻塞等待,这就导致了互斥锁2无法释放,共享资源2无法被线程1访问。
于是两者都在等对方先释放资源,你不动,我也不动,于是,死锁产生了… …

2. 死锁发生的条件
死锁只有同时满足以下四个条件才会发生:
- 互斥条件
- 持有并等待条件
- 不可剥夺条件
- 环路等待条件
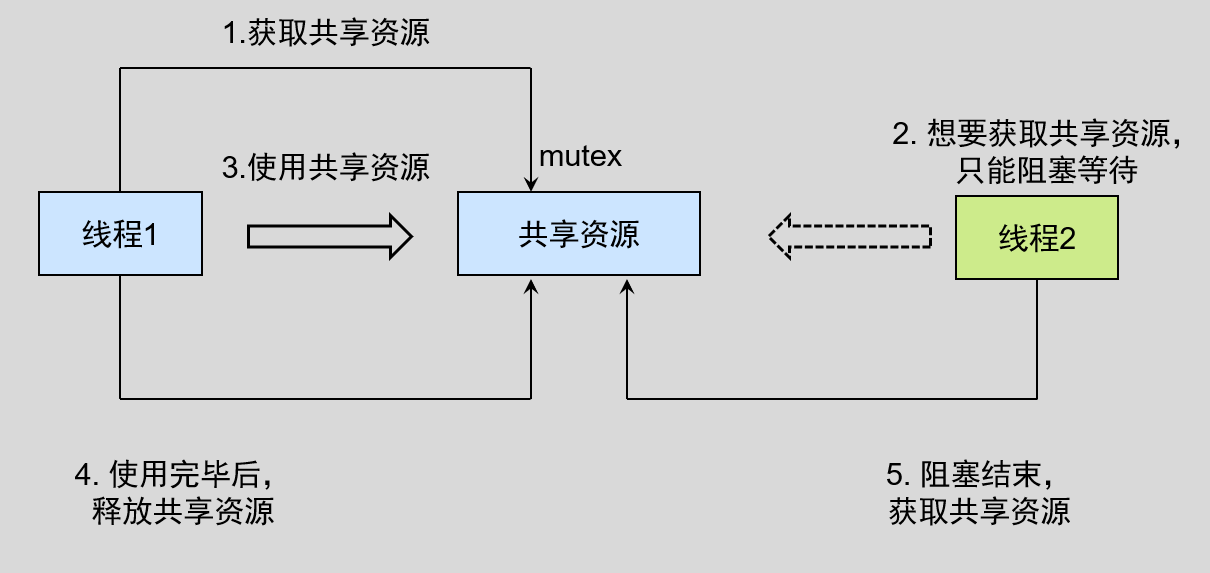
2.1 互斥条件
互斥条件是指多个线程不能同时使用同一个资源。
如果线程 1 已经持有的资源,不能再同时被线程 2 持有,如果线程 2 请求获取线程 1 已经占用的资源,那线程 2 只能等待,直到线程 1 释放了资源。
2.2 持有并等待条件
持有并等待条件是指,当线程 1 已经持有了共享资源 1,又想申请共享资源 2,而共享资源 2 已经被线程 3 持有了,所以线程 1 就会处于等待状态,但是线程 1 在等待共享资源 2 的同时并不会释放自己已经持有的共享资源 1。
2.3 不可剥夺条件
不可剥夺条件是指,当线程已经持有了资源 ,在自己使用完之前不能被其他线程获取,线程 2 如果也想使用此共享资源,则只能在线程 1 使用完并释放后才能获取。
2.4 环路等待条件
环路等待条件指都是,在死锁发生的时候,两个线程获取资源的顺序构成了环形链。
比如,线程 1 已经持有共享资源 2,而想请求资源 1, 线程 2 已经获取了共享资源 1,而想请求共享资源 2,这就形成共享资源请求等待的环形图。
3. 死锁产生实例
点击查看实例
1 |
|
在终端执行以下命令编译程序:
1 | gcc test.c -Wall -l pthread # 生成可执行文件 a.out |
然后,终端会有以下信息显示:
1 | This is threadMutex1 thread create,ret=0,tid1=139650389415488 |
然后程序就卡住了,不会继续运行了,这就是产生了死锁问题。
4. 如何排查死锁问题?
在 Linux 下,我们可以使用 pstack 和 GDB 调试工具来定位死锁问题,主要是还是查看各个函数的堆栈的信息来判断。
4.1 pstack 的使用
pstack 命令可以显示每个线程的栈跟踪信息(函数调用过程),它的使用格式:
1 | sudo pstack <pid> |
【注意事项】pstack安装完毕后使用可能会有问题,具体解决办法可以查看这篇文章:【Linux】LV2-02-Linux文件系统与基础命令 | 繁華落尽 (gitee.io)
还是使用上边的死锁例程,我们运行进程后,重新开一个终端,多执行几次pstack命令,会发现显示的内容都差不多,都会有__lll_lock_wait ()这样一句,这便可以初步判定程序有某个地方一直处于锁定等待状态。不过这里有很多的?,暂时还不清楚是什么,不过具体的,后边会再通过GDB确定,这里只需要大概判断出可能有死锁问题就可以了:
1 | Thread 3 (LWP 14824 "a.out"): |
不过呢,我们也可以不用pstack命令,其实我们可以直接使用GDB来打印所有线程的堆栈信息,找到系统中pstack的执行脚本,打开之后就会发现,它其实也就是一个Shell脚本,在脚本中使用GDB进行了堆栈信息的打印。
4.2 GDB 的使用
接下来我们就来使用GDB调试工具一步一步的分析死锁发生的问题吧。
- (1)开启进程调试
1 | sudo gdb -p 14822 # 需要有管理员权限才可以 |
这里和之前不同,-p参数后边跟着的是我们要调试的进程的PID,还需要有root权限才能正常开启调试,然后便会进入GDB调试界面。
- (2)打印所有线程堆栈信息
1 | (gdb) thread apply all bt |
点击查看打印信息
1 | Thread 3 (LWP 14824 "a.out"): |
可以看到,上边有两个线程中均显示有__lll_lock_wait,其实这一步就可以确定是发生了死锁的。
- (3)显示所有线程信息
1 | (gdb) info thread |
可以看到打印信息如下:
1 | Id Target Id Frame |
- (4)切换到第二个线程
这里主要是先随便找一个,以便于后边确定线程名称以及对应的线程号。
1 | (gdb) thread 2 |
可以看到打印信息如下:
1 | [Switching to thread 2 (LWP 14823)] |
- (5)打印这个线程堆栈信息
1 | (gdb) bt |
可以看到打印信息如下:
1 | 0 futex_wait (private=0, expected=2, futex_word=0x5592ec341080 <mutex2>) at ../sysdeps/nptl/futex-internal.h:146 |
看到打印信息中有threadMutex1可以知道,这是线程threadMutex1的函数,也就是说(LWP 14823)是线程threadMutex1,同样的方法可以确定,(LWP 14824)是线程threadMutex2。
- (6)打印调用栈中的第三个帧的信息
1 | (gdb) frame 3 |
可以看到打印信息如下:
1 | 3 0x00005592ec33e36c in threadMutex1 (arg=0x1) at test.c:43 |
可以看到线程 threadMutex1 函数,在获取互斥锁 mutex2 的时候阻塞了。
- (7)打印互斥锁
mutex2对象信息
1 | (gdb) p mutex2 |
可以看到打印信息如下:
1 | 1 = {__data = {__lock = 2, __count = 0, __owner = 14824, __nusers = 1, __kind = 0, __spins = 0, __elision = 0, __list = {__prev = 0x0, __next = 0x0}}, |
可以看到它被 LWP 为 14824(线程 threadMutex2) 的线程持有着。
- (8)打印互斥锁
mutex1对象信息
1 | (gdb) p mutex1 |
可以看到打印信息如下:
1 | 2 = {__data = {__lock = 2, __count = 0, __owner = 14823, __nusers = 1, __kind = 0, __spins = 0, __elision = 0, __list = {__prev = 0x0, __next = 0x0}}, |
可以看到它被 LWP 为 14823(线程 threadMutex1) 的线程持有着。
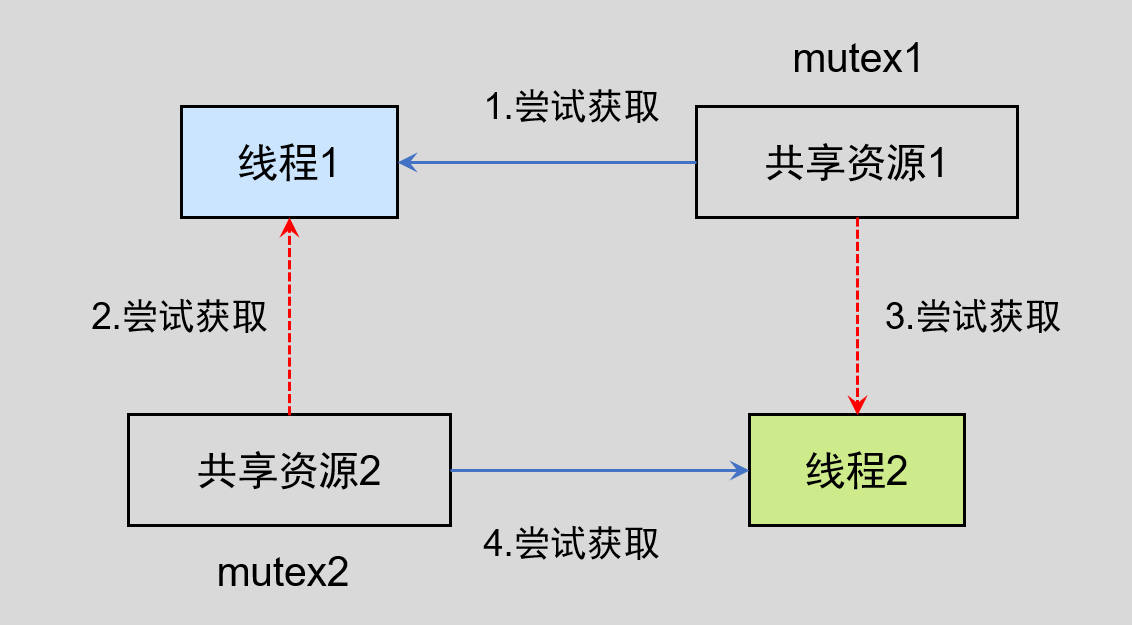
经过以上分析,可知线程threadMutex1在等待线程threadMutex2所赐持有的mutex2,而线程threadMutex2在等待线程threadMutex1所赐持有的mutex1,由此可以判断产生了死锁。
5. 避免死锁
产生死锁的四个必要条件是:互斥条件、持有并等待条件、不可剥夺条件、环路等待条件。那么避免死锁问题就只需要破环其中一个条件就可以,最常见的并且可行的就是定义互斥锁的层级关系,来破环环路等待条件。
线程 1 和 线程 2 获取资源的顺序要一样,当线程 1 是先尝试获取共享资源1,然后尝试获取共享资源2 的时候,线程 2 同样也是先尝试获取共享资源1,然后尝试获取共享资源2。也就是说,线程1 和 线程 2 总是以相同的顺序申请自己想要的资源。
所以上边死锁的例子可以修改如下:
点击查看实例
1 |
|
在终端执行以下命令编译程序:
1 | gcc test.c -Wall -l pthread # 生成可执行文件 a.out |
然后,终端会有以下信息显示:
1 | This is threadMutex1 thread create,ret=0,tid1=139952005150272 |
这样程序就正常运行了。