LV03-repo-03-从0搭建一个repo管理的项目
本文主要是使用repo——从0搭建一个repo管理的项目的相关笔记,若笔记中有错误或者不合适的地方,欢迎批评指正😃。
点击查看使用工具及版本
| PC端开发环境 | Windows | Windows11 |
| Ubuntu | Ubuntu20.04.2的64位版本 | |
| VMware® Workstation 17 Pro | 17.6.0 build-24238078 | |
| 终端软件 | MobaXterm(Professional Edition v23.0 Build 5042 (license)) | |
| Win32DiskImager | Win32DiskImager v1.0 | |
| Linux开发板环境 | Linux开发板 | 正点原子 i.MX6ULL Linux 阿尔法开发板 |
| uboot | NXP官方提供的uboot,NXP提供的版本为uboot-imx-rel_imx_4.1.15_2.1.0_ga(使用的uboot版本为U-Boot 2016.03) | |
| linux内核 | linux-4.15(NXP官方提供) |
点击查看本文参考资料
| 参考资料 | 相关说明 |
| Git 官网 | https://git-scm.com/ |
| Git 官方文档 | https://git-scm.com/doc |
| Pro Git Book | https://git-scm.com/book/zh/v2 |
| Git 快速使用指南 | https://training.github.com/downloads/zh_CN/github-git-cheat-sheet/ |
| Visual Git Cheat Sheet | https://ndpsoftware.com/git-cheatsheet.html#loc=index |
| Repo 工具使用介绍 - Gitee.com | https://gitee.com/help/articles/4316#article-header0 |
点击查看相关文件下载
| 分类 | 网址 | 说明 |
| --- | --- | --- |
一、概要
前面我们已经知道了,repo是git仓库的管理工具,它能更方便的管理由若干个git仓库组成的项目。它是python脚本,平常我们操作的repo命令只是一个入口,其实它还有一个git仓库,是一系列python脚本的集合。
repo通过清单文件(.xml)来管理。清单文件里记录了所有的git仓库信息。也可以当作是项目的快照,根据某一个清单文件,就能将整个项目里的所有git仓库都还原到生成清单文件时的状态。所有的清单需要一个git仓库管理。
所需要的东西和教程,可以参考这两个地方:
下载 Android 源代码 | Android Open Source Project (google.cn)
AOSP | 镜像站使用帮助 | 清华大学开源软件镜像站 | Tsinghua Open Source Mirror
二、准备工作
1. repo工具安装
这个在前面已经安装过了。
2. repo源码
repo的源码:不仅仅是repo命令那一个脚本,而是repo的源码库,源码库中也会有repo命令。前面我们知道在进行repo init的时候是要进行repo源码的下载的,一般来讲,默认是从官方网站:https://gerrit.googlesource.com/git-repo,但是这里呢,我们又必须要科学上网,所以有两种办法。
2.1 使用清华源
参考文档在这里:AOSP | 镜像站使用帮助 | 清华大学开源软件镜像站 | Tsinghua Open Source Mirror,然后我们可以按照说明,一步一步操作。这个方式的话需要修改一下环境变量,但是其实命令改一下也行,不过还是改环境变量吧,方便一点:
1 | echo "export REPO_URL='https://mirrors.tuna.tsinghua.edu.cn/git/git-repo'" >> ~/.bashrc |
2.2 fork源码
这种方式当然就是在自己的github或者gitee中创建一个源码仓库就行了,可以从这里fork:GerritCodeReview/git-repo: repo - The Multiple Git Repository Tool - (mirror of https://gerrit.googlesource.com/git-repo) (github.com)。
说明:我没用这个,这个毕竟还是github,有时候也访问不了,我后面用的都是清华源的了。
3. 清单库
自己建一个叫manifest名字的git库,用来存放清单文件就可以。注意,必须至少有一个清单文件,这样才能根据清单文件拉代码,之后也才能生成新的清单文件。
这个是我的测试清单库:manifest: repo的清单库 (gitee.com),后来改成这个名字了:repo-manifest: repo的清单库 - Gitee.com
三、相关命令
1. repo init
1.1 命令说明
1 | repo init -u <URL> [<OPTIONS>] |
-u:指定manifests这个远程git库的URL,manifests库是整个项目的清单。默认情况,这个git库只包含了default.xml一个文件,其内容可以参见Android的样本
-m, –manifest-name:指定所需要的manifests库中的清单文件。默认情况下,会使用maniftests/default.xml
-b, –manifest-branch:指定manifest.xml文件中的一个版本,,也就是俗称的“分支”
还有这几个参数可能也会用到:
1 | repo Version options: |
- –-repo-url:指定远程repo库的URL,默认情况是https://gerrit.googlesource.com/git-repo,但国内访问Google受限,会导致这个库无法下载,从而导致repo init失败,所以可以通过该参数指定一个访问不受限的repo地址。
- –repo-rev:同manifest这个git库一样,repo这个git库也是有版本差异的,可以通过该参数来指定下载repo这个远程git库的特定分支。
- –no-repo-verify:在下载repo库时,会对repo的源码进行检查。通过–repo-url指定第三方repo库时,可能会导致检查不通过,所以可以配套使用该参数,强制不进行检查。
运行该命令后,会在当前目录下新建一个.repo子目录:
1 | .repo |
1.2 命令参考
这些本地的目录是如何生成的呢?执行repo命令时,可以通过-–trace参数,来看实际发生了什么。
1 | repo --trace init -u $URL -b $BRANCH -m $MANIFEST |
有的时候我们忘记设置git-repo源码位置的话,就会从默认地址下载源码,但是这又需要科学上网,就导致会失败,所以我们可以按照git-repo | 镜像站使用帮助 | 清华大学开源软件镜像站 | Tsinghua Open Source Mirror这里说的,修改环境变量,当然也可不修改,我们可以使用上面的两个参数:
1 | repo init --repo-url=<git-repo SRC_URL> --repo-rev=<git-repo SRC_BRANCH> -u <URL> [<OPTIONS>] |
注意:这里的两个URL都用http地址吧,不然好像会报错。
参考命令如下:
1 | repo --trace init --repo-url=https://mirrors.tuna.tsinghua.edu.cn/git/git-repo --repo-rev= -u https://gitee.com/xxx/manifest.git -b master -m xxx.xml |
1.3 使用实例
上面我们已经设置完了环境变量,然后我的manifest目录是:
1 | https://gitee.com/sumumm/manifest.git # 为了防止输入账号密码,我后面用的实SSH链接 |
初始化的命令如下:
1 | repo init https://gitee.com/sumumm/manifest.git -m default.xml |
我们还可加上–trace参数:
1 | repo --trace init https://gitee.com/sumumm/manifest.git -m default.xml |
会看到有如下打印信息:
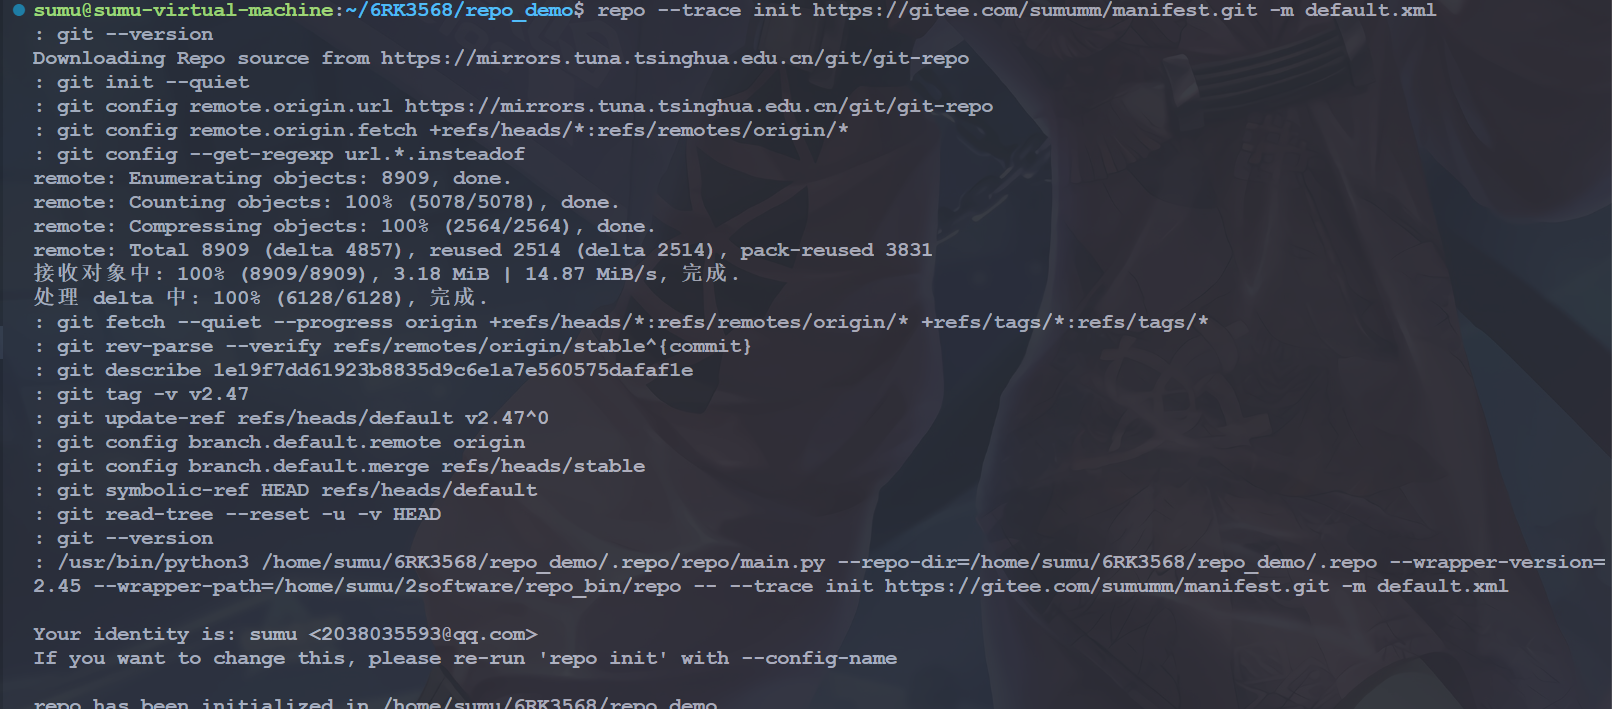
(1)在当前目录下创建.repo子目录,后续所有的操作都在.repo子目录下完成;
(2)clone了两个git库,其中一个是-u参数指定的manifests,本地git库的名称是manifest.git;另一个是默认的repo,后面我们会看到这个URL也可以通过参数来指定;
(3)创建了manifest/.git目录,里面的所有文件都是到manifests.git这个目录的链接,这个是为了方便对manifests目录执行git命令,
(4)将manifest切换到-b参数指定的分支;
(5)在.repo目录下,创建了一个软链接,链接到-m参数制定的清单文件,默认情况是manifests/default.xml。
这样,就完成了一个多git库的初始化,之后,就可以执行其他的repo命令了。
1.4 指定清单文件名
注意:这一部分的实例中清单库的名字后来我改掉了:repo-manifest: repo的清单库 - Gitee.com
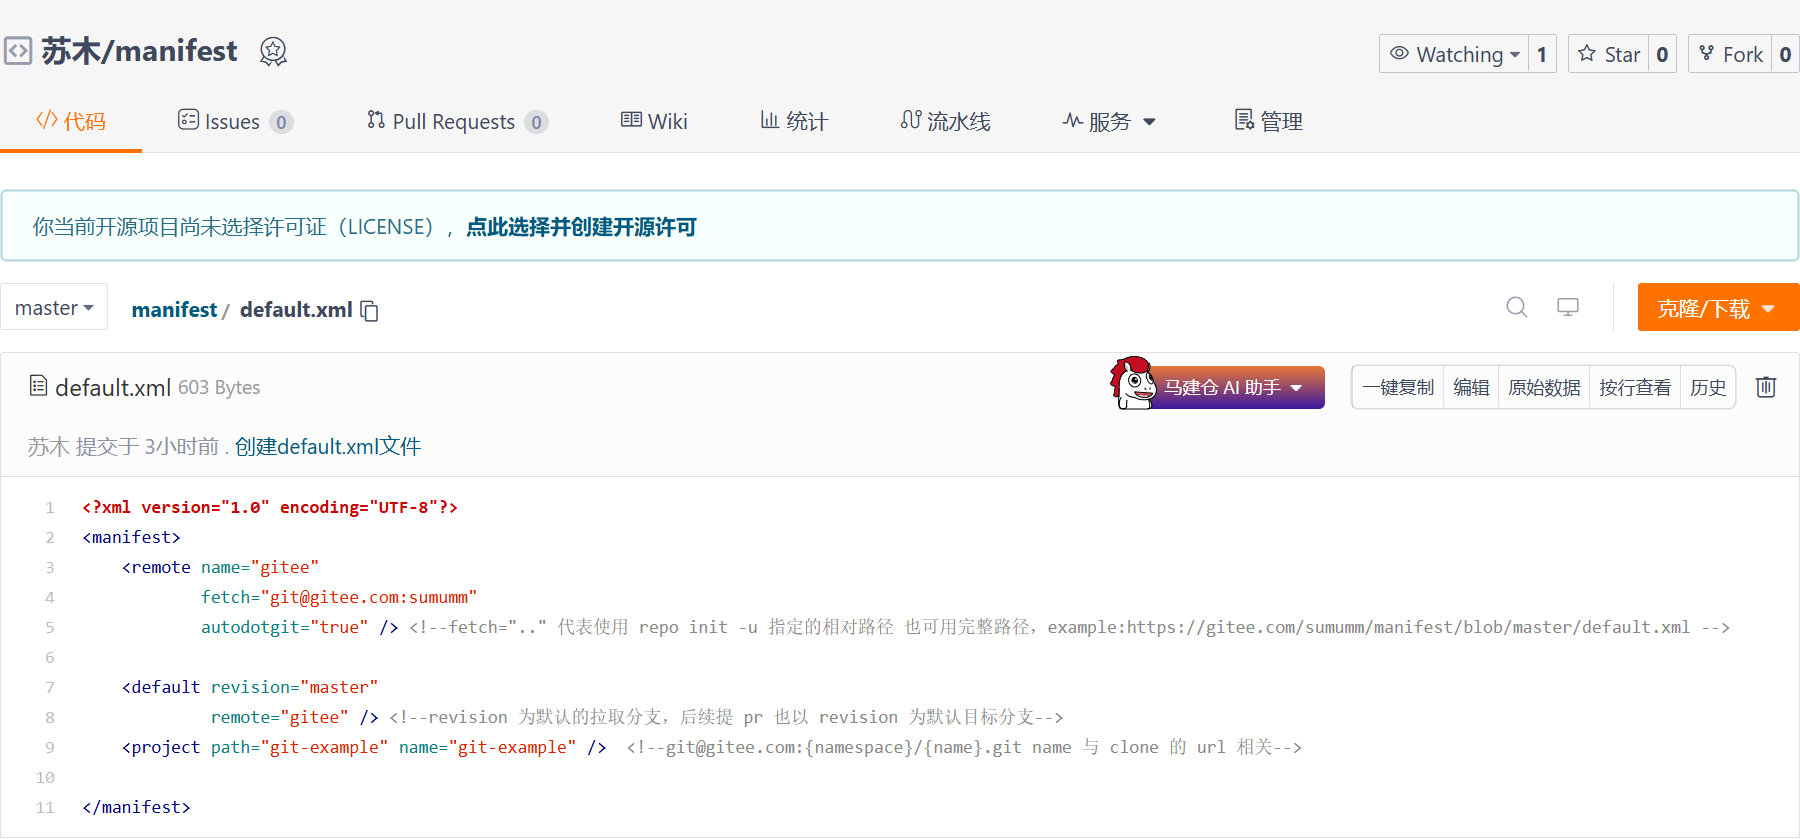
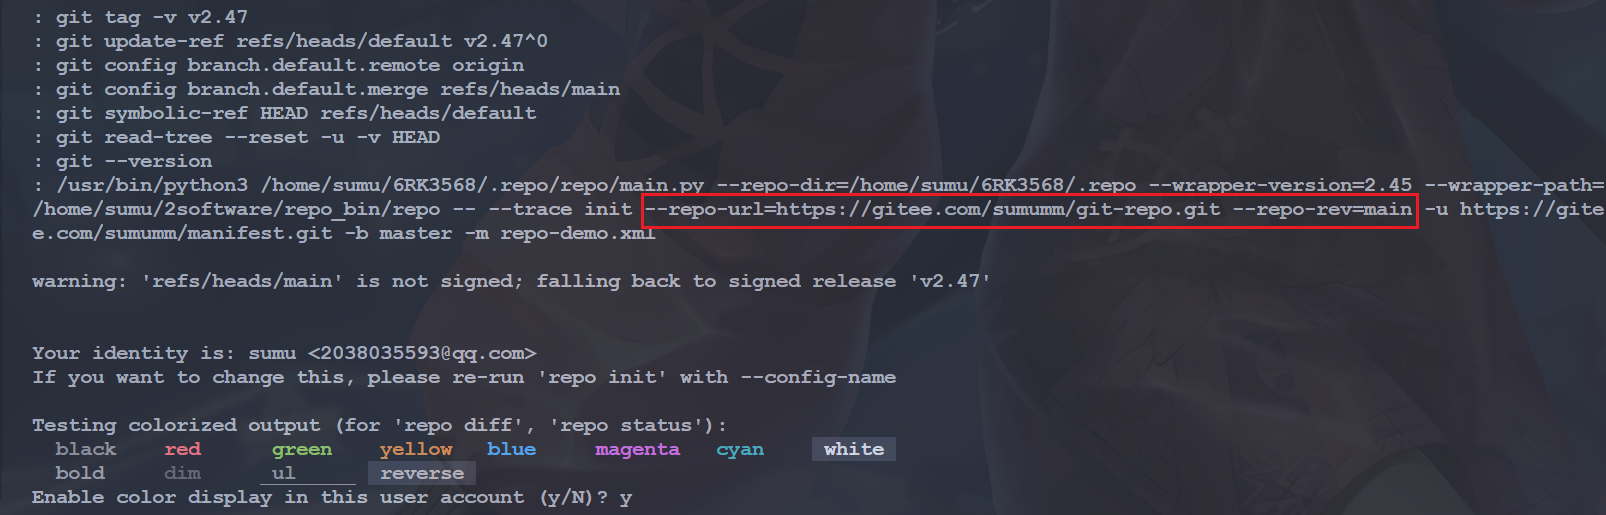
其实这里也不一定非要用default.xml,由于这个清单库的名字是固定的,我们不可能用这一个清单库只管理一个项目吧,那岂不是很浪费。前面我们知道这里是可以指定使用的xml文件的,所以我们可以修改清单库中默认xml文件名称为repo-demo.xml然后我们可以通过以下命令来创建一个项目:
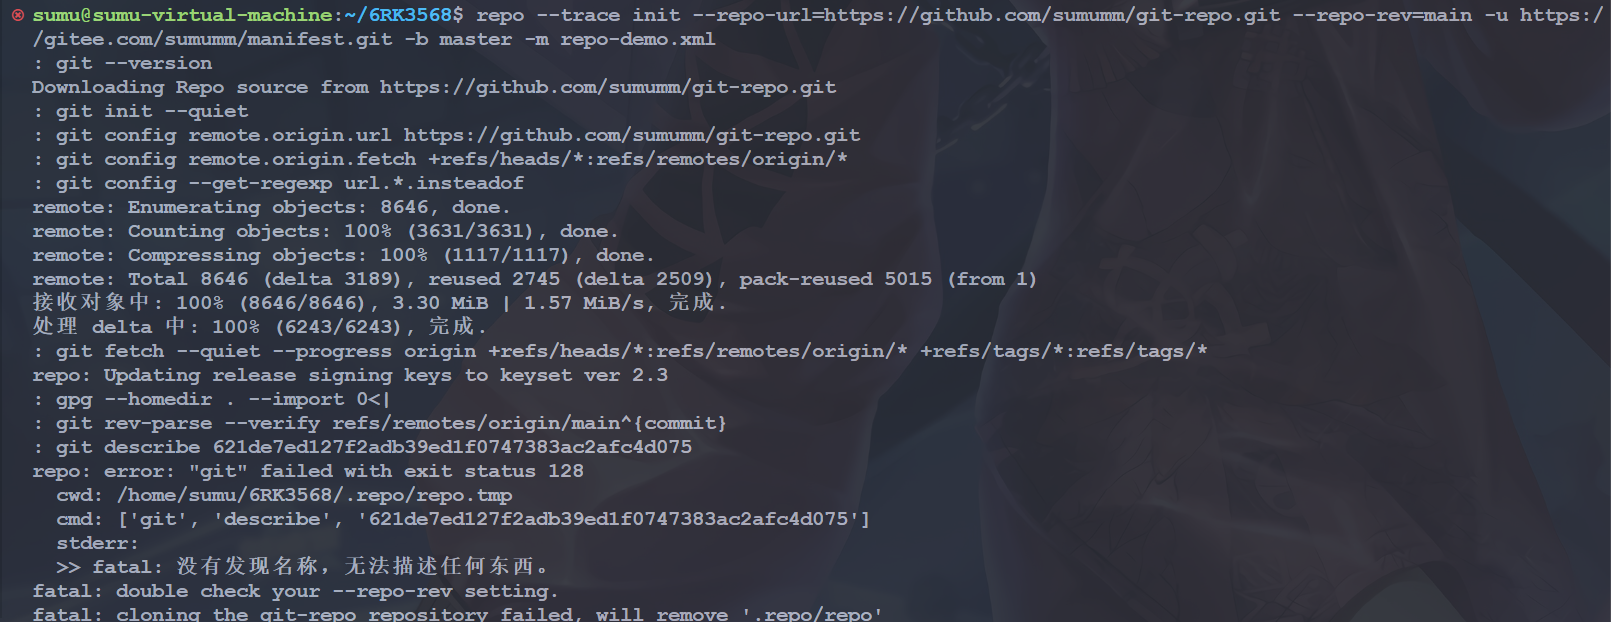
1 | repo --trace init --repo-url=https://gitee.com/sumumm/git-repo.git --repo-rev=main -u https://gitee.com/sumumm/manifest.git -b master -m repo-demo.xml |
自定义git-repo源码仓库的时候可能会出现无法访问的情况比如我用了自己github上的仓库,就出现了报错
但是我导入到gitee上就没问题了:
其实自己也没必要搞这么一个仓库,用清华源的那个就好啦:
1 | repo --trace init --repo-url=https://mirrors.tuna.tsinghua.edu.cn/git/git-repo --repo-rev= -u https://gitee.com/sumumm/manifest.git -b master -m repo-demo.xml |
这样也很快,这个不指定git-repo源码仓库分支也可以,就用默认的。所以这样修改xml名字后也完成了repo项目的初始化。我们能不能把xml放到其他文件夹中?我们来试一下(repo-manifest: repo的清单库 - Gitee.com):
1 | repo --trace init --repo-url=https://mirrors.tuna.tsinghua.edu.cn/git/git-repo --repo-rev= -u https://gitee.com/sumumm/manifest.git -b master -m repo-demo/repo-demo.xml |
就会发现这样也是可以的:

我们还可尝试创建链接文件到仓库目录下,这样就不用输入路径了,我们来试一下(repo-manifest: repo的清单库 - Gitee.com):
1 | repo --trace init --repo-url=https://mirrors.tuna.tsinghua.edu.cn/git/git-repo --repo-rev= -u https://gitee.com/sumumm/manifest.git -b master -m repo-demo.xml |
还是这个命令,但是仓库变成这个样子:

我们上传到gitee仓库,是这样的:

需要注意的是windows好像不太支持软链接,可能会有问题,我这个是在ubuntu中测试的。执行上面的命令后,也会创建成功:

1.5 指定清单库名
清单文件名可以自定义,那清单库名呢,应该也是可以的,我们可以修改清单库名称为:
1 | repo --trace init --repo-url=https://mirrors.tuna.tsinghua.edu.cn/git/git-repo --repo-rev= -u https://gitee.com/sumumm/repo-manifest.git -b master -m repo-demo.xml |
尝试一下,就会发现正常创建了.repo目录:
1 | sumu@sumu-virtual-machine:~/6RK3568$ repo --trace init --repo-url=https://mirrors.tuna.tsinghua.edu.cn/git/git-repo --repo-rev= -u https://gitee.com/sumumm/repo-manifest.git -b master -m repo-demo.xml |
2. repo sync
2.1 命令说明
1 | repo sync [PROJECT_LIST] |
下载远程代码,并将本地代码更新到最新,这个过程称为“同步”。如果不使用任何参数,那么会对所有repo管理的进行同步操作。也可以PROJECT_LIST参数,指定若干要同步的PROJECT。 根据本地git库代码不同,同步操作会有不同的行为:
(1)当本地的git库是第一次触发同步操作时,那么,该命令等价于git clone,会将远程git库直接拷贝到本地。
(2)当本地已经触发过同步操作时,那么,该命令等价于git remote update && git rebase origin/,就是当前与本地分支所关联的远程分支 代码合并可能会产生冲突,当冲突出现时,只需要解决完冲突,然后执行git rebase –continue即可。当sync命令正确执行完毕后,本地代码就同远程代码保持一致了。
在一些场景下,我们会用到sync命令的一些参数:
-j:开启多线程同步操作,这会加快sync命令的执行速度。默认情况下,使用4个线程并发进行sync
-c, –current-branch:只同步指定的远程分支。默认情况下,sync会同步所有的远程分支,当远程分支比较多的时候,下载的代码量就大。使用该参数,可以缩减下载时间,节省本地磁盘空间
-d, –detach:脱离当前的本地分支,切换到manifest.xml中设定的分支。在实际操作中,这个参数很有用,当我们第一次sync完代码后,往往会切换到dev分支进行开发。如果不带该参数使用sync, 则会触发本地的dev分支与manifest设定的远程分支进行合并,这会很可能会导致sync失败
-f, –force-broken:当有git库sync失败了,不中断整个同步操作,继续同步其他的git库。
2.2 使用实例
上面我们已经初始化好repo项目了,接下来我们同步一下:
1 | repo sync |
会看到有如下打印信息:
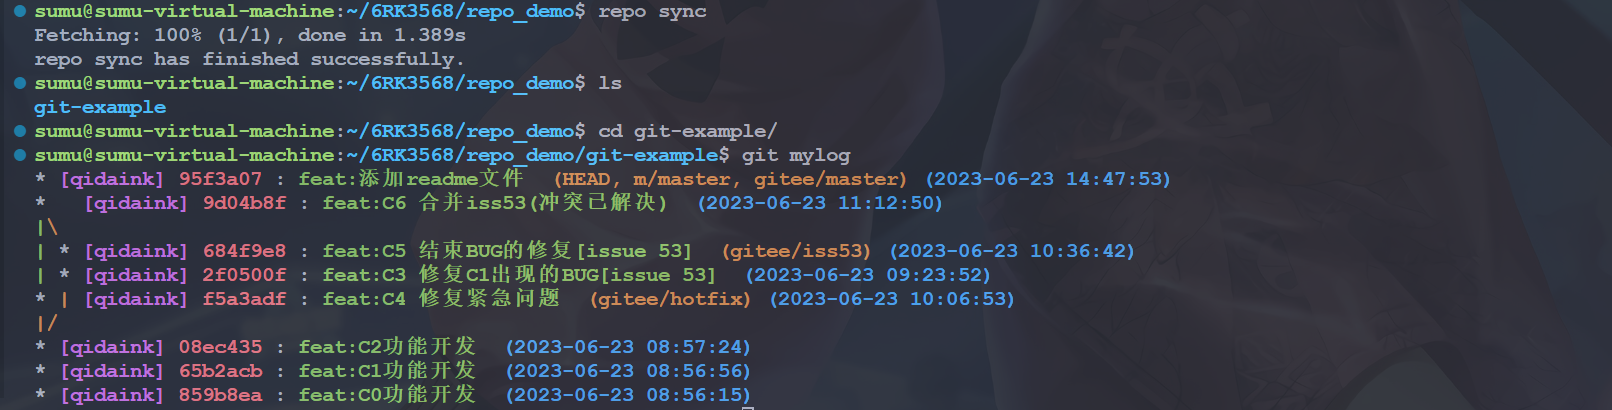
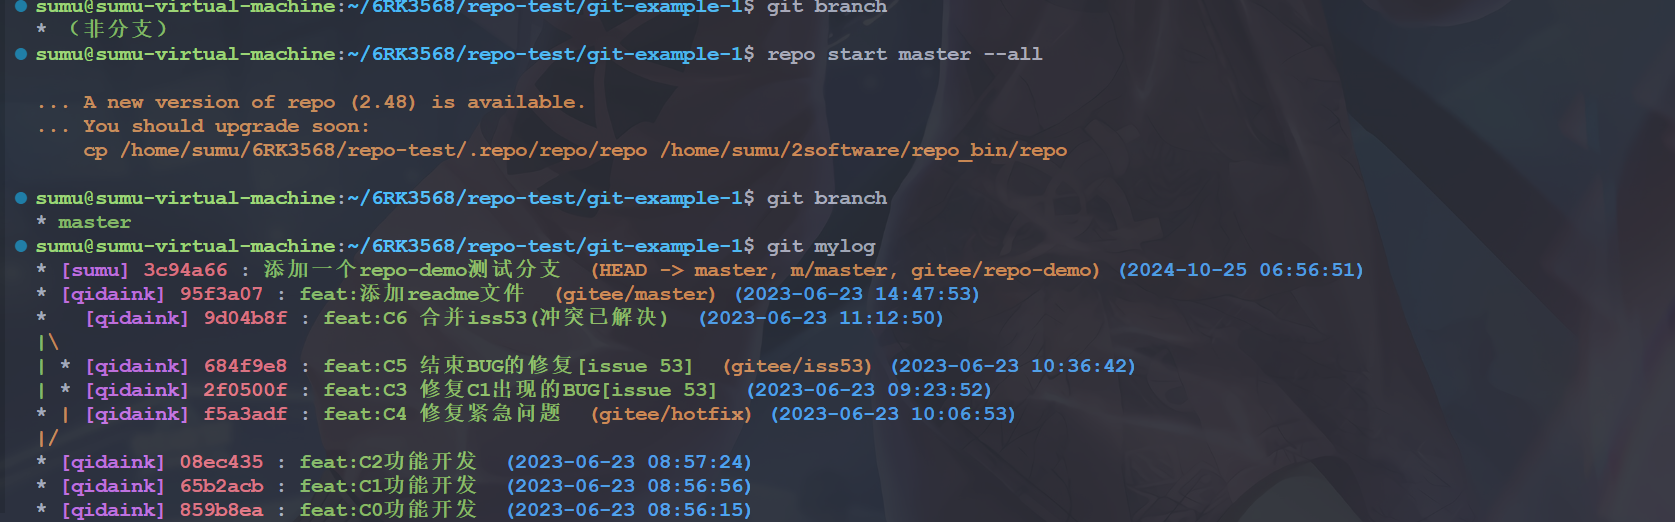
我们进到仓库中查看提交记录,会发现与原来的仓库一致。但是我们进入仓库查看一下现在在哪个分支,会看到如下内容:

会发现其实现在仓库是处于一个分离头指针状态,没有任何分支,我们可以手动使用git switch -c branch_name创建分支,但是当项目很多的时候就很繁琐了,我们继续向后看repo start命令。
3. repo start
3.1 命令说明
1 | repo start <newbranchname> [--all | <project>...] |
命令用于在一个或多个项目中创建一个新的分支。它使得开发者能够方便地从当前的代码状态开始新的开发工作,尤其在处理多项目代码库时非常有用。
- newbranchname:是自定义的,它将追踪manifest中指定的分支名。
- project:指定了将参与此主题分支的项目。
- –all表示所有的项目都开始新的分支。
repo start是对git checkout -b 命令的封装。这条指令与git checkout -b 还是有很大的区别的,git checkout -b 是在当前所在的分支的基础上创建特性分支,而repo start是在清单文件中设定的分支的基础上创建特性分支。例如:repo start stable –all(所有项目)
假设清单文件中设定的分支是gingerbread-stable,那么执行以上指令就是对所有项目,在gingerbread-stable的基础上创建特性分支stable。
3.2 使用实例
1 | repo start master --all |