本文主要是自定义NexT主题相关笔记,若笔记中有错误或者不合适的地方,欢迎批评指正😃。
点击查看使用工具及版本
Windows windows11 Ubuntu Ubuntu16.04的64位版本 VMware® Workstation 16 Pro 16.2.3 build-19376536
点击查看本文参考资料
点击查看相关文件下载
本文主要介绍在NexT下的几种优化显示的方式,本文写的时候使用的是v7.8.0,后续更新可能有些地方不再适用,但是都大同小异。
一、浏览器网页标题 1. 新建效果实现文件 1 vim ~/02MyBlog/hexofiles/themes/next/source/js/funnytitle.js
添加以下代码(我这里没有设置网页标题图标):
1 2 3 4 5 6 7 8 9 10 11 12 13 14 15 var OriginTitle = document.title;var titleTime;document.addEventListener ('visibilitychange' , function () { if (document.hidden) { document.title = '╭(°A°`)╮ 页面崩溃啦 ~' ; clearTimeout (titleTime); } else { document.title = '(ฅ>ω<*ฅ) 噫又好啦 ~' + OriginTitle; titleTime = setTimeout (function () { document.title = OriginTitle; }, 2000 ); } });
2. 引用 1 vim ~/02MyBlog/hexofiles/themes/next/layout/_layout.swig
在<body></body>内添加以下代码:
1 2 <script type ="text/javascript" src ="/js/funnytitle.js" > </script >
二、添加页面卡通人物 1. 基础live2d模型 项目地址:hexo-helper-live2d
1 npm install --save hexo-helper-live2d
模型地址:live2d-widget-models
1
2
# 用以下命令下载,我使用的是live2d-widget-model-shizuku npm install packagename
1 vim ~/02MyBlog/hexofiles/_config.yml
添加以下代码:
1
2
3
4
5
6
7
8
9
10
11
live2d: enable: true scriptFrom: local model: use: live2d-widget-model-shizuku display: position: right width: 150 height: 300 mobile: show: false
2. 升级版live2d 1 npm uninstall hexo-helper-live2d
删除之前的模型live2d-widget-model-shizuku及配置
删除node_modules下的模型文件。
1 rm -r ~/02MyBlog/hexofiles/node_modules/live2d-widget-model-shizuku/
编辑站点配置文件,将2.1节中在站点配置文件中添加的数据删除。
1 vim ~/02MyBlog/hexofiles/_config.yml
加强版live2d项目地址:live2d-widget 。可以folk该项目到自己的仓库中,以便于寻找,folk完毕后就可以从自己的仓库中下载该代码了。
1
2
3
4
# 进入站点根目录 cd ~/02MyBlog/hexofiles/ # 下载文件 git clone https://github.com/sumumm/live2d-widget.git themes/next/source/mylive2d
打开相应的文件_layout.swig。
1 vim ~/02MyBlog/hexofiles/themes/next/layout/_layout.swig
在<body><body>添加jquery.min.js依赖(我在樱花特效的时候已经添加过了)
1 2 <script type ="text/javascript" src ="/js/jquery.min.js" > </script >
在<head></head>添加font-awesome.min.css图标支持。
1 2 <link rel ="stylesheet" href ="https://cdn.jsdelivr.net/npm/font-awesome/css/font-awesome.min.css" >
1
2
# 打开相应的文件 vim ~/02MyBlog/hexofiles/themes/next/layout/_layout.swig
在<body></body>内添加以下代码。
1 2 3 4 <script src ="https://cdn.jsdelivr.net/gh/username/live2d-widget@latest/autoload.js" > </script > <script src ="/mylive2d/autoload.js" > </script >
修改mylive2d文件下的autoloads.js
打开autoloads.js文件。
1 vim ~/02MyBlog/hexofiles/themes/next/source/mylive2d/autoload.js
修改开头的路径为以下情况:
1 2 3 4 const live2d_path = "/mylive2d/" ;
三、压缩静态页面 本地浏览的话,网站访问还是很快的,但是放到GitHub Pages的时候就很慢了,如何加快访问速度呢?可以从以下入手:
(1)将js文件尽可能放到body的闭合标签之前,因为在加载或者引入js文件时是阻塞式的,如果在页面的最开始就引入这些js文件,而这些文件又比较大,会造成页面在渲染时长时间处于白屏状态。
(2)尽量避免去引用访问速度非常低下的cdn或者图片,可改用访问速度更快的cdn,或将难以迅速加载的图片保存到自己的站点目录下,以免在加载图片时耗费大量时间。
(3)对页面的静态资源进行压缩,包括css、js和html等文件。
1
2
3
4
# 安装gulp npm install gulp -g # 插件安装 npm install gulp-minify-html gulp-minify-css gulp-uglify gulp-imagemin --save
1 vim ~/02MyBlog/hexofiles/gulpfile.js
添加以下代码:
1
2
3
4
5
6
7
8
9
10
11
12
13
14
15
16
17
18
19
20
21
22
23
24
25
26
27
28
var gulp = require ('gulp' );var minifycss = require ('gulp-minify-css' );var uglify = require ('gulp-uglify' );var minifyhtml = require ('gulp-minify-html' );gulp.task ('minify-css' , function ( return gulp.src ('./public/css/*.css' ) .pipe (minifycss ()) .pipe (gulp.dest ('./public' )); }); gulp.task ('minify-html' , function ( return gulp.src ('./public/*.html' ) .pipe (minifyhtml ()) .pipe (gulp.dest ('./public' )) }); gulp.task ('minify-js' , function ( return gulp.src (['./public/js/*.js' , '!./public/lib/blog-encrypt.js' ]) .pipe (uglify ()) .pipe (gulp.dest ('./public' )) }); gulp.task ('default' , gulp.parallel ('minify-css' , 'minify-html' , 'minify-js' ));
四、 分页显示 1 2 # 打开站点配置文件 vim ~/02MyBlog/hexofiles/_config.yml
找到以下代码:
1 2 3 4 per_page: 5 pagination_dir: page
在站点配置文件的以下代码中:
1 2 3 4 5 6 7 8 index_generator: path: '' per_page: 3 order_by: page
五、文章超链接显示为蓝色 在部署完成后会发现文章中的超链接都是没有颜色的,并不能明显区分,所以可以进行以下优化。
1 2 # 打开相应文件 vim ~/02MyBlog/hexofiles/themes/next/source/css/_common/components/post/post.styl
添加以下内容:
1 2 3 4 5 6 7 8 .post-body p a{ color : #0593d3 ; border-bottom : none; &:hover { color : #0477ab ; text-decoration : underline; } }
六、新建一个菜单选项 这里新建了一个留言板菜单,后边会增加相应的功能,目前是熟悉以下在NexT中新增菜单的方法。
1 vim ~/02MyBlog/hexofiles/source/guestbook/index.md
添加以下内容:
1 <div class ="ds-recent-visitors" data-num-items ="28" data-avatar-size ="42" id ="ds-recent-visitors" > </div >
1 vim ~/02MyBlog/hexofiles/themes/next/_config.yml
在menu中添加以下内容,fas fa-edit为菜单图标,来源于Font Awesome 。
1 guestbook: /guestbook || fas fa-edit
1 vim ~/02MyBlog/hexofiles/themes/next/languages/zh-CN.yml
在menu中添加以下内容:
七、添加评论系统 Hexo的评论系统有很多,常见的有以下几个:
畅言、来必力(LiveRe)、Disqus、Hypercomments和valine,畅言需要备案,Disqus,Hypercomments和LiveRe都是国外的,加载速度贼慢,而NexT主题中直接含有valine的相关配置选项,所以我便采用了valine和来必力两种,由于不是专业写博客,所以评论不是很重要,这一章就略微简写。
项目地址:Valine
说明文档:Valine说明文档
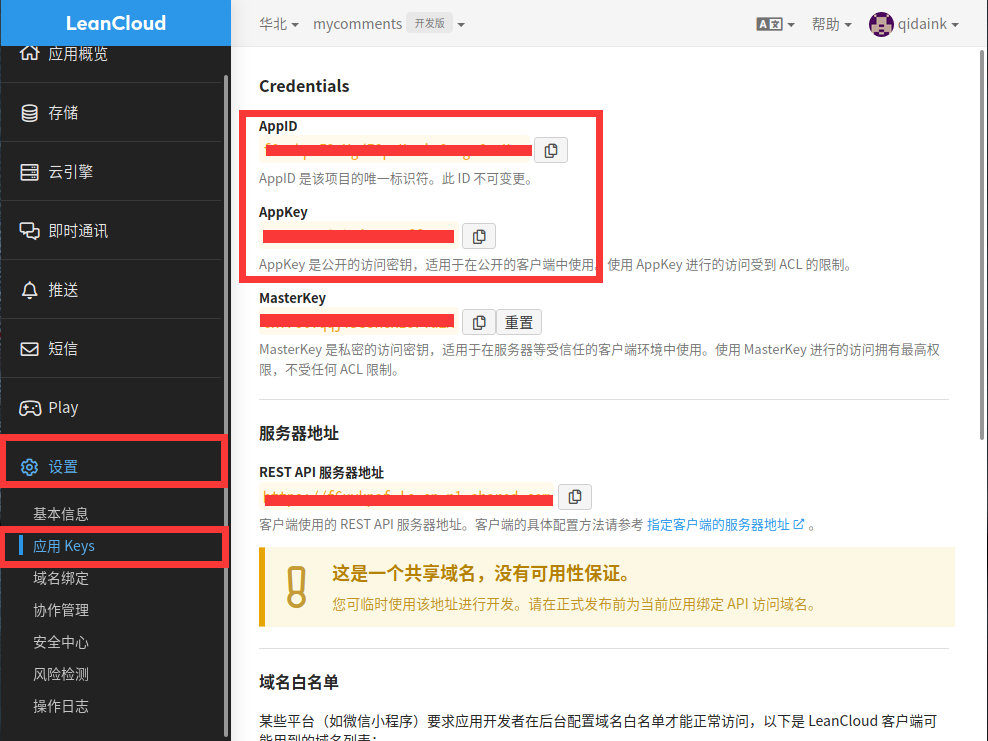
1. 开启valine Leancloud官网:leancloud官网,点击访问
1 https://www.leancloud.cn/
随便创建一个应用即可,然后记录下图中的两个值。
1 vim ~/02MyBlog/hexofiles/themes/next/_config.yml
找到以下代码,修改相应位置即可:
1 2 3 4 5 6 7 8 9 10 11 12 13 14 15 16 17 18 valine: enable: true appid: AppId appkey: AppKey notify: false verify: false placeholder: 欢迎评论呀! avatar: identicon guest_info: nick,mail pageSize: 5 language: zh-CN visitor: false comment_count: true recordIP: false serverURLs:
2. 来必力评论系统 官网地址:来必力 。进入官网之后正常注册即可,注册完毕后来到控制台后点击代码管理,会得到以下代码,记录下data-uid。
1 2 3 4 5 6 7 8 9 10 11 12 13 14 15 16 17 18 <div id ="lv-container" data-id ="city" data-uid ="**************************" > <script type ="text/javascript" > (function (d, s ) { var j, e = d.getElementsByTagName (s)[0 ]; if (typeof LivereTower === 'function' ) { return ; } j = d.createElement (s); j.src = 'https://cdn-city.livere.com/js/embed.dist.js' ; j.async = true ; e.parentNode .insertBefore (j, e); })(document , 'script' ); </script > <noscript > 为正常使用来必力评论功能请激活JavaScript</noscript > </div >
在NexT中,已经集成了该评论系统,只需要打开即可。
1 2 # 打开主题配置文件 vim ~/02MyBlog/hexofiles/themes/next/_config.yml
找到以下代码,并添加自己的data-uid即可开启该评论系统。
八、添加标签云 1 2 3 4 # 进入站点根目录 cd cd ~/02MyBlog/hexofiles/ # 安装插件 npm install hexo-tag-cloud@^2.0.* --save
1 2 # 打开相应文件 vim ~/02MyBlog/hexofiles/themes/next/layout/_macro/sidebar.swig
找到以下代码:
1 2 3 4 5 6 {%- if theme.back2top.enable and theme.back2top.sidebar %} <div class ="back-to-top motion-element" > <i class ="fa fa-arrow-up" > </i > <span > 0%</span > </div > {%- endif %}
在后边添加以下代码:
1 2 3 4 5 6 7 8 9 10 11 12 {% if site.tags.length > 1 %} <script type ="text/javascript" charset ="utf-8" src ="/js/tagcloud.js" > </script > <script type ="text/javascript" charset ="utf-8" src ="/js/tagcanvas.js" > </script > <div class ="widget-wrap" > <h3 class ="widget-title" > 我的标签云</h3 > <div id ="myCanvasContainer" class ="widget tagcloud" > <canvas width ="100" height ="100" id ="resCanvas" style ="width=100%" > {{ list_tags() }} </canvas > </div > </div > {% endif %}
1
2
# 打开主题配置文件 vim ~/02MyBlog/hexofiles/themes/next/_config.yml
添加以下代码:
1 2 3 4 5 6 7 tag_cloud: textFont: Trebuchet MS, Helvetica textColor: '#333' textHeight: 30 outlineColor: '#E2E1D1' maxSpeed: 0.1
九、文章内链接鼠标悬停效果 打开相应文件
1 vim themes/next/source/css/_common/components/post/post.styl
添加以下代码
1 2 3 4 5 6 7 8 9 10 .post-body p a{ color : #0593d3 ; border-bottom : none; border-bottom : 1px solid #0593d3 ; &:hover { color : #fc6423 ; border-bottom : none; border-bottom : 1px solid #fc6423 ; } }