本文主要是GPIO控制——应用开发实例的相关笔记,若笔记中有错误或者不合适的地方,欢迎批评指正😃。
点击查看使用工具及版本
| PC端开发环境 | Windows | Windows11 |
| Ubuntu | Ubuntu20.04.6的64位版本(一开始使用的是16.04版本,后来进行了升级) |
| VMware® Workstation 17 Pro | 17.0.0 build-20800274 |
| 终端软件 | MobaXterm(Professional Edition v23.0 Build 5042 (license)) |
| Win32DiskImager | Win32DiskImager v1.0 |
| Linux开发板环境 | Linux开发板 | 正点原子 i.MX6ULL Linux 阿尔法开发板 |
| uboot | NXP官方提供的uboot,NXP提供的版本为uboot-imx-rel_imx_4.1.15_2.1.0_ga(使用的uboot版本为U-Boot 2016.03) |
| linux内核 | linux-4.15(NXP官方提供) |
点击查看本文参考资料
点击查看相关文件下载
这一部分的示例可以看这里:LV16_GPIO_CTRL · 苏木/imx6ull-app-demo - 码云 - 开源中国 (gitee.com)
一、GPIO——输出
1. 代码编写
控制开发板上的某一个 GPIO 输出高、低不同的电平状态 的代码如下:
1
2
3
4
5
6
7
8
9
10
11
12
13
14
15
16
17
18
19
20
21
22
23
24
25
26
27
28
29
30
31
32
33
34
35
36
37
38
39
40
41
42
43
44
45
46
47
48
49
50
51
52
53
54
55
56
57
58
59
60
61
62
63
64
65
66
67
68
69
70
71
72
73
74
75
76
77
78
79
80
81
82
83
84
85
86
87
88
89
90
91
92
93
94
95
96
97
98
99
100
101
|
#include <stdio.h>
#include <stdlib.h>
#include <sys/types.h>
#include <sys/stat.h>
#include <fcntl.h>
#include <unistd.h>
#include <string.h>
static char gpio_out_path[100];
static int gpio_out_config(const char *attr, const char *val)
{
int len = 0;
int fd = -1;
char file_path[100] = {0};
sprintf(file_path, "%s/%s", gpio_out_path, attr);
if (0 > (fd = open(file_path, O_WRONLY)))
{
perror("open error");
return fd;
}
len = strlen(val);
if (len != write(fd, val, len))
{
perror("write error");
close(fd);
return -1;
}
close(fd);
return 0;
}
int main(int argc, char *argv[])
{
if (3 != argc)
{
fprintf(stderr, "usage: %s <gpio> <value>\n", argv[0]);
exit(-1);
}
sprintf(gpio_out_path, "/sys/class/gpio/gpio%s", argv[1]);
if (access(gpio_out_path, F_OK))
{
int fd = -1;
int len = 0;
if (0 > (fd = open("/sys/class/gpio/export", O_WRONLY)))
{
perror("open error");
exit(-1);
}
len = strlen(argv[1]);
if (len != write(fd, argv[1], len))
{
perror("write error");
close(fd);
exit(-1);
}
close(fd);
}
if (gpio_out_config("direction", "out"))
{
exit(-1);
}
if (gpio_out_config("active_low", "0"))
{
exit(-1);
}
if (gpio_out_config("value", argv[2]))
{
exit(-1);
}
exit(0);
}
|
执行程序时需要传入两个参数, argv[1]指定 GPIO 的编号、 argv[2]指定输出电平状态(0 表示低电平、1 表示高电平)。
上述代码中首先使用 access()函数判断指定编号的 GPIO 引脚是否已经导出,也就是判断相应的 gpioX目录是否存在,如果不存在则表示未导出,则通过”/sys/class/gpio/export”文件将其导出;导出之后先配置了GPIO 引脚为输出模式,也就是向 direction 文件中写入”out”;接着再配置极性,通过向 active_low 文件中写入”0”(不用配置也可以) ;最后再控制 GPIO 引脚输出相应的电平状态,通过对 value 属性文件写入”1”或
“0”来使其输出高电平或低电平。
2. 开发板测试
在测试之前,选择一个测试引脚,这里以板子上的 GPIO1_IO01 引脚为例,该引脚在底板上已经引出,如下所示:
![image-20240905073307815]()
执行该应用程序控制开发板上的 GPIO1_IO01 引脚输出高或低电平:
1
2
| ./app_demo 1 1 #控制 GPIO1_IO01 输出高电平
./app_demo 1 0 #控制 GPIO1_IO01 输出低电平
|
执行相应的命令后,可以使用万用表或者连接一个 LED 小灯进行检验,以验证实验结果!
二、GPIO——输入
1. 代码编写
某引脚配置为输入,读取电平状态的代码如下:
1
2
3
4
5
6
7
8
9
10
11
12
13
14
15
16
17
18
19
20
21
22
23
24
25
26
27
28
29
30
31
32
33
34
35
36
37
38
39
40
41
42
43
44
45
46
47
48
49
50
51
52
53
54
55
56
57
58
59
60
61
62
63
64
65
66
67
68
69
70
71
72
73
74
75
76
77
78
79
80
81
82
83
84
85
86
87
88
89
90
91
92
93
94
95
96
97
98
99
100
101
102
103
104
105
106
107
108
109
110
111
112
113
114
115
116
117
118
119
120
121
122
|
#include <stdio.h>
#include <stdlib.h>
#include <sys/types.h>
#include <sys/stat.h>
#include <fcntl.h>
#include <unistd.h>
#include <string.h>
static char gpio_in_path[100];
static int gpio_in_config(const char *attr, const char *val)
{
int len = 0;
int fd = -1;
char file_path[100] = {0};
sprintf(file_path, "%s/%s", gpio_in_path, attr);
if (0 > (fd = open(file_path, O_WRONLY)))
{
perror("open error");
return fd;
}
len = strlen(val);
if (len != write(fd, val, len))
{
perror("write error");
close(fd);
return -1;
}
close(fd);
return 0;
}
int main(int argc, char *argv[])
{
char val = 0;
int fd = -1;
char file_path[100] = {0};
if (2 != argc)
{
fprintf(stderr, "usage: %s <gpio>\n", argv[0]);
exit(-1);
}
sprintf(gpio_in_path, "/sys/class/gpio/gpio%s", argv[1]);
if (access(gpio_in_path, F_OK))
{
int len = 0;
if (0 > (fd = open("/sys/class/gpio/export", O_WRONLY)))
{
perror("open error");
exit(-1);
}
len = strlen(argv[1]);
if (len != write(fd, argv[1], len))
{
perror("write error");
close(fd);
exit(-1);
}
close(fd);
}
if (gpio_in_config("direction", "in"))
{
exit(-1);
}
if (gpio_in_config("active_low", "0"))
{
exit(-1);
}
if (gpio_in_config("edge", "none"))
{
exit(-1);
}
sprintf(file_path, "%s/%s", gpio_in_path, "value");
if (0 > (fd = open(file_path, O_RDONLY)))
{
perror("open error");
exit(-1);
}
if (0 > read(fd, &val, 1))
{
perror("read error");
close(fd);
exit(-1);
}
printf("value: %c\n", val);
close(fd);
exit(0);
}
|
执行程序时需要传入一个参数, argv[1]指定要读取电平状态的 GPIO 对应的编号。上述代码中首先使用 access()函数判断指定编号的 GPIO 引脚是否已经导出, 若未导出, 则通过”/sys/class/gpio/export”文件将其导出;导出之后先配置了 GPIO 引脚为输入模式,也就是向 direction 文件中写入”in”;接着再配置极性、设置 GPIO 引脚为非中断模式(向 edge 属性文件中写入”none”)。最后打开 value 属性文件,读取 GPIO 的电平状态并将其打印出来。
2. 开发板测试
在测试之前,选择一个测试引脚,这里以板子上的 GPIO1_IO01 引脚为例,该引脚在底板上已经引出,如下所示:
![image-20240905073307815]()
首先通过杜邦线将 GPIO1_IO01 引脚连接到板子上的 3.3V 电源引脚上,接着执行命令读取 GPIO 电平状态。命令如下:
应该会看到打印出的 value 等于 1,表示读取到 GPIO 的电平确实是高电平;接着将 GPIO1_IO01 引脚连接到板子上的 GND 引脚上,执行命令:
应该会看到打印出的 value 等于 0,表示读取到 GPIO 的电平确实是低电平。
三、GPIO——中断
1. 代码编写
在应用层可以将 GPIO 配置为中断触发模式,例如将 GPIO 配置为上升沿触发、下降沿触发或者边沿触发 。将 GPIO 配置为边沿触发模式并监测中断触发状态的示例代码如下:
1
2
3
4
5
6
7
8
9
10
11
12
13
14
15
16
17
18
19
20
21
22
23
24
25
26
27
28
29
30
31
32
33
34
35
36
37
38
39
40
41
42
43
44
45
46
47
48
49
50
51
52
53
54
55
56
57
58
59
60
61
62
63
64
65
66
67
68
69
70
71
72
73
74
75
76
77
78
79
80
81
82
83
84
85
86
87
88
89
90
91
92
93
94
95
96
97
98
99
100
101
102
103
104
105
106
107
108
109
110
111
112
113
114
115
116
117
118
119
120
121
122
123
124
125
126
127
128
129
130
131
132
133
134
135
136
137
138
139
140
141
142
143
144
145
146
147
148
149
150
151
152
153
154
155
|
#include <stdio.h>
#include <stdlib.h>
#include <sys/types.h>
#include <sys/stat.h>
#include <fcntl.h>
#include <unistd.h>
#include <string.h>
#include <poll.h>
static char gpio_intr_path[100];
static int gpio_intr_config(const char *attr, const char *val)
{
int len = 0;
int fd = -1;
char file_path[100] = {0};
sprintf(file_path, "%s/%s", gpio_intr_path, attr);
if (0 > (fd = open(file_path, O_WRONLY)))
{
perror("open error");
return fd;
}
len = strlen(val);
if (len != write(fd, val, len))
{
perror("write error");
return -1;
}
close(fd);
return 0;
}
int main(int argc, char *argv[])
{
int ret = 0;
char val = 0;
struct pollfd pfd = {0};
char file_path[100] = {0};
if (2 != argc)
{
fprintf(stderr, "usage: %s <gpio>\n", argv[0]);
exit(-1);
}
sprintf(gpio_intr_path, "/sys/class/gpio/gpio%s", argv[1]);
if (access(gpio_intr_path, F_OK))
{
int len = 0;
int fd = -1;
if (0 > (fd = open("/sys/class/gpio/export", O_WRONLY)))
{
perror("open error");
exit(-1);
}
len = strlen(argv[1]);
if (len != write(fd, argv[1], len))
{
perror("write error");
exit(-1);
}
close(fd);
}
if (gpio_intr_config("direction", "in"))
{
exit(-1);
}
if (gpio_intr_config("active_low", "0"))
{
exit(-1);
}
if (gpio_intr_config("edge", "both"))
{
exit(-1);
}
sprintf(file_path, "%s/%s", gpio_intr_path, "value");
if (0 > (pfd.fd = open(file_path, O_RDONLY)))
{
perror("open error");
exit(-1);
}
pfd.events = POLLPRI;
read(pfd.fd, &val, 1);
for (;;)
{
ret = poll(&pfd, 1, -1);
if (0 > ret)
{
perror("poll error");
exit(-1);
}
else if (0 == ret)
{
fprintf(stderr, "poll timeout.\n");
continue;
}
if (pfd.revents & POLLPRI)
{
if (0 > lseek(pfd.fd, 0, SEEK_SET))
{
perror("lseek error");
exit(-1);
}
if (0 > read(pfd.fd, &val, 1))
{
perror("read error");
exit(-1);
}
printf("GPIO中断触发<value=%c>\n", val);
}
}
exit(0);
}
|
2. 开发板测试
在测试之前,选择一个测试引脚,这里以板子上的 GPIO1_IO02 (图中红框下面的引脚)引脚为例,该引脚在底板上已经引出,如下所示:
![image-20240905073307815]()
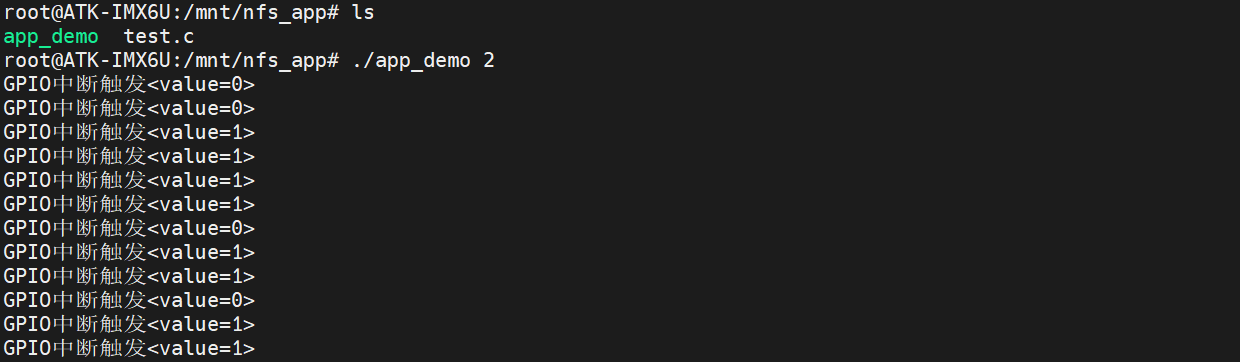
执行应用程序监测 GPIO1_IO02 引脚的中断触发情况,如下所示 :
1
| ./app_demo 2 # 监测 GPIO1_IO02 引脚中断触发
|
当执行命令之后,我们可以使用杜邦线将 GPIO1_IO02 引脚连接到 GND 或 3.3V 电源引脚上,来回切换,使得 GPIO1_IO02 引脚的电平状态发生由高到低或由低到高的状态变化, 以验证 GPIO 中断的边沿触发情况;当发生中断时,终端将会打印相应的信息,如上图所示。
![image-20240905074717197]()