LV05-02-U-Boot-04-uboot下命令的执行

本文主要是uboot——uboot下命令的执行流程的相关笔记,若笔记中有错误或者不合适的地方,欢迎批评指正😃。

点击查看使用工具及版本
PC端开发环境 Windows Windows11
Ubuntu Ubuntu20.04.2的64位版本
VMware® Workstation 17 Pro 17.6.0 build-24238078
终端软件 MobaXterm(Professional Edition v23.0 Build 5042 (license))
Win32DiskImager Win32DiskImager v1.0
Linux开发板环境 Linux开发板 正点原子 i.MX6ULL Linux 阿尔法开发板
uboot NXP官方提供的uboot,使用的uboot版本为U-Boot 2019.04
linux内核 linux-4.19.71(NXP官方提供)
点击查看本文参考资料
分类 网址 说明
官方网站 https://www.arm.com/ ARM官方网站,在这里我们可以找到Cotex-Mx以及ARMVx的一些文档
https://www.nxp.com.cn/ NXP官方网站
https://www.nxpic.org.cn/NXP 官方社区
https://u-boot.readthedocs.io/en/latest/u-boot官网
https://www.kernel.org/linux内核官网
其他网站 kernel - Linux source code (v4.15) - Bootlin linux内核源码在线查看
点击查看相关文件下载
分类 网址 说明
NXP https://github.com/nxp-imx NXP imx开发资源GitHub组织,里边会有u-boot和linux内核的仓库
nxp-imx/linux-imx/releases/tag/v4.19.71 NXP linux内核仓库tags中的v4.19.71
nxp-imx/uboot-imx/releases/tag/rel_imx_4.19.35_1.1.0 NXP u-boot仓库tags中的rel_imx_4.19.35_1.1.0
I.MX6ULL i.MX 6ULL Applications Processors for Industrial Products I.MX6ULL 芯片手册(datasheet,可以在线查看)
i.MX 6ULL Applications ProcessorReference Manual I.MX6ULL 参考手册(下载后才能查看,需要登录NXP官网)
Source Code https://elixir.bootlin.com/linux/latest/source linux kernel源码
https://elixir.bootlin.com/u-boot/latest/source uboot源码

我们进入uboot界面后敲命令就可以执行,我们从敲命令到按下enter键到执行是怎样的一个过程?uboot怎么识别到我们敲了什么命令,怎么执行的?这一节就来探讨一下吧。

注意:本篇笔记从链接文件开始分析,但是不会详细分析,后面会专门学习uboot的启动流程,会详细的去分析uboot是怎么启动起来的。这里我们的目的是找到uboot的命令是怎么初始化的,怎么执行的。重点在于命令。

一、主循环在哪

我们知道uboot是一个大型的裸机程序,它不会说像linux系统一样有多个进程多个线程再执行,它只有一个进程,就是它自己。既然我们的程序能一直运行,那必然内部有一个循环在处理,这个大概推测一下就知道在循环中执行的肯定是uboot命令的解析和执行相关的部分,那么主循环在哪里?这一部分我们先来找一找主循环在哪里。

1. 寻找主循环函数

1.1 main函数在哪?

正常来说,我们看到一个程序一定是找main函数,因为在做裸机开发、应用开发的时候,我们主函数都是这样的:

1
int main(int argc, char * argv[]);

那我们就按照这个思路来分析一下,一步一步找一下这个函数,看看它究竟在哪里。

1.1.1 u-boot.lds

我们知道uboot是一个大型的裸机程序,那么它一定有一个main函数,其实不管是不是裸机程序,都是有一个main函数的。这个main函数在哪?程序的链接是由链接脚本来决定的,所以通过链接脚本可以找到程序的入口。如果没有编译过 uboot 的话链接脚本为 u-boot.lds - arch/arm/cpu/u-boot.lds。但是这个不是最终使用的链接脚本,最终的链接脚本是在这个链接脚本的基础上生成的。 我们编译完uboot就会在uboot源码目录下生成一个u-boot.lds(01_uboot/01_gpio_cmd/u-boot.lds · 苏木/imx6ull-driver-demo - 码云 - 开源中国),我们打开看一下:

1
2
3
4
5
6
7
8
9
10
11
12
13
14
OUTPUT_FORMAT("elf32-littlearm", "elf32-littlearm", "elf32-littlearm")
OUTPUT_ARCH(arm)
ENTRY(_start)
SECTIONS
{
. = 0x00000000;
. = ALIGN(4);
.text :
{
*(.__image_copy_start)
*(.vectors)
arch/arm/cpu/armv7/start.o (.text*)
}
}

说明: ENTRY(SYMBOL):将符号 SYMBOL 的值设置为入口地址,入口地址是进程执行的第一条指令在进程地址空间的地址(比如 ENTRY(Reset_Handler) 表示进程最开始从复位中断服务函数处执行

在第三行中,有一个_start符号,这里就是代码的入口点,这个时候我们去源码里面搜的话,会有一堆,很多文件里都有。我们继续看往下看链接文件,

  • SECTIONS定义了段,包括text文本段、data数据段、bss段等。

  • __image_copy_start在System.map和u-boot.map中均有定义,它是.text段的起始地址,我们可以搜索一下,就会发现它在System.map和u-boot.map中的值为0x87800000,也就是链接地址。

  • *(.vectors) 包含所有 .vectors 段的内容,这通常用于存放中断向量等。

  • arch/arm/cpu/armv7/start.o对应文件arch/arm/cpu/armv7/start.S,该文件中定义了main函数的入口。

1.1.2 vectors.S

接下来我们先找中断向量表,因为前面学习裸机开发的时候我们程序一开始就是要设置异常向量表,那么中断向量表定义在哪个文件?我们用grep命令搜索一下.vectors这个关键词,这样搜索出来还是一堆文件,哪一个是我们要的?首先,它一定是一个汇编文件,其次,它一定含有入口点_start并且包含一些中断向量表的定义。我们就可以定位到这个 vectors.S - arch/arm/lib/vectors.S 文件,下面的我精简了一下:

1
2
3
4
5
6
7
8
9
10
11
12
13
14
15
16
17
18
19
20
21
22
23
24
25
26
        .macro ARM_VECTORS
#ifdef CONFIG_ARCH_K3
ldr pc, _reset
#else
b reset
#endif
ldr pc, _undefined_instruction
ldr pc, _software_interrupt
ldr pc, _prefetch_abort
ldr pc, _data_abort
ldr pc, _not_used
ldr pc, _irq
ldr pc, _fiq
.endm

.globl _start

.section ".vectors", "ax"
/* ...... */
_start:
#ifdef CONFIG_SYS_DV_NOR_BOOT_CFG
.word CONFIG_SYS_DV_NOR_BOOT_CFG
#endif
ARM_VECTORS
#endif /* !defined(CONFIG_ENABLE_ARM_SOC_BOOT0_HOOK) */

可以看到这里就是定义了中断向量表,并且一开始会跳转到reset中执行。reset函数在哪?我们继续分析。

1.1.3  start.S

reset这个符号并没有定义在vectors.S - arch/arm/lib/vectors.S文件中,它定义在哪?从u-boot.lds中推测一下,它里面有这么一行:

1
arch/arm/cpu/armv7/start.o (.text*)

多少肯定有点关系,这个start.o对应的文件应该就是 start.S - arch/arm/cpu/armv7/start.S,我们打开这个文件看一下

1
2
3
4
5
6
7
8
9
10
11
/* ... ... */
.globl reset
.globl save_boot_params_ret
.type save_boot_params_ret,%function
/* ... ... */
bl _main
/* ... ... */
ENTRY(c_runtime_cpu_setup)
/* ... ... */
ENDPROC(c_runtime_cpu_setup)
/* ... ... */

会发现猜想是对的,reset符号就在这里,这里会调用一些初始化函数,例如 lowlevel_init,这里我们暂时不关心,这里我们要做的是找到主循环所在的地方。简单看一下代码可以看到,到最后是跳转到_main函数执行了。

1.1.4 crt0.S

我们搜一下这个_main的符号在哪,会找到这个文件 crt0.S - arch/arm/lib/crt0.S

1
2
3
4
5
6
7
8
9
10
11
12
13
14
15
16
17
18
19
20
21
22
23
24
25
26
27
ENTRY(_main)
/* ...... */
bic r0, r0, #7 /* 8-byte alignment for ABI compliance */
mov sp, r0
bl board_init_f_alloc_reserve
mov sp, r0
/* set up gd here, outside any C code */
mov r9, r0
bl board_init_f_init_reserve

mov r0, #0
bl board_init_f
/* ...... */
/* call board_init_r(gd_t *id, ulong dest_addr) */
mov r0, r9 /* gd_t */
ldr r1, [r9, #GD_RELOCADDR] /* dest_addr */
/* call board_init_r */
#if CONFIG_IS_ENABLED(SYS_THUMB_BUILD)
ldr lr, =board_init_r /* this is auto-relocated! */
bx lr
#else
ldr pc, =board_init_r /* this is auto-relocated! */
#endif
/* we should not return here. */
#endif

ENDPROC(_main)

我们暂时不关心其他的函数,这里有两个函数值得我们关注

  • board_init_f 函数主要有两个工作

(1)初始化一系列外设,比如串口、定时器,或者打印一些消息等。

(2)初始化 gd 的各个成员变量,uboot 会将自己重定位到 DRAM 最后面的地址区域,也就 是将自己拷贝到 DRAM 最后面的内存区域中。

  • board_init_r

board_init_f 并没有初始化所有的外设,还需要做一些后续工作,这 些后续工作就是由函数 board_init_r 来完成的。后面继续分析就会知道我们要找的命令的初始化以及调用相关的东西都在这个函数中。

1.2 board_init_r()

这个函数定义在哪?其实搜索一下,大概可以判断的出来,或者加点打印信息确认就可以知道这个函数定义在board_r.c - common/board_r.c中:

1
2
3
4
5
6
7
8
9
10
11
12
13
14
15
16
17
18
19
20
21
22
23
24
25
26
27
28
29
30
31
32
void board_init_r(gd_t *new_gd, ulong dest_addr)
{
/*
* Set up the new global data pointer. So far only x86 does this
* here.
* TODO(sjg@chromium.org): Consider doing this for all archs, or
* dropping the new_gd parameter.
*/
#if CONFIG_IS_ENABLED(X86_64)
arch_setup_gd(new_gd);
#endif

#ifdef CONFIG_NEEDS_MANUAL_RELOC
int i;
#endif

#if !defined(CONFIG_X86) && !defined(CONFIG_ARM) && !defined(CONFIG_ARM64)
gd = new_gd;
#endif
gd->flags &= ~GD_FLG_LOG_READY;

#ifdef CONFIG_NEEDS_MANUAL_RELOC
for (i = 0; i < ARRAY_SIZE(init_sequence_r); i++)
init_sequence_r[i] += gd->reloc_off;
#endif

if (initcall_run_list(init_sequence_r))
hang();

/* NOTREACHED - run_main_loop() does not return */
hang();
}

这里面也没几行代码,我们直接看重点initcall_run_list。可以看一下最后一行的注释,就会发现,这个函数最终会一直运行在run_main_loop()函数中,不会再返回,也就是说这里就是最终一直死循环处理命令的函数了。

1.3 initcall_run_list()

这个函数定义在 initcall.h - include/initcall.h

1
2
3
4
5
6
7
8
9
10
11
12
13
14
15
16
17
18
19
20
21
22
23
24
25
26
27
28
static inline int initcall_run_list(const init_fnc_t init_sequence[])
{
const init_fnc_t *init_fnc_ptr;

for (init_fnc_ptr = init_sequence; *init_fnc_ptr; ++init_fnc_ptr) {
unsigned long reloc_ofs = 0;
int ret;

if (gd->flags & GD_FLG_RELOC)
reloc_ofs = gd->reloc_off;
#ifdef CONFIG_EFI_APP
reloc_ofs = (unsigned long)image_base;
#endif
debug("initcall: %p", (char *)*init_fnc_ptr - reloc_ofs);
if (gd->flags & GD_FLG_RELOC)
debug(" (relocated to %p)\n", (char *)*init_fnc_ptr);
else
debug("\n");
ret = (*init_fnc_ptr)();
if (ret) {
printf("initcall sequence %p failed at call %p (err=%d)\n",
init_sequence,
(char *)*init_fnc_ptr - reloc_ofs, ret);
return -1;
}
}
return 0;
}

简化一下:

1
2
3
4
5
6
7
8
9
10
11
12
13
14
15
16
static inline int initcall_run_list(const init_fnc_t init_sequence[])
{
const init_fnc_t *init_fnc_ptr;

for (init_fnc_ptr = init_sequence; *init_fnc_ptr; ++init_fnc_ptr) {
/* ...... */
ret = (*init_fnc_ptr)();
if (ret) {
printf("initcall sequence %p failed at call %p (err=%d)\n",
init_sequence,
(char *)*init_fnc_ptr - reloc_ofs, ret);
return -1;
}
}
return 0;
}

先看一下init_fnc_t这个类型,它同样定义在 initcall.h - include/initcall.h

1
typedef int (*init_fnc_t)(void);

可以看到这是一个指向没有形参且返回值为int类型的函数的函数指针,所以上面的代码大概分析一下就是:

(1)定义了一个函数指针init_fnc_ptr,指向一个名为init_sequence的数组,这个数组里面每一个成员都是函数指针。

(2)便利函数指针数组init_sequence,然后执行。这个init_sequence是谁?我们看上一级调用就知道这个传入的参数是init_sequence_r。

1.4 init_sequence_r

init_sequence_r是一个函数指针数组,它定义在board_r.c - common/board_r.c

1
2
3
4
static init_fnc_t init_sequence_r[] = {
/* ...... */
run_main_loop,
};

其他的我们都先不看其他的,那些都是一些初始化,命令的初始化以及执行这些都在最后的run_main_loop函数中。

2. run_main_loop()

上面我们已经找到了这个函数被调用的地方,它定义在board_r.c - common/board_r.c

1
2
3
4
5
6
7
8
9
10
static int run_main_loop(void)
{
#ifdef CONFIG_SANDBOX
sandbox_main_loop_init();
#endif
/* main_loop() can return to retry autoboot, if so just run it again */
for (;;)
main_loop();
return 0;
}

可以看到这里面是一个死循环了,一直在执行main_loop函数。所以,这里其实就是我们要找的主循环函数。

3. main_loop

我们再来看一下main_loop这个函数,它定义在main.c - common/main.c中:

1
2
3
4
5
6
7
8
9
10
11
12
13
14
15
16
17
18
19
20
21
22
23
24
25
26
/* We come here after U-Boot is initialised and ready to process commands */
void main_loop(void)
{
const char *s;

bootstage_mark_name(BOOTSTAGE_ID_MAIN_LOOP, "main_loop");

if (IS_ENABLED(CONFIG_VERSION_VARIABLE))
env_set("ver", version_string); /* set version variable */

cli_init();

run_preboot_environment_command();

if (IS_ENABLED(CONFIG_UPDATE_TFTP))
update_tftp(0UL, NULL, NULL);

s = bootdelay_process();
if (cli_process_fdt(&s))
cli_secure_boot_cmd(s);

autoboot_command(s);

cli_loop();
panic("No CLI available");
}

4. 总结一下

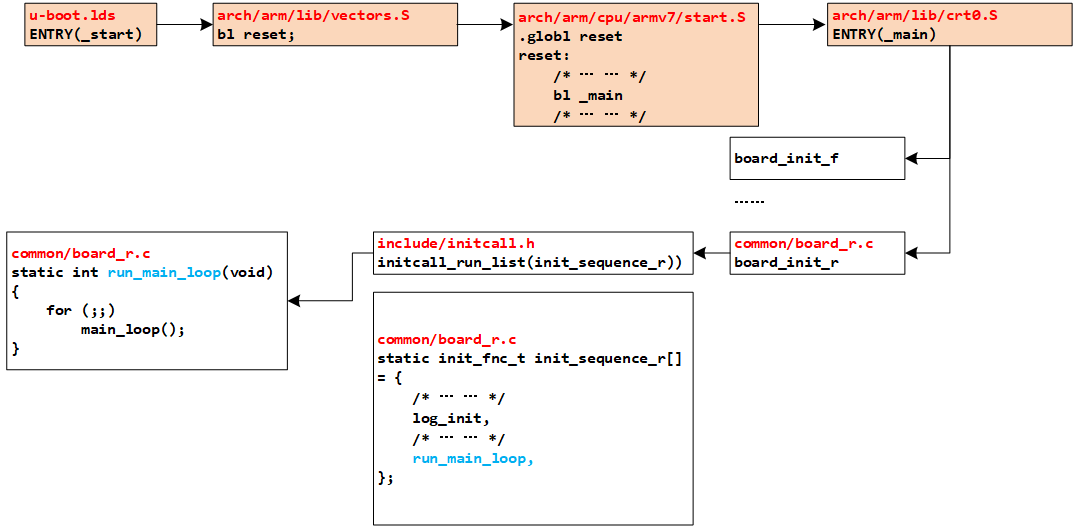
到这里我们就找到了主循环所在的函数,调用关系大概就是:

image-20241116075502350

最后调用的main_loop()就是最后主循环的函数。

二、main_loop在做什么?

这里只分析命令相关的东西,其他的就暂时先不管。

1. main_loop()

main_loop函数定义在main.c - common/main.c

1
2
3
4
5
6
7
8
9
10
11
12
13
14
15
16
17
18
19
20
21
22
23
24
25
26
27
/* We come here after U-Boot is initialised and ready to process commands */
void main_loop(void)
{
const char *s;

bootstage_mark_name(BOOTSTAGE_ID_MAIN_LOOP, "main_loop");

if (IS_ENABLED(CONFIG_VERSION_VARIABLE))
env_set("ver", version_string); /* set version variable */

cli_init();

run_preboot_environment_command();

if (IS_ENABLED(CONFIG_UPDATE_TFTP))
update_tftp(0UL, NULL, NULL);

s = bootdelay_process();
if (cli_process_fdt(&s))
cli_secure_boot_cmd(s);

autoboot_command(s);

cli_loop();
panic("No CLI available");
}

我们先大概分析一下这个函数:

(1)调用 bootstage_mark_name() 函数,打印启动进度。

(2)如果定义了宏 CONFIG_VERSION_VARIABLE 的话就会执行函数 setenv,设置环境变量 ver 的值为 version_string,也就是设置版本号环境变量。

(3)cli_init() 函数,跟命令初始化有关,初始化 hush shell 相关的变量。

(4)run_preboot_environment_command() 函数,获取环境变量 perboot 的内容, perboot是一些预启动命令,一般不使用这个环境变量。

(5)CONFIG_UPDATE_TFTP这个宏我们搜索一下就会发现它是没有定义的,所以这里不用管。

(6)bootdelay_process 函数,此函数会读取环境变量 bootdelay 和 bootcmd 的内容,然后将 bootdelay 的值赋值给全局变量 stored_bootdelay,返回值为环境变量 bootcmd 的值。

(7)cli_process_fdt()这里其实就是看这个CONFIG_OF_CONTROL有没有定义,如果定义了 CONFIG_OF_CONTROL 的话函数 cli_process_fdt 就会实现,如果没有定义 CONFIG_OF_CONTROL 的话函数 cli_process_fdt 直接返回一个 false。在本 uboot 中
没有定义 CONFIG_OF_CONTROL,因此 cli_process_fdt 函数返回值为 false。 所以这里也不管。

(8)autoboot_command() 函数,此函数就是检查倒计时是否结束?倒计时结束之前有没有被打断? 这里就不展开分析了,后面学习uboot启动流程的时候会详细去分析这个函数。

(9)cli_loop() 函数是 uboot 的命令行处理函数,我们在 uboot 中输入各种命令,进行各种操作就是 cli_loop() 来处理的 。所以后面我们重点看一下这个函数。

2. cli_loop()

我们来看一下cli_loop()这个函数,它定义在cli.c - common/cli.c中:

1
2
3
4
5
6
7
8
9
10
11
12
void cli_loop(void)
{
#ifdef CONFIG_HUSH_PARSER
parse_file_outer();
/* This point is never reached */
for (;;);
#elif defined(CONFIG_CMDLINE)
cli_simple_loop();
#else
printf("## U-Boot command line is disabled. Please enable CONFIG_CMDLINE\n");
#endif /*CONFIG_HUSH_PARSER*/
}

这里面有两个宏,我们找一找这些宏的定义,没有的就直接去掉,最后简化一下函数就是:

1
2
3
4
5
6
7
// CONFIG_HUSH_PARSER存在所以简化一下就是:
void cli_loop(void)
{
parse_file_outer();
/* This point is never reached */
for (;;);
}

接下来我们继续看parse_file_outer();

3. parse_file_outer()

parse_file_outer()这个函数定义在cli_hush.c - common/cli_hush.c,里面还是一些宏,我们直接根据宏是否定义把函数简化一下:

1
2
3
4
5
6
7
8
9
int parse_file_outer(void)
{
int rcode;
struct in_str input;

setup_file_in_str(&input);
rcode = parse_stream_outer(&input, FLAG_PARSE_SEMICOLON);
return rcode;
}

第 6 行调用函数 setup_file_in_str() 初始化变量 input 的成员变量。

第 7 行调用函数 parse_stream_outer(),这个函数就是 hush shell 的命令解释器,负责接收命令行输入,然后解析并执行相应的命令。

4. parse_stream_outer()

接下来肯定是parse_stream_outer()这个函数了,它定义在cli_hush.c - common/cli_hush.c,这里还是一样,把里面的宏都去掉,简化后如下:

1
2
3
4
5
6
7
8
9
10
11
12
13
14
15
16
17
18
19
20
21
22
23
24
25
26
27
28
29
30
31
32
33
34
35
36
37
38
39
40
41
42
43
44
45
46
47
48
49
50
51
52
53
54
55
56
57
58
59
60
/* most recursion does not come through here, the exeception is
* from builtin_source() */
static int parse_stream_outer(struct in_str *inp, int flag)
{

struct p_context ctx;
o_string temp=NULL_O_STRING;
int rcode;
int code = 1;

do {
ctx.type = flag;
initialize_context(&ctx);
update_ifs_map();
if (!(flag & FLAG_PARSE_SEMICOLON) || (flag & FLAG_REPARSING)) mapset((uchar *)";$&|", 0);
inp->promptmode=1;
rcode = parse_stream(&temp, &ctx, inp, flag & FLAG_CONT_ON_NEWLINE ? -1 : '\n');

if (rcode == 1) flag_repeat = 0;
if (rcode != 1 && ctx.old_flag != 0) {
syntax();
flag_repeat = 0;
}
if (rcode != 1 && ctx.old_flag == 0) {
done_word(&temp, &ctx);
done_pipe(&ctx,PIPE_SEQ);

code = run_list(ctx.list_head);
if (code == -2) { /* exit */
b_free(&temp);
code = 0;
/* XXX hackish way to not allow exit from main loop */
if (inp->peek == file_peek) {
printf("exit not allowed from main input shell.\n");
continue;
}
break;
}
if (code == -1)
flag_repeat = 0;

} else {
if (ctx.old_flag != 0) {
free(ctx.stack);
b_reset(&temp);
}
if (inp->__promptme == 0) printf("<INTERRUPT>\n");
inp->__promptme = 1;
temp.nonnull = 0;
temp.quote = 0;
inp->p = NULL;
free_pipe_list(ctx.list_head,0);
}
b_free(&temp);
/* loop on syntax errors, return on EOF */
} while (rcode != -1 && !(flag & FLAG_EXIT_FROM_LOOP) &&
(inp->peek != static_peek || b_peek(inp)));

return (code != 0) ? 1 : 0;
}

第 11 ~ 56 行中的 do-while 循环就是处理输入命令的。 这里的命令解析什么的我都没有仔细去研究了,内部大概是这样一个调用关系:

image-20241116133256624

5. cmd_process()

前面分析过了,到这个cmd_process()函数,要经过:

1
2
3
4
5
parse_stream_outer() 
--> run_list
--> run_list_real()
--> run_pipe_real()
--> cmd_process()

中间那几个函数这里就不管了,我看了下好像还挺复杂的,以后有机会再深入分析吧。我们看一下cmd_process(),它定义在command.c - common/command.c

1
2
3
4
5
6
7
8
9
10
11
12
13
14
15
16
17
18
19
20
21
22
23
24
25
26
27
28
29
30
31
32
33
34
35
36
37
38
39
40
41
42
43
44
enum command_ret_t cmd_process(int flag, int argc, char * const argv[],
int *repeatable, ulong *ticks)
{
enum command_ret_t rc = CMD_RET_SUCCESS;
cmd_tbl_t *cmdtp;

/* Look up command in command table */
cmdtp = find_cmd(argv[0]);
if (cmdtp == NULL) {
printf("Unknown command '%s' - try 'help'\n", argv[0]);
return 1;
}

/* found - check max args */
if (argc > cmdtp->maxargs)
rc = CMD_RET_USAGE;

#if defined(CONFIG_CMD_BOOTD)
/* avoid "bootd" recursion */
else if (cmdtp->cmd == do_bootd) {
if (flag & CMD_FLAG_BOOTD) {
puts("'bootd' recursion detected\n");
rc = CMD_RET_FAILURE;
} else {
flag |= CMD_FLAG_BOOTD;
}
}
#endif

/* If OK so far, then do the command */
if (!rc) {
int newrep;

if (ticks)
*ticks = get_timer(0);
rc = cmd_call(cmdtp, flag, argc, argv, &newrep);
if (ticks)
*ticks = get_timer(*ticks);
*repeatable &= newrep;
}
if (rc == CMD_RET_USAGE)
rc = cmd_usage(cmdtp);
return rc;
}

我们查一下用到的宏都有没有定义,然后把宏都去掉,简化一下,但是发现宏是定义了的,所以简化不了了那我们一个一个看。

5.1 find_cmd()

从名字上看就知道这个是查找命令的,它定义在command.c - common/command.c

1
2
3
4
5
6
cmd_tbl_t *find_cmd(const char *cmd)
{
cmd_tbl_t *start = ll_entry_start(cmd_tbl_t, cmd);
const int len = ll_entry_count(cmd_tbl_t, cmd);
return find_cmd_tbl(cmd, start, len);
}

可以看到传入的参数是一个字符串类型,由于前面一大部分的调用我们都没分析,这里我们可以加条打印信息,还是以前面的gpio命令为例,我们看一下这里传进来的是什么:

1
2
3
4
5
6
7
cmd_tbl_t *find_cmd(const char *cmd)
{
printf("%s:%d cmd=%s\n", __FUNCTION__, __LINE__, cmd);
cmd_tbl_t *start = ll_entry_start(cmd_tbl_t, cmd);
const int len = ll_entry_count(cmd_tbl_t, cmd);
return find_cmd_tbl(cmd, start, len);
}

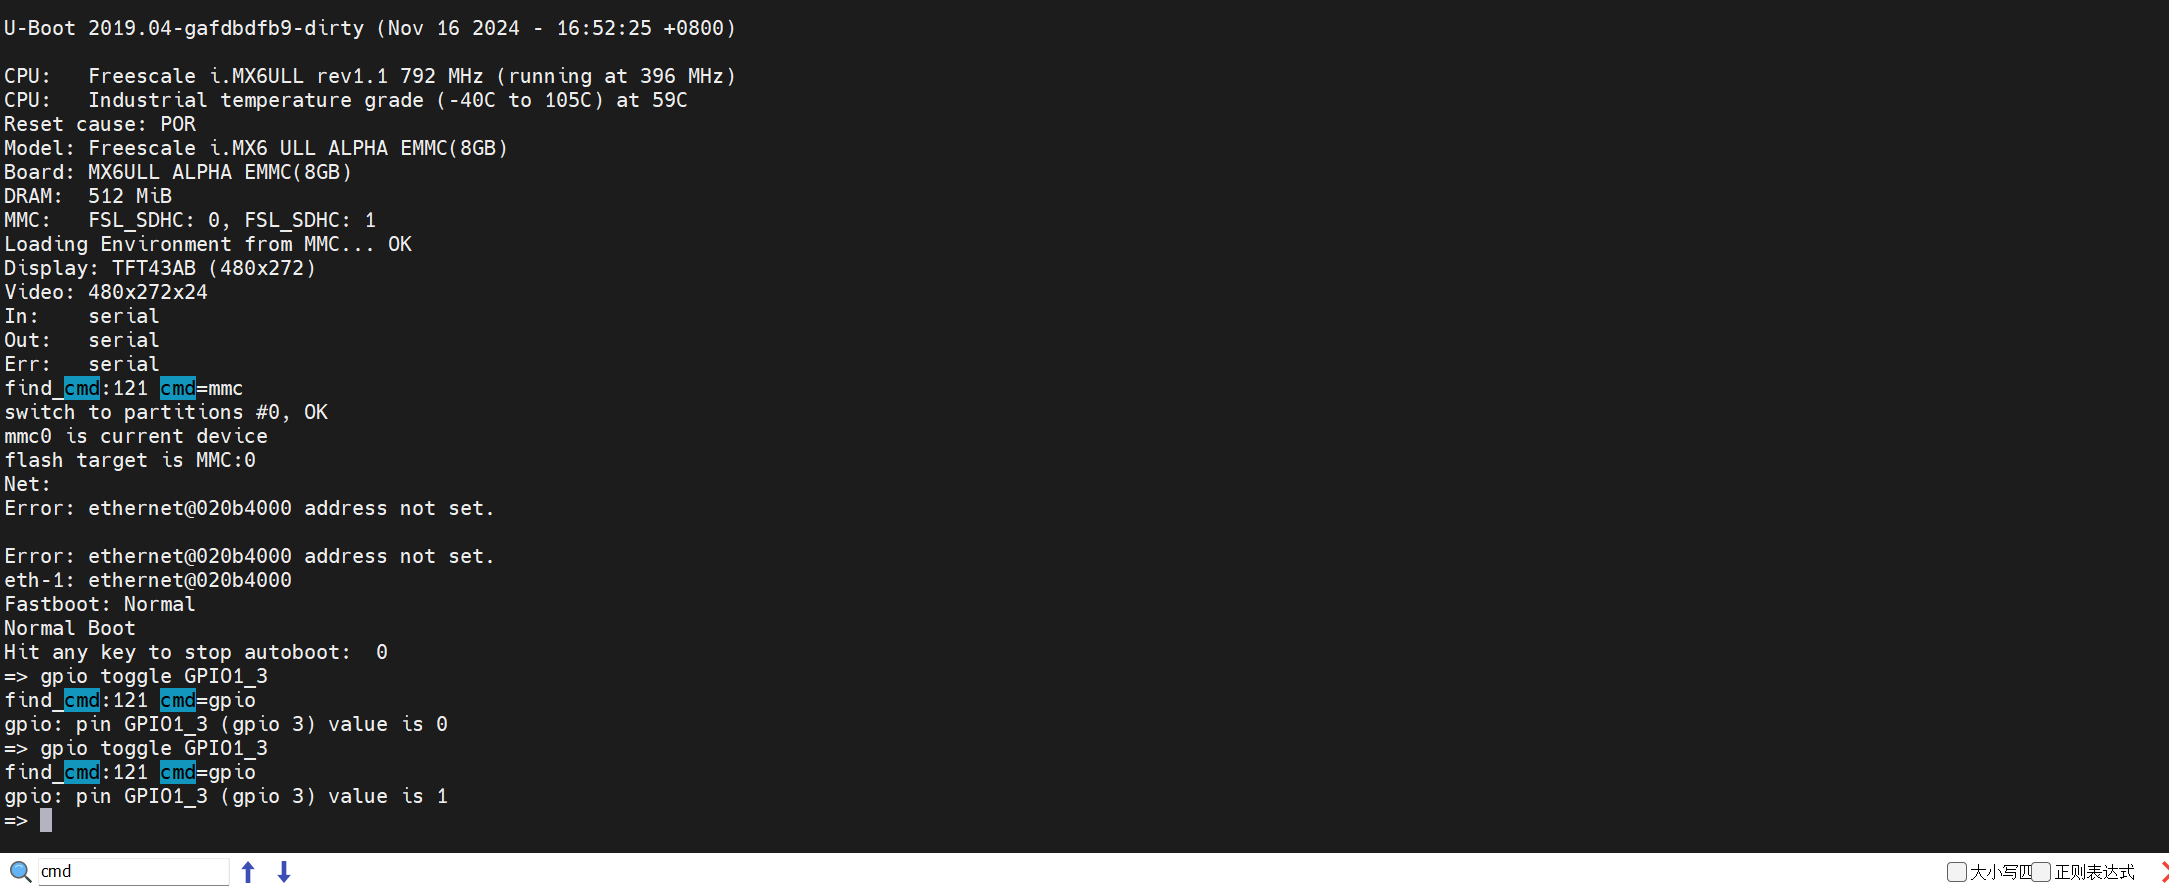
然后编译烧写到sd卡并启动,我们在uboot的命令模式下敲以下命令:

1
=> gpio toggle GPIO1_3

可以看到有如下打印信息:

image-20241116165331445

可以看到这里收到的字符串就是敲的gpio关键词。

5.1.1 linker_lists

我们先来了解一下linker_lists这部分相关的几个宏定义。

5.1.1.1 ll_entry_start

我们来看一下这个 ll_entry_start 在干什么,它不是一个函数,而是一个宏,定义在linker_lists.h - include/linker_lists.h

1
2
3
4
5
6
7
8
9
10
11
12
13
14
15
16
17
18
19
20
21
22
23
24
25
26
27
28
29
30
31
32
33
/*
* We need a 0-byte-size type for iterator symbols, and the compiler
* does not allow defining objects of C type 'void'. Using an empty
* struct is allowed by the compiler, but causes gcc versions 4.4 and
* below to complain about aliasing. Therefore we use the next best
* thing: zero-sized arrays, which are both 0-byte-size and exempt from
* aliasing warnings.
*/

/**
* ll_entry_start() - Point to first entry of linker-generated array
* @_type: Data type of the entry
* @_list: Name of the list in which this entry is placed
*
* This function returns ``(_type *)`` pointer to the very first entry of a
* linker-generated array placed into subsection of .u_boot_list section
* specified by _list argument.
*
* Since this macro defines an array start symbol, its leftmost index
* must be 2 and its rightmost index must be 1.
*
* Example:
*
* ::
*
* struct my_sub_cmd *msc = ll_entry_start(struct my_sub_cmd, cmd_sub);
*/
#define ll_entry_start(_type, _list) \
({ \
static char start[0] __aligned(4) __attribute__((unused, \
section(".u_boot_list_2_"#_list"_1"))); \
(_type *)&start; \
})

这个宏就是声明一个指向_type类型的_list数组中第一个元素的类型为_type指针。所以这也就意味着,我们可以通过这个指针获取到_list这个数组的首地址。这个宏我们展开一下吧,在find_cmd()函数中是这样使用的:

1
cmd_tbl_t *start = ll_entry_start(cmd_tbl_t, cmd);

那我们展开它:

1
2
3
4
5
6
7
8
9
10
11
12
// 先把参数替换一下
#define ll_entry_start(cmd_tbl_t, cmd) \
({ \
static char start[0] __aligned(4) __attribute__((unused, \
section(".u_boot_list_2_""cmd""_1"))); \
(cmd_tbl_t *)&start; \
})
// 然后展开得到
cmd_tbl_t *start = {
static char start[0] __aligned(4) __attribute__((unused, section(".u_boot_list_2_""cmd""_1")));
(cmd_tbl_t *)&start;
}

以gpio命令为例(这里先埋个坑),这里就是:

1
2
3
4
5
//这是一种错误的做法
cmd_tbl_t *start = {
static char start[0] __aligned(4) __attribute__((unused, section(".u_boot_list_2_gpio_1")));
(cmd_tbl_t *)&start;
}

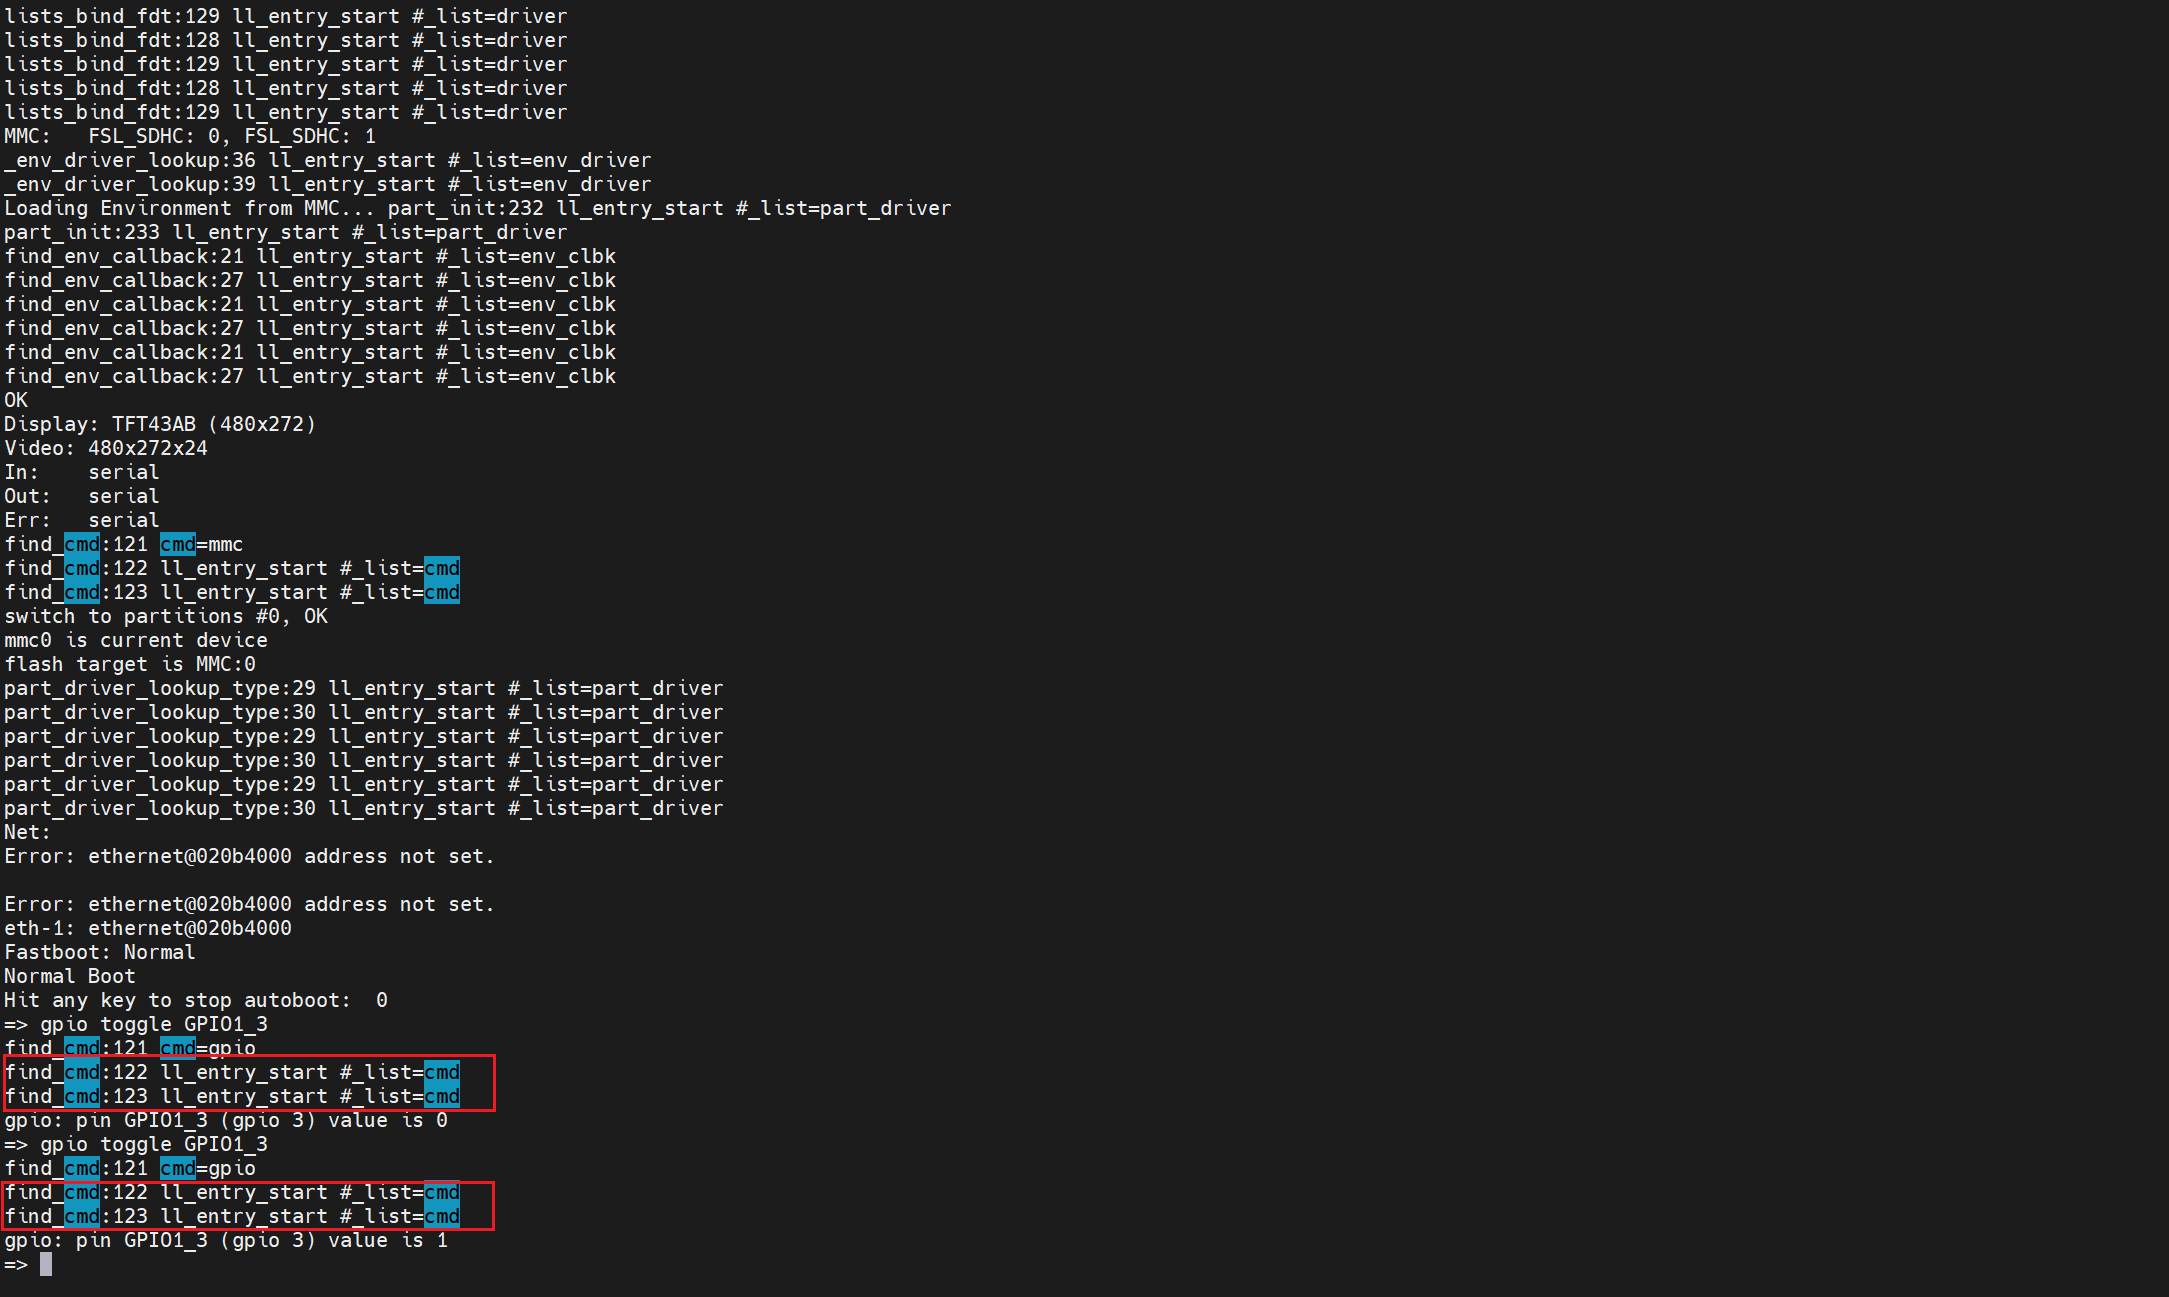
但是呢,这里不能这么想,这个.u_boot_list_2_gpio_1在映射文件中是没有的,我们也找不到这个段,那这里应该怎么搞?我后来在这个宏里面加了打印:

1
2
3
4
5
6
7
#define ll_entry_start(_type, _list)					\
({ \
printf("%s:%d ll_entry_start %s\n", __FUNCTION__, __LINE__, #_list);\
static char start[0] __aligned(4) __attribute__((unused, \
section(".u_boot_list_2_"#_list"_1"))); \
(_type *)&start; \
})
image-20241116165716871

为啥???????其实这里是一个宏,我们是要在预处理阶段就展开的,所以这里我们把这个先展开,不能说是把形参直接替换进去,所以这里展开的过程是对的,就是:

1
2
3
4
5
6
//cmd_tbl_t *start = ll_entry_start(cmd_tbl_t, cmd);

cmd_tbl_t *start = {
static char start[0] __aligned(4) __attribute__((unused, section(".u_boot_list_2_""cmd""_1")));
(cmd_tbl_t *)&start;
}

所以,这个find_cmd()函数就变成了:

1
2
3
4
5
6
7
8
9
cmd_tbl_t *find_cmd(const char *cmd)
{
cmd_tbl_t *start = {
static char start[0] __aligned(4) __attribute__((unused, section(".u_boot_list_2_cmd_1")));
(cmd_tbl_t *)&start;
}
const int len = ll_entry_count(cmd_tbl_t, cmd);
return find_cmd_tbl(cmd, start, len);
}

这个样子才对。

5.1.1.2 ll_entry_end

我们直接看一下ll_entry_end这个宏,它定义在linker_lists.h - include/linker_lists.h

1
2
3
4
5
6
7
8
9
10
11
12
13
14
15
16
17
18
19
20
21
22
23
24
25
/**
* ll_entry_end() - Point after last entry of linker-generated array
* @_type: Data type of the entry
* @_list: Name of the list in which this entry is placed
* (with underscores instead of dots)
*
* This function returns ``(_type *)`` pointer after the very last entry of
* a linker-generated array placed into subsection of .u_boot_list
* section specified by _list argument.
*
* Since this macro defines an array end symbol, its leftmost index
* must be 2 and its rightmost index must be 3.
*
* Example:
*
* ::
*
* struct my_sub_cmd *msc = ll_entry_end(struct my_sub_cmd, cmd_sub);
*/
#define ll_entry_end(_type, _list) \
({ \
static char end[0] __aligned(4) __attribute__((unused, \
section(".u_boot_list_2_"#_list"_3"))); \
(_type *)&end; \
})

声明一个指向_type类型的_list数组中最后一个元素的末尾地址的下一个地址的类型为_type指针。

5.1.1.3 ll_entry_count

我们接着来看这个ll_entry_count,它也是一个宏,定义在linker_lists.h - include/linker_lists.h

1
2
3
4
5
6
7
8
9
10
11
12
13
14
15
16
17
18
19
20
21
22
23
24
25
26
/**
* ll_entry_count() - Return the number of elements in linker-generated array
* @_type: Data type of the entry
* @_list: Name of the list of which the number of elements is computed
*
* This function returns the number of elements of a linker-generated array
* placed into subsection of .u_boot_list section specified by _list
* argument. The result is of an unsigned int type.
*
* Example:
*
* ::
*
* int i;
* const unsigned int count = ll_entry_count(struct my_sub_cmd, cmd_sub);
* struct my_sub_cmd *msc = ll_entry_start(struct my_sub_cmd, cmd_sub);
* for (i = 0; i < count; i++, msc++)
* printf("Entry %i, x=%i y=%i\n", i, msc->x, msc->y);
*/
#define ll_entry_count(_type, _list) \
({ \
_type *start = ll_entry_start(_type, _list); \
_type *end = ll_entry_end(_type, _list); \
unsigned int _ll_result = end - start; \
_ll_result; \
})

这个宏是返回_type类型的_list数组中元素个数。前面已经找到了\list数组的起始地址ll_entry_start和结束地址ll_entry_end,两者相减就是中间元素的个数。

5.1.1.4 ll_entry_declare

前面我们分析gpio命令声明的时候有展开过它,它是定义在linker_lists.h - include/linker_lists.h

1
2
3
4
5
6
7
8
9
10
11
12
13
14
15
16
17
18
19
20
21
22
23
24
25
26
27
28
29
30
31
32
33
34
35
36
37
38
39
40
41
42
/**
* ll_entry_declare() - Declare linker-generated array entry
* @_type: Data type of the entry
* @_name: Name of the entry
* @_list: name of the list. Should contain only characters allowed
* in a C variable name!
*
* This macro declares a variable that is placed into a linker-generated
* array. This is a basic building block for more advanced use of linker-
* generated arrays. The user is expected to build their own macro wrapper
* around this one.
*
* A variable declared using this macro must be compile-time initialized.
*
* Special precaution must be made when using this macro:
*
* 1) The _type must not contain the "static" keyword, otherwise the
* entry is generated and can be iterated but is listed in the map
* file and cannot be retrieved by name.
*
* 2) In case a section is declared that contains some array elements AND
* a subsection of this section is declared and contains some elements,
* it is imperative that the elements are of the same type.
*
* 3) In case an outer section is declared that contains some array elements
* AND an inner subsection of this section is declared and contains some
* elements, then when traversing the outer section, even the elements of
* the inner sections are present in the array.
*
* Example:
*
* ::
*
* ll_entry_declare(struct my_sub_cmd, my_sub_cmd, cmd_sub) = {
* .x = 3,
* .y = 4,
* };
*/
#define ll_entry_declare(_type, _name, _list) \
_type _u_boot_list_2_##_list##_2_##_name __aligned(4) \
__attribute__((unused, \
section(".u_boot_list_2_"#_list"_2_"#_name)))

在_list数组中声明一个链接器产生的_type类型命名为name的元素。

5.1.1.5 linker list分析

这一部分我们可以参考linker_lists.rst - Documentation/linker_lists.rst或者我的uboot的源码仓库doc/linker_lists.rst · 苏木/u-boot - 码云 - 开源中国 (gitee.com)

上面我们接触到了四个宏:

1
2
3
4
5
6
7
8
9
10
11
12
13
14
15
16
17
18
19
20
21
22
23
24
25
26
#define ll_entry_start(_type, _list)					\
({ \
static char start[0] __aligned(4) __attribute__((unused, \
section(".u_boot_list_2_"#_list"_1"))); \
(_type *)&start; \
})

#define ll_entry_end(_type, _list) \
({ \
static char end[0] __aligned(4) __attribute__((unused, \
section(".u_boot_list_2_"#_list"_3"))); \
(_type *)&end; \
})

#define ll_entry_count(_type, _list) \
({ \
_type *start = ll_entry_start(_type, _list); \
_type *end = ll_entry_end(_type, _list); \
unsigned int _ll_result = end - start; \
_ll_result; \
})

#define ll_entry_declare(_type, _name, _list) \
_type _u_boot_list_2_##_list##_2_##_name __aligned(4) \
__attribute__((unused, \
section(".u_boot_list_2_"#_list"_2_"#_name)))

为了计算数组中元素的个数定义了ll_entry_start和ll_entry_end两个宏,在link_list数据结构中段的命名都是以.u_boot_list_2_开始,.u_boot_list_2_"#_list"_2_"#_name中_list为数组项名称,_name数组项下的元素名称,我们其实可以先去u-boot.map文件中看一下uboot中都定义了哪些数组(01_uboot/01_gpio_cmd/u-boot.map · 苏木/imx6ull-driver-demo - 码云 - 开源中国 (gitee.com)),这里列举两部分(这里应该可以理解为数组):

  • .u_boot_list_2_cmd
1
2
3
4
5
6
7
8
9
10
11
12
13
14
15
16
17
18
19
20
21
22
23
.u_boot_list_2_cmd_1
0x00000000878899b4 0x0 cmd/built-in.o
.u_boot_list_2_cmd_1
0x00000000878899b4 0x0 common/built-in.o
.u_boot_list_2_cmd_2_base
0x00000000878899b4 0x1c cmd/built-in.o
0x00000000878899b4 _u_boot_list_2_cmd_2_base
/*中间省略*/
.u_boot_list_2_cmd_2_gpio
0x0000000087889ed8 0x1c cmd/built-in.o
0x0000000087889ed8 _u_boot_list_2_cmd_2_gpio
/*中间省略*/
.u_boot_list_2_cmd_2_mmc
0x000000008788a0ec 0x1c cmd/built-in.o
0x000000008788a0ec _u_boot_list_2_cmd_2_mmc
/*中间省略*/
.u_boot_list_2_cmd_2_version
0x000000008788a3fc 0x1c cmd/built-in.o
0x000000008788a3fc _u_boot_list_2_cmd_2_version
.u_boot_list_2_cmd_3
0x000000008788a418 0x0 cmd/built-in.o
.u_boot_list_2_cmd_3
0x000000008788a418 0x0 common/built-in.o
  • .u_boot_list_2_driver
1
2
3
4
5
6
7
8
9
10
11
12
13
14
15
.u_boot_list_2_driver_1
0x000000008788a418 0x0 drivers/built-in.o
.u_boot_list_2_driver_1
0x000000008788a418 0x0 lib/built-in.o
.u_boot_list_2_driver_2_74x164
0x000000008788a418 0x48 drivers/gpio/built-in.o
0x000000008788a418 _u_boot_list_2_driver_2_74x164
/*中间省略*/
.u_boot_list_2_driver_2_usb_storage_blk
0x000000008788abb0 0x48 common/built-in.o
0x000000008788abb0 _u_boot_list_2_driver_2_usb_storage_blk
.u_boot_list_2_driver_3
0x000000008788abf8 0x0 drivers/built-in.o
.u_boot_list_2_driver_3
0x000000008788abf8 0x0 lib/built-in.o

可以看到这里两种数组都是".u_boot_list_2_"#_list"_1"开始,".u_boot_list_2_"#_list"_3"结束,中间的".u_boot_list_2_"#_list"_2"是各个命令,我们可以看一下链接文件u-boot.lds(01_uboot/01_gpio_cmd/u-boot.lds · 苏木/imx6ull-driver-demo - 码云 - 开源中国 (gitee.com))里面有这么一段:

1
2
3
4
5
. = .;
. = ALIGN(4);
.u_boot_list : {
KEEP(*(SORT(.u_boot_list*)));
}

从链接脚本中,我们可以知道.u_boot_list开头的段都会按照字符顺序进行排序,如.u_boot_list_3*.u_boot_list_2*.u_boot_list_1* ,则链接器链接的时候就以.u_boot_list_1*.u_boot_list_2*.u_boot_list_3* 的顺序进行链接。

为了方便获取起始和结束地址,在所有.u_boot_list_2*段前面插入一个.u_boot_list_1段,在u_boot_list_2*段后面插入一个.u_boot_list_3段,这两个段不分配任何内存,让u_boot_list_1指向.u_boot_list_2*开始的起始地址,让u_boot_list_3指向最后.u_boot_list_2*最后一个地址的下一个地址,这样{(.u_boot_list_3)-(.u_boot_list_1)=(.u_boot_list_2*所占内存大小)},在这里可以使用一个空数组start[0]进行定位,因为数组长度为0,所以不分配内存,但是它指向的地址时当前所在位置,他赋予属性,将他放在.u_boot_list_1段,这样start[0]就可以指向下一个段的起始地址,下个段为.u_boot_list_2*

同理在.u_boot_list_2*末尾插入.u_boot_list_3段,使用一个空数组end[0],并且将它放到.u_boot_list_3段,这样end[0]就指向.u_boot_list_3后面的第一个地址。如果start和end强制为char型指针,那(end-start)就是.u_boot_list_2*所占内存大小,如果是_type类型,那么(.u_boot_list_2*所占内存大小)=sizeof(_type)*(start-end)

同理也可以计算_u_boot_list_2_##_list##_2_##_name的内存大小或数组元素个数,为什么将这个_list列表称之为数组,是因为在ll_entry_declare宏定义时就要求相同的_list下的元素的数据类型必须一致,例如_list名为cmd的数据类型就为struct cmd_tbl_t结构体,driver的数据类型为struct driver结构体。因为链接脚本中对.u_boot_list*段进行了排序,.u_boot_list_2_cmd_2_*段会排放在一起,自然而然这些段中的变量_u_boot_list_2_cmd_2_*就会被放在连续的地址空间,数据类型又是相同的,所以和数组的属性一致,因此将之称之为数组。

同上在.u_boot_list_2_cmd_2_*段的起始地址插一个.u_boot_list_2_cmd_1段,并且存放一个空数组start[0],让指向_u_boot_list_2_cmd_2_* 数组第一个变量,在_u_boot_list_2_cmd_2_*数组结束后插入一个.u_boot_list_2_cmd_3段,存放一个空数组end[0],end指向_u_boot_list_2_cmd_2_*数组列结束后的第一个地址,然后将end和start强制转化为struct cmd_tbl_t结构体指针,这样(end-start)=(_u_boot_list_2_cmd_2_*)数组元素的个数。

5.1.1.6 u_boot_list_2_cmd_1怎么来的?

上面其实分析完有一个疑问,就是.u_boot_list_2_cmd_1.u_boot_list_2_cmd_3是怎么来的?我们每次通过U_BOOT_CMD定义命令的时候会使用ll_entry_declare宏来定义一个链接到.u_boot_list_2_cmd_2_*段的_u_boot_list_2_cmd_2_*命令,但是用于寻找开始起始和末尾的两个段怎么被插入的?我其实找了半天,最后就发现,这两个段相关的关键词就在这两个宏里面:

1
2
3
4
5
6
7
8
9
10
11
12
13
#define ll_entry_start(_type, _list)					\
({ \
static char start[0] __aligned(4) __attribute__((unused, \
section(".u_boot_list_2_"#_list"_1"))); \
(_type *)&start; \
})

#define ll_entry_end(_type, _list) \
({ \
static char end[0] __aligned(4) __attribute__((unused, \
section(".u_boot_list_2_"#_list"_3"))); \
(_type *)&end; \
})

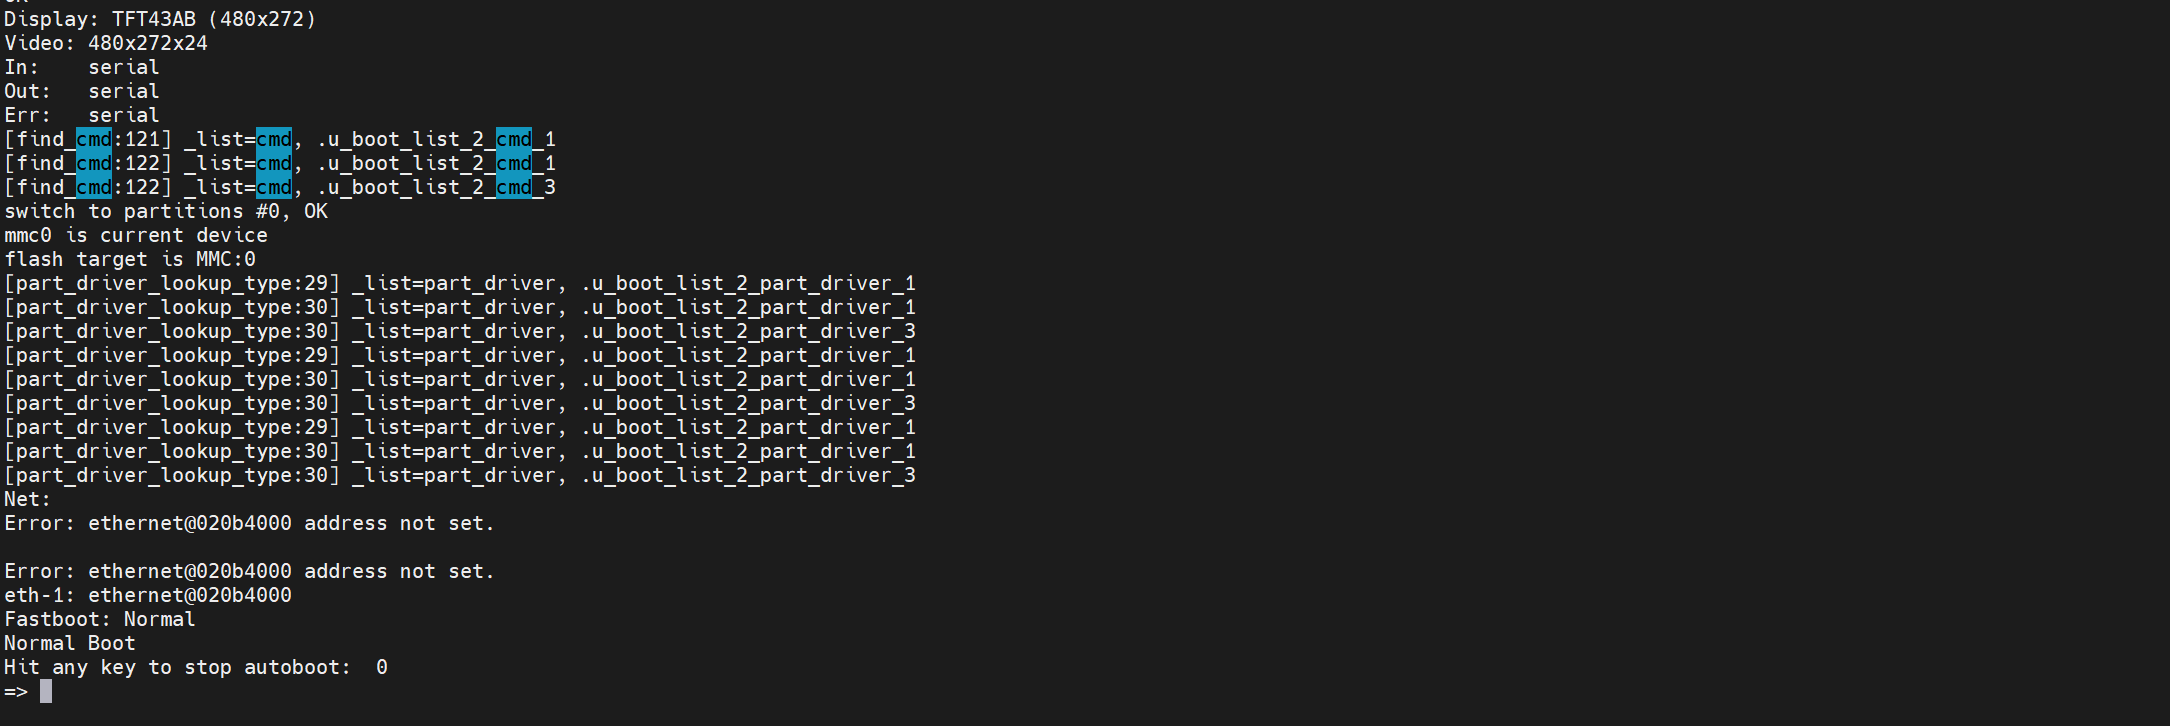
别的地方找不到,那么肯定是在某个地方使用了这两个宏的,所以在链接的时候才会出现这两个段。虽然找不到,但是我们可以加打印啊,虽然这样其实不是很合理,但是试一下吧,看一看程序一开始从哪出现的:

1
2
3
4
5
6
7
8
9
10
11
12
13
14
15
#define ll_entry_start(_type, _list)					\
({ \
printf("[%s:%d] _list=%s, %s\n", __FUNCTION__, __LINE__, #_list, ".u_boot_list_2_"#_list"_1");\
static char start[0] __aligned(4) __attribute__((unused, \
section(".u_boot_list_2_"#_list"_1"))); \
(_type *)&start; \
})

#define ll_entry_end(_type, _list) \
({ \
printf("[%s:%d] _list=%s, %s\n", __FUNCTION__, __LINE__, #_list, ".u_boot_list_2_"#_list"_3");\
static char end[0] __aligned(4) __attribute__((unused, \
section(".u_boot_list_2_"#_list"_3"))); \
(_type *)&end; \
})

然后打印信息如下:

image-20241117093804710

发现其实就是在这个寻找命令的地方,所以其实可能并没有什么用,据我推测,可能是因为宏里面是static类型的数组名,虽然是0个元素,不分配内存,但是还是会被链接到对应的段中。我们可以试一下,就随便定义一个吧,在linker_lists.h - include/linker_lists.h里面定义:

1
2
3
4
5
6
7
8
9
10
11
12
13
#define ll_entry_start_demo(_type, _list)					\
({ \
static char start[0] __aligned(4) __attribute__((unused, \
section(".u_boot_list_2_"#_list"_demo_1"))); \
(_type *)&start; \
})

#define ll_entry_end_demo(_type, _list) \
({ \
static char end[0] __aligned(4) __attribute__((unused, \
section(".u_boot_list_2_"#_list"_demo_3"))); \
(_type *)&end; \
})

就这样:

image-20241117095724996

然后我们去随便定义一个变量,让这个宏展开,就去main.c - common/main.c里面搞:

1
2
int *p1 = ll_entry_start_demo(int, sumu);
int *p2 = ll_entry_end_demo(int, sumu);
image-20241117095945588

然后我们编译一下,编译完去看映射文件,搜索一下sumu关键词,发现啥都没有,大概应该是这两个局部变量没有使用,直接被优化掉了,根本没有参与链接,那么我们使用一下这两个变量:

1
2
3
int *p1 = ll_entry_start_demo(int, sumu);
int *p2 = ll_entry_end_demo(int, sumu);
printf("p1=%p p2=%p\n", p1, p2);

然后再编译,再搜索,就会发现,这两个段出现了:

image-20241117100435266

其实通过以上实验就可以知道,这两个段,只要有调用的地方,就一定会插入进去。

5.1.2 find_cmd_tbl()

最后我们再看一下这个find_cmd_tbl()函数,它定义在command.c - common/command.c

1
2
3
4
5
6
7
8
9
10
11
12
13
14
15
16
17
18
19
20
21
22
23
24
25
26
27
28
29
30
31
32
33
34
/* find command table entry for a command */
cmd_tbl_t *find_cmd_tbl(const char *cmd, cmd_tbl_t *table, int table_len)
{
#ifdef CONFIG_CMDLINE
cmd_tbl_t *cmdtp;
cmd_tbl_t *cmdtp_temp = table; /* Init value */
const char *p;
int len;
int n_found = 0;

if (!cmd)
return NULL;
/*
* Some commands allow length modifiers (like "cp.b");
* compare command name only until first dot.
*/
len = ((p = strchr(cmd, '.')) == NULL) ? strlen (cmd) : (p - cmd);

for (cmdtp = table; cmdtp != table + table_len; cmdtp++) {
if (strncmp(cmd, cmdtp->name, len) == 0) {
if (len == strlen(cmdtp->name))
return cmdtp; /* full match */

cmdtp_temp = cmdtp; /* abbreviated command ? */
n_found++;
}
}
if (n_found == 1) { /* exactly one match */
return cmdtp_temp;
}
#endif /* CONFIG_CMDLINE */

return NULL; /* not found or ambiguous command */
}

这个函数主要是在命令列表里面找到我们的命令。我们可以看一下传入的参数:

1
find_cmd_tbl(cmd, start, len);

cmd就是前面我们的gpio命令字符串,start就是.u_boot_list_2_cmd_1的地址,len就是_u_boot_list_2_cmd_2_*列表的长度。所以这里其实就是把_u_boot_list_2_cmd_2_*列表的数据遍历一遍,找到name为字符串的命令,找到了就返回这个命令的地址,没找到就返回一个NULL。返回的这个命令包含哪些信息?我们来看一下这个cmd_tbl_t类型就知道了command.h - include/command.h,其实前面分析gpio命令的时候有了解过的:

1
2
3
4
5
6
7
8
9
struct cmd_tbl_s {
char *name; /* Command Name */
int maxargs; /* maximum number of arguments */
int (*cmd_rep)(struct cmd_tbl_s *cmd, int flags, int argc, char * const argv[], int *repeatable); /* Implementation function */
int (*cmd)(struct cmd_tbl_s *, int, int, char * const []);
char *usage; /* Usage message (short) */
char *help; /* Help message (long) */
int (*complete)(int argc, char * const argv[], char last_char, int maxv, char *cmdv[]);/* do auto completion on the arguments */
};

结合展开的gpio命令变量:

1
2
3
4
5
6
7
8
9
10
11
cmd_tbl_t _u_boot_list_2_cmd_2_gpio __aligned(4)
__attribute__((unused, section(".u_boot_list_2_cmd_2_gpio"))) = {
"gpio",
4,
cmd_never_repeatable,
do_gpio,
"query and control gpio pins",
"<input|set|clear|toggle> <pin>\n"
" - input/set/clear/toggle the specified pin\n"
"gpio status [-a] [<bank> | <pin>] - show [all/claimed] GPIOs",
NULL,};

可以知道这个find_cmd_tbl()函数返回的就这些数据:

1
2
3
4
5
6
7
8
9
_u_boot_list_2_cmd_2_gpio.name = "gpio"
_u_boot_list_2_cmd_2_gpio.maxargs = 4;
_u_boot_list_2_cmd_2_gpio.cmd_rep = cmd_never_repeatable;
_u_boot_list_2_cmd_2_gpio.cmd = do_gpio;
_u_boot_list_2_cmd_2_gpio.usage = "query and control gpio pins"
_u_boot_list_2_cmd_2_gpio.help = "<input|set|clear|toggle> <pin>\n"
" - input/set/clear/toggle the specified pin\n"
"gpio status [-a] [<bank> | <pin>] - show [all/claimed] GPIOs"
_u_boot_list_2_cmd_2_gpio.complete = NULL;

5.2 cmd_call()

上面我们已经找到了gpio命令的信息,接下来就该执行了,我们看cmd_process函数中是调用了cmd_call()函数来执行,这个函数定义在command.c - common/command.c

1
2
3
4
5
6
7
8
9
10
11
12
13
14
15
16
17
18
19
20
21
22
/**
* Call a command function. This should be the only route in U-Boot to call
* a command, so that we can track whether we are waiting for input or
* executing a command.
*
* @param cmdtp Pointer to the command to execute
* @param flag Some flags normally 0 (see CMD_FLAG_.. above)
* @param argc Number of arguments (arg 0 must be the command text)
* @param argv Arguments
* @param repeatable Can the command be repeated
* @return 0 if command succeeded, else non-zero (CMD_RET_...)
*/
static int cmd_call(cmd_tbl_t *cmdtp, int flag, int argc, char * const argv[],
int *repeatable)
{
int result;

result = cmdtp->cmd_rep(cmdtp, flag, argc, argv, repeatable);
if (result)
debug("Command failed, result=%d\n", result);
return result;
}

可以看到这个是在调用cmd_rep这个函数指针,前面在gpio命令中,这个函数指针指向了cmd_never_repeatable()。

5.3 cmd_never_repeatable()

我们再去详细看一下这个cmd_never_repeatable()函数,它是定义在command.c - common/command.c

1
2
3
4
5
6
7
int cmd_never_repeatable(cmd_tbl_t *cmdtp, int flag, int argc,
char * const argv[], int *repeatable)
{
*repeatable = 0;

return cmdtp->cmd(cmdtp, flag, argc, argv);
}

这里又调用了cmd函数指针,前面参数一路传进来,其实这里的cmd在gpio命令中就是do_gpio()函数。

6. 总结一下

前面经过一步一步的分析,最终执行到go_gpio()函数,我们来回顾一下这个过程:
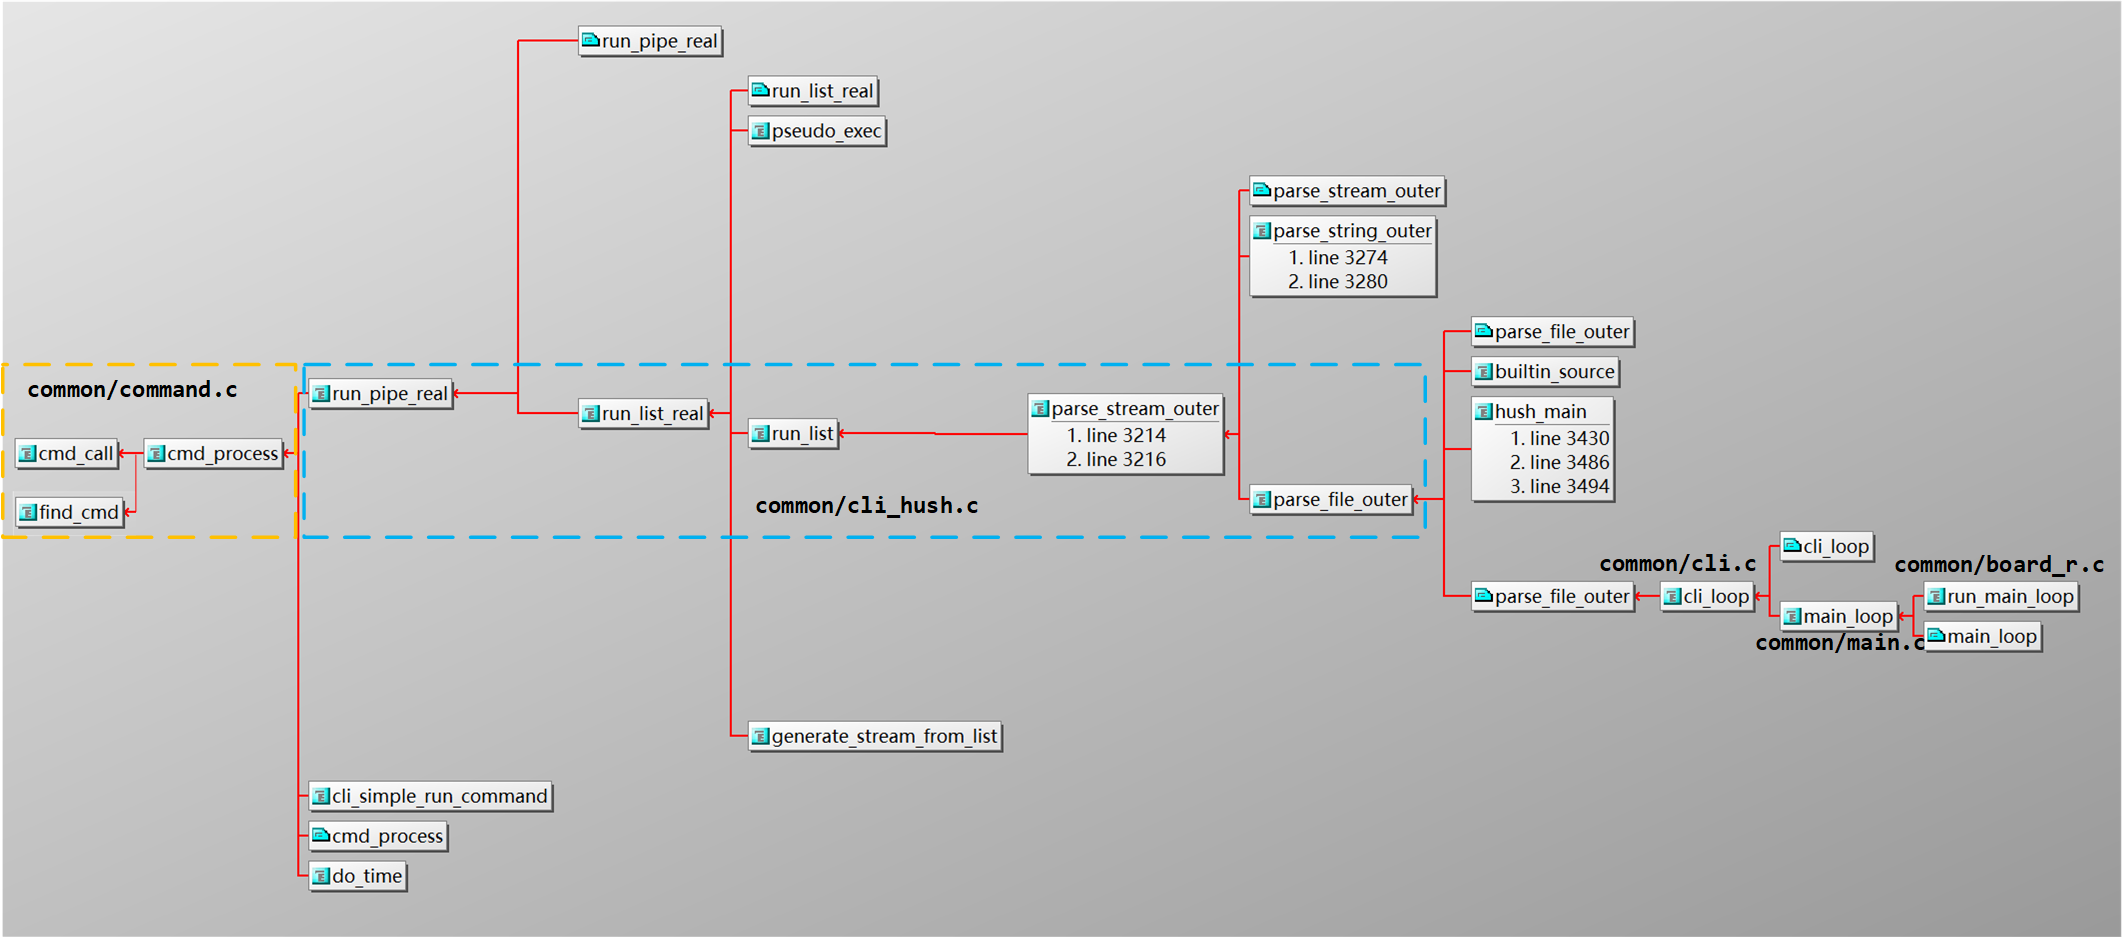
image-20241116190843990

函数调用关系如上图所示。

参考资料:

u-boot的linker list源码分析_uboot env callback-CSDN博客

链接脚本(Linker Scripts)语法和规则解析(自官方手册) - BSP-路人甲 - 博客园 (cnblogs.com)